
Experlogix leverages Salesforce's custom buttons to trigger CPQ features such as launching the Configurator or recalculating an existing configuration. These custom CPQ buttons can be added to the Lightning pages and Classic pages alike. This article provides detailed steps for creating and adding buttons to both layout types.
Packages
The assets and logic for buttons are available in the latest Salesforce packages. See Cloud Connect Installers for the latest Salesforce packages.
Adding a Button to Salesforce for Pop-up CPQ
Adding a button to open CPQ in a pop-up window requires creating a quick action button and adding buttons to a Lightning page Layout.
Creating a Quick Action Button
-
Log in to Salesforce.
-
Launch the Experlogix app.
-
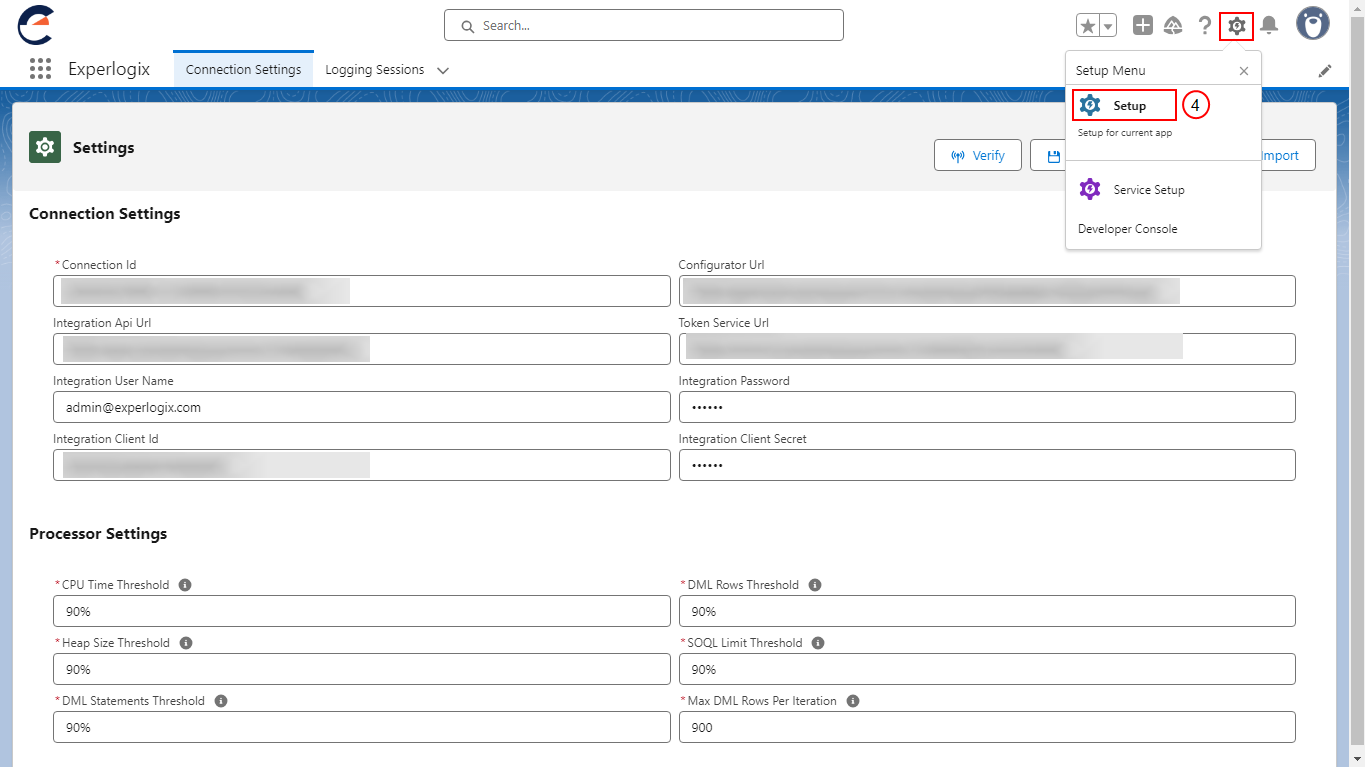
On the Experlogix App page, select the Settings icon.
-
Select Setup.
-
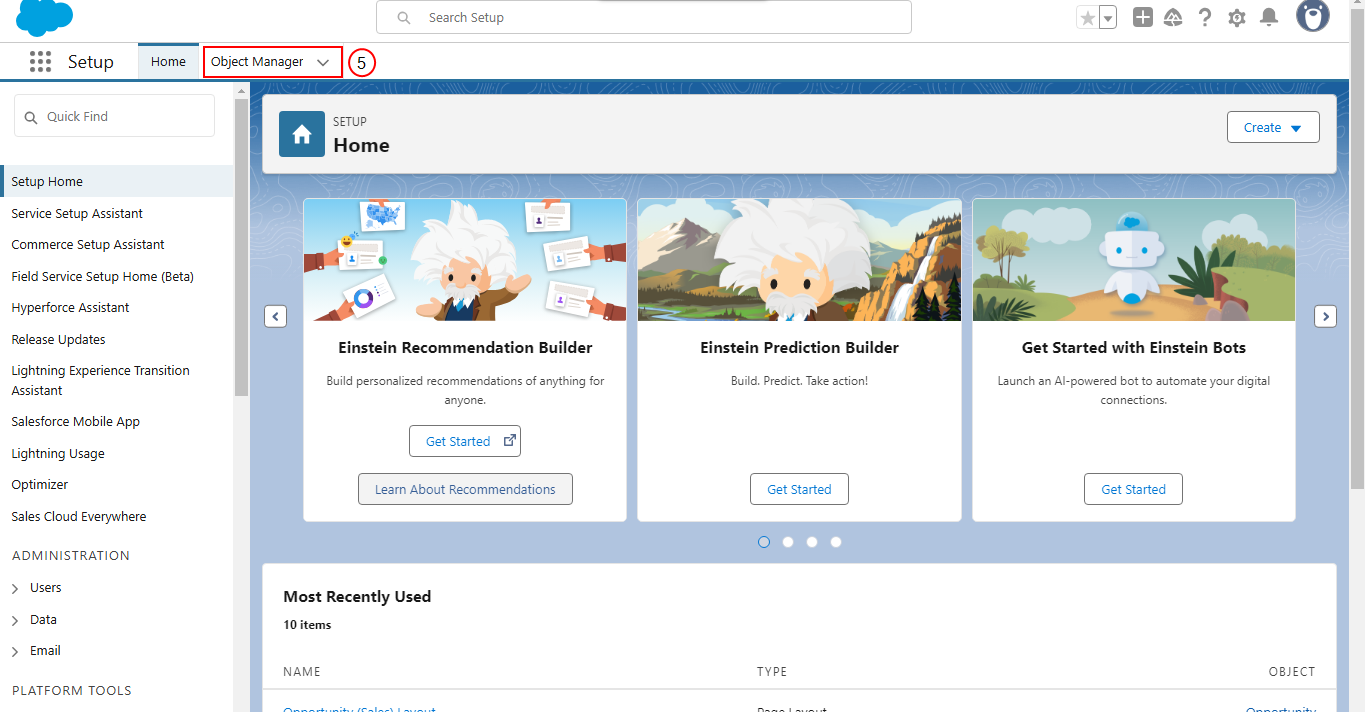
Select Object Manager.
-
Select the object to which you want to add the quick action.
-
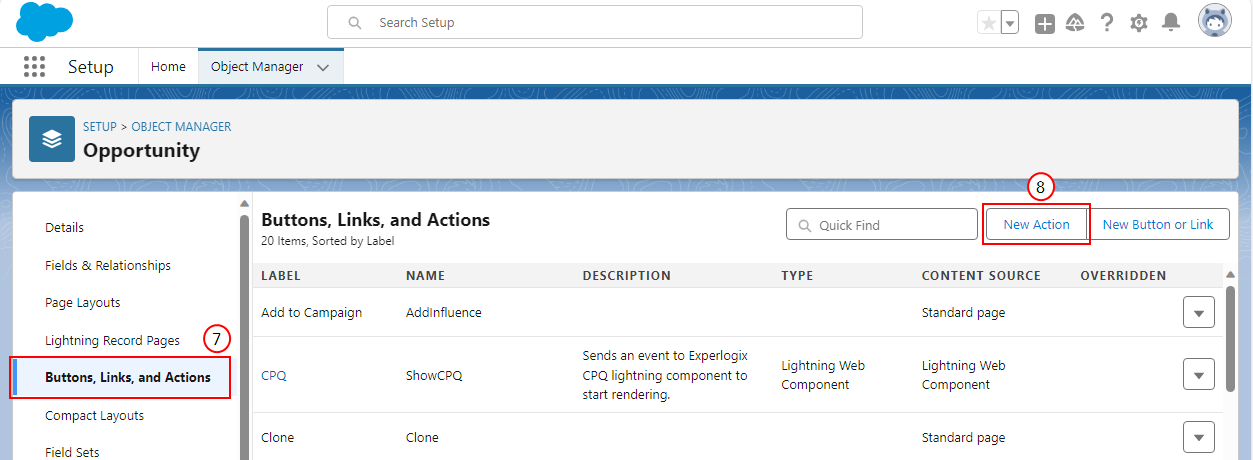
In the left pane, select Buttons, Links, and Actions.
-
Select New Action.
-
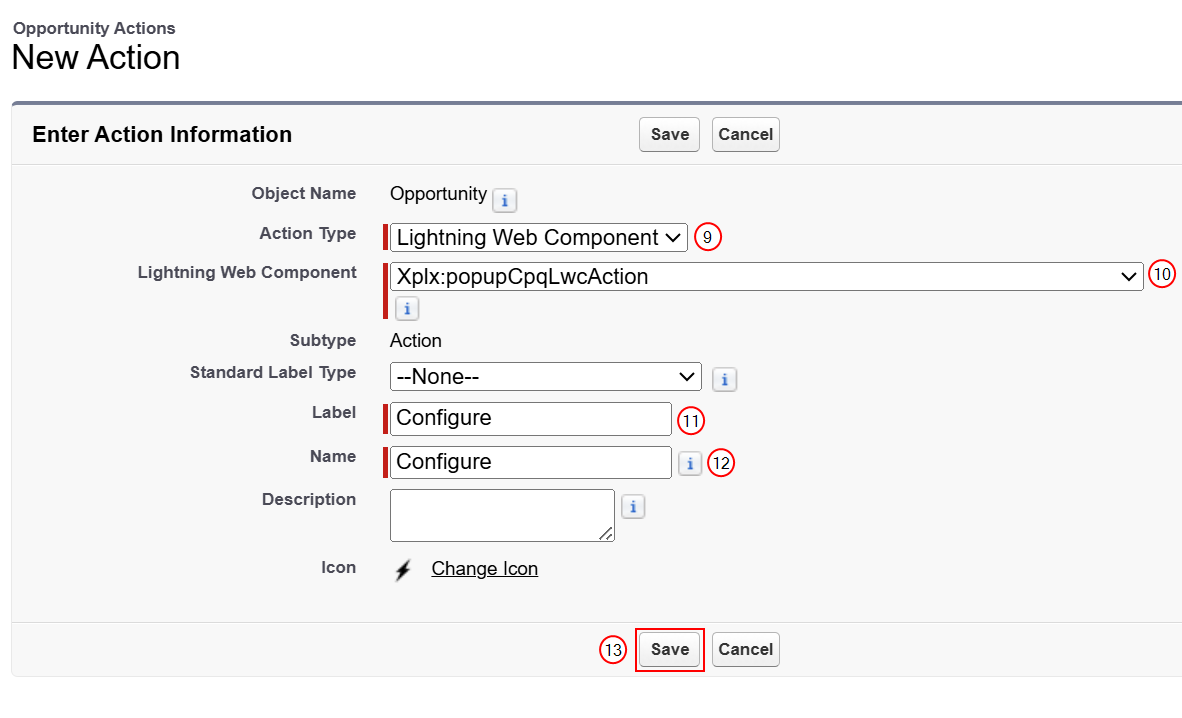
In the Action Type field, select Lightning Web Component.
If you are creating a Quick Action button for Salesforce Community pages, select Lightning Component.
-
In the Lightning Web Component field, enter the desired action.
|
Action |
Value |
Description |
|---|---|---|
|
Configure |
Using the command above, the Configurator will open in a new tab. If you would prefer it open in a new browser window, you may use |
Launches the Configurator so the current user can create a configuration on the current entity. |
|
Recalculate |
|
When the user selects Recalculate, the selected configuration(s) are loaded, any automatic Configurator logic is applied, and the updated configuration is saved and closed. |
If you are creating a Quick Action button for the Salesforce Community pages object, select Xplx:popupCpqLwcAction.
-
In the Label field, enter an appropriate label name, i.e. Configure or Recalculate.
-
In the Name field, enter an appropriate name, i.e. Configure or Recalculate.
-
Select the Save button.
The CPQ quick action button is created.
Add a Button to a Lightning Page Layout
Dynamic actions allow you to control the visibility and behavior of actions based on specific criteria, enhancing the user experience by ensuring relevant actions are available at the right time. For example, you can configure dynamic actions to display buttons only when certain conditions are met. If dynamic actions are enabled, changes made on Page Layouts will not be reflected. See Adding Buttons to Layouts Using Dynamic Actions for more information.
-
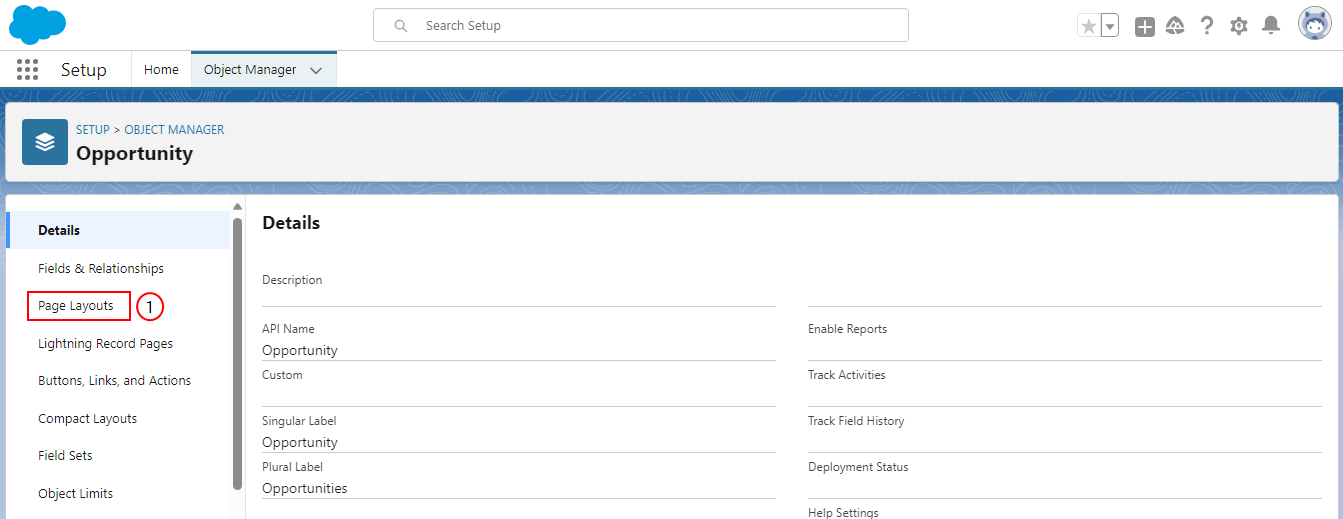
On the Object Manager page, in the left pane, select Page Layouts.
-
Select a layout to which you want to add buttons.
-
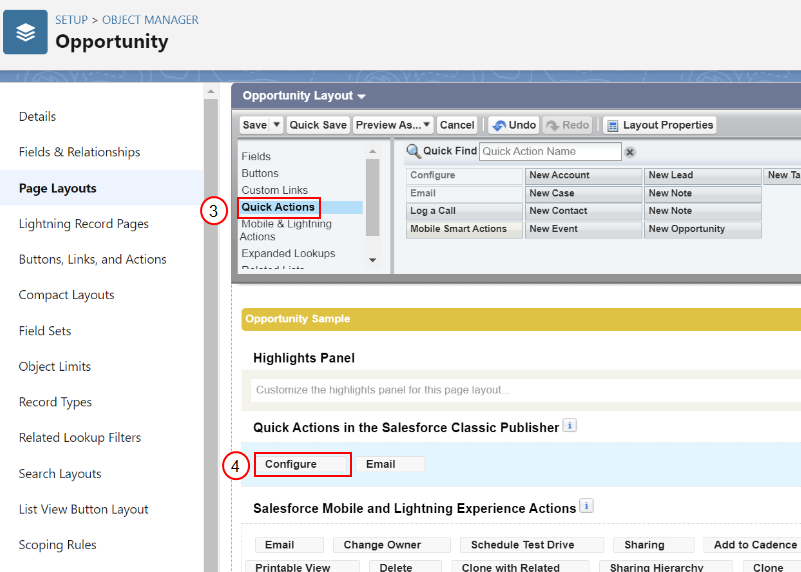
Select Quick Actions.
-
Select the Configure button.
-
Drag the label into the Salesforce Mobile and Lightning Experience Actions section.
-
Select the Save button.
The CPQ button is added to the layout.
Adding buttons to Salesforce Classic
Adding buttons to a Salesforce Classic layout requires the Classic Buttons package. The link can be found here: Cloud ConnectSalesforce Release Notes 25.7.
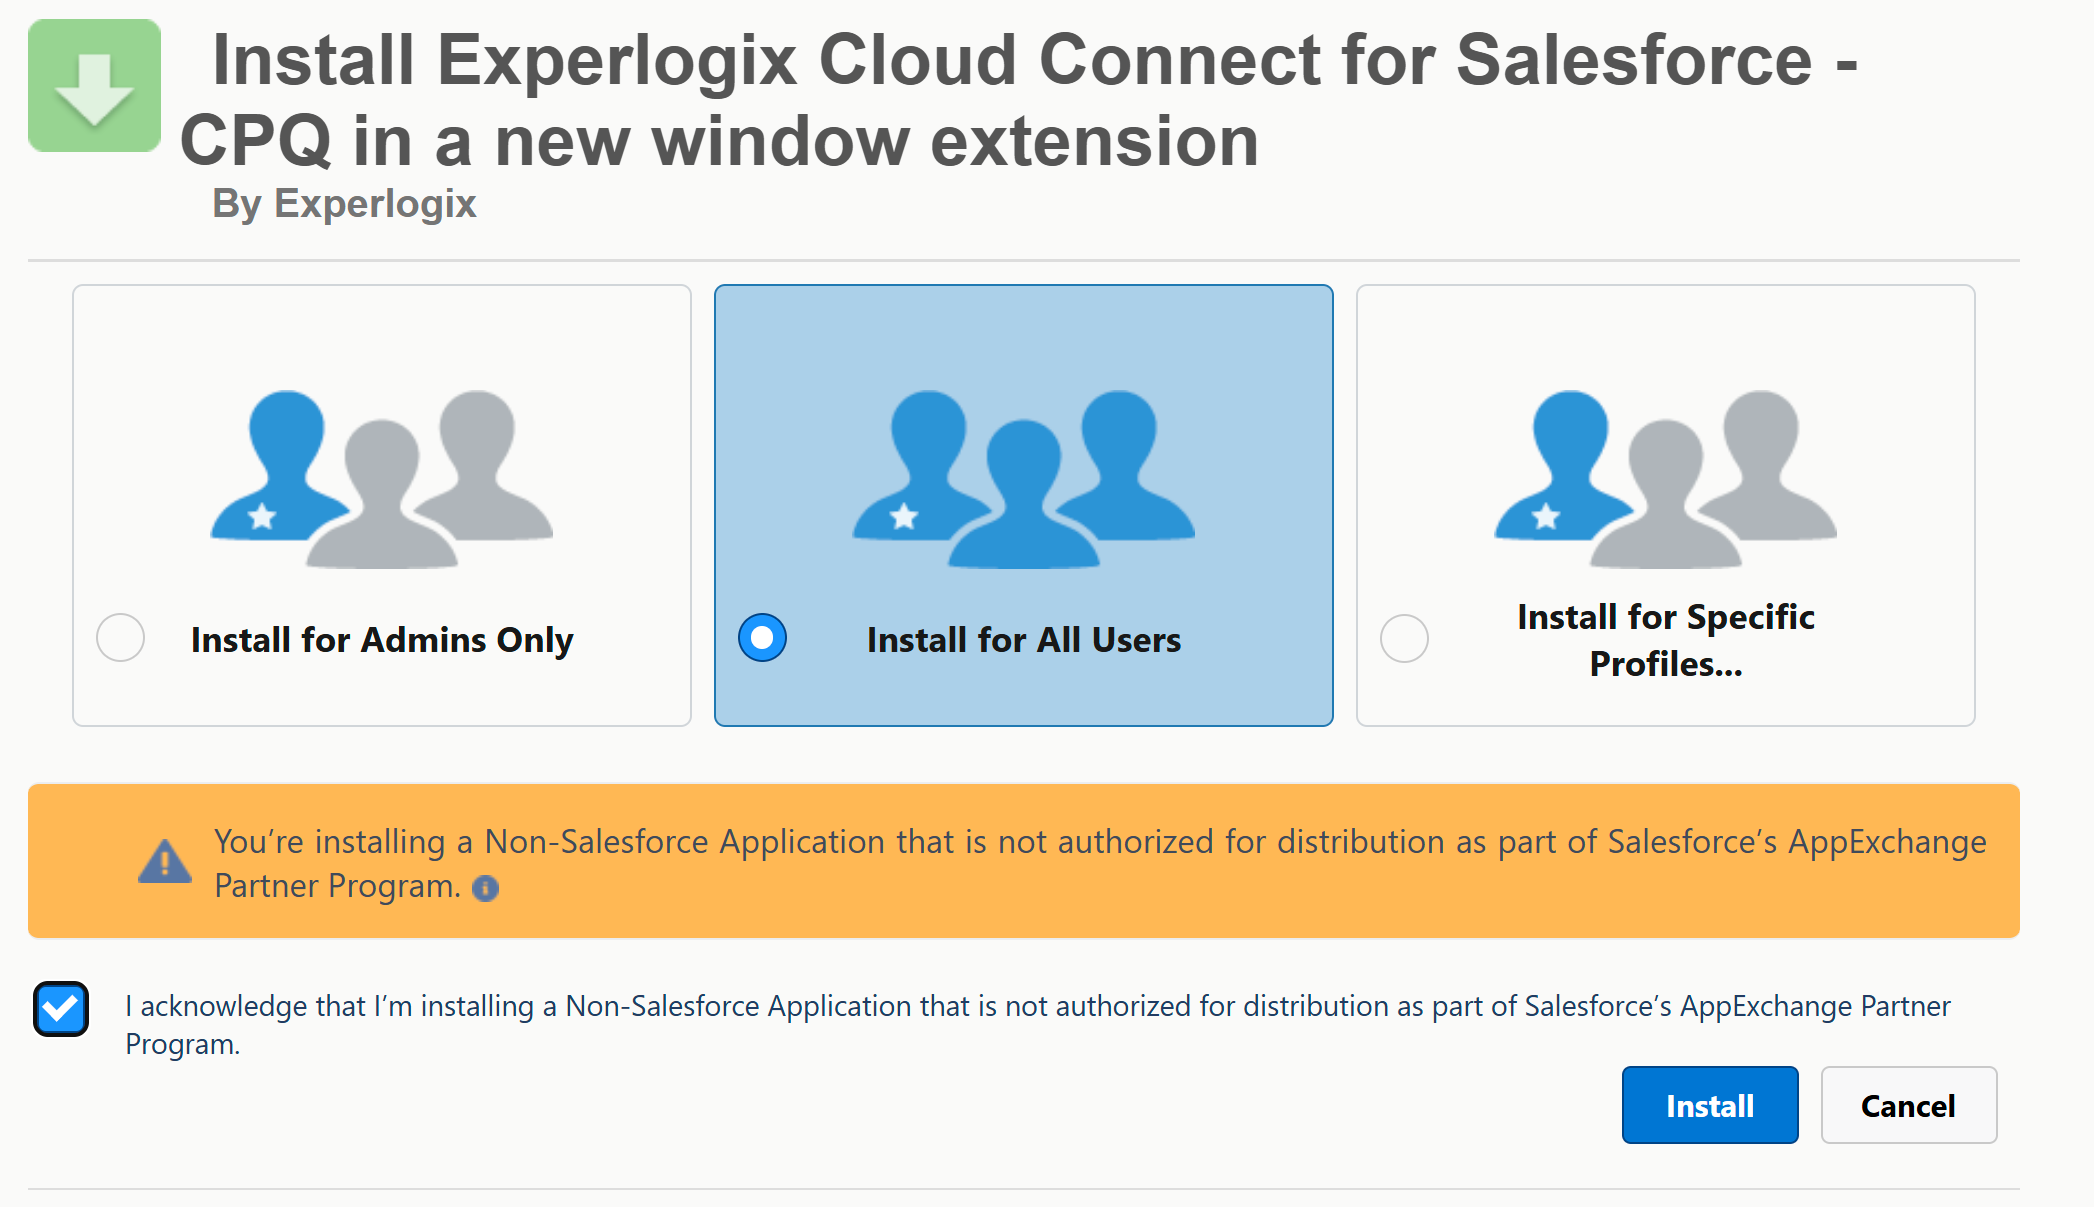
To ensure access to the Recalculate functionality, select Install for All Users during installation. If not, it is required to assign an "Experlogix Buttons Classic" Permission Set to users who will use the button.
Create a Custom Button for Classic Layout
-
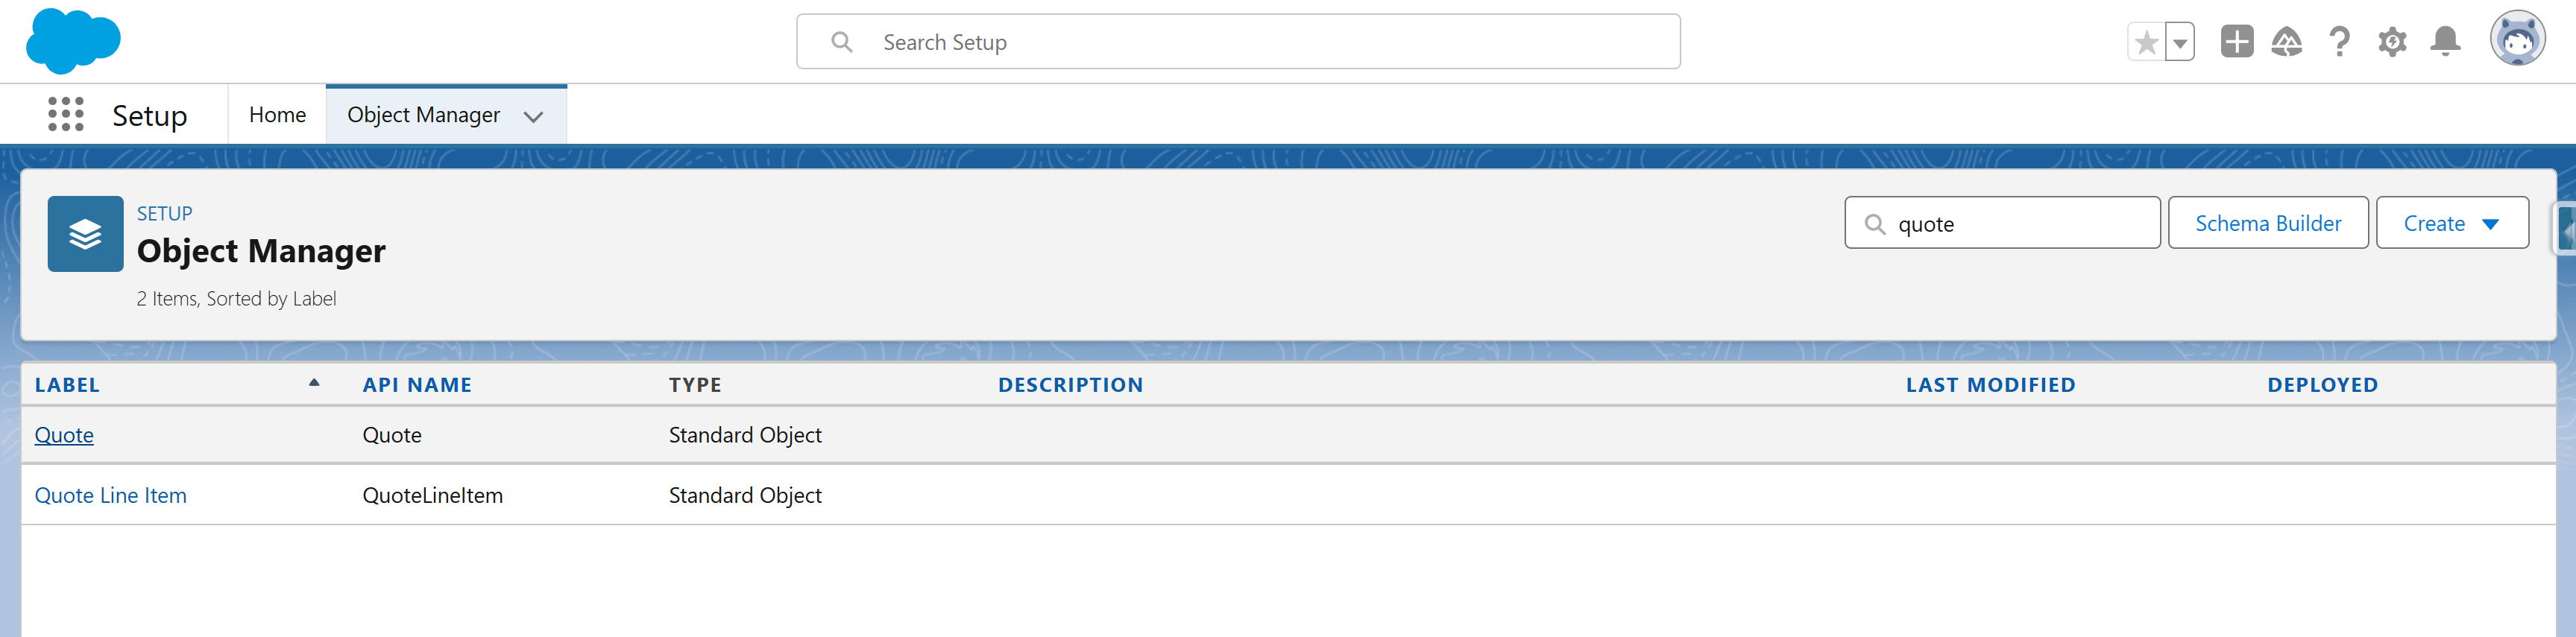
Navigate to Setup > Object Manager.
-
In the Quick Find field, enter Quote.
-
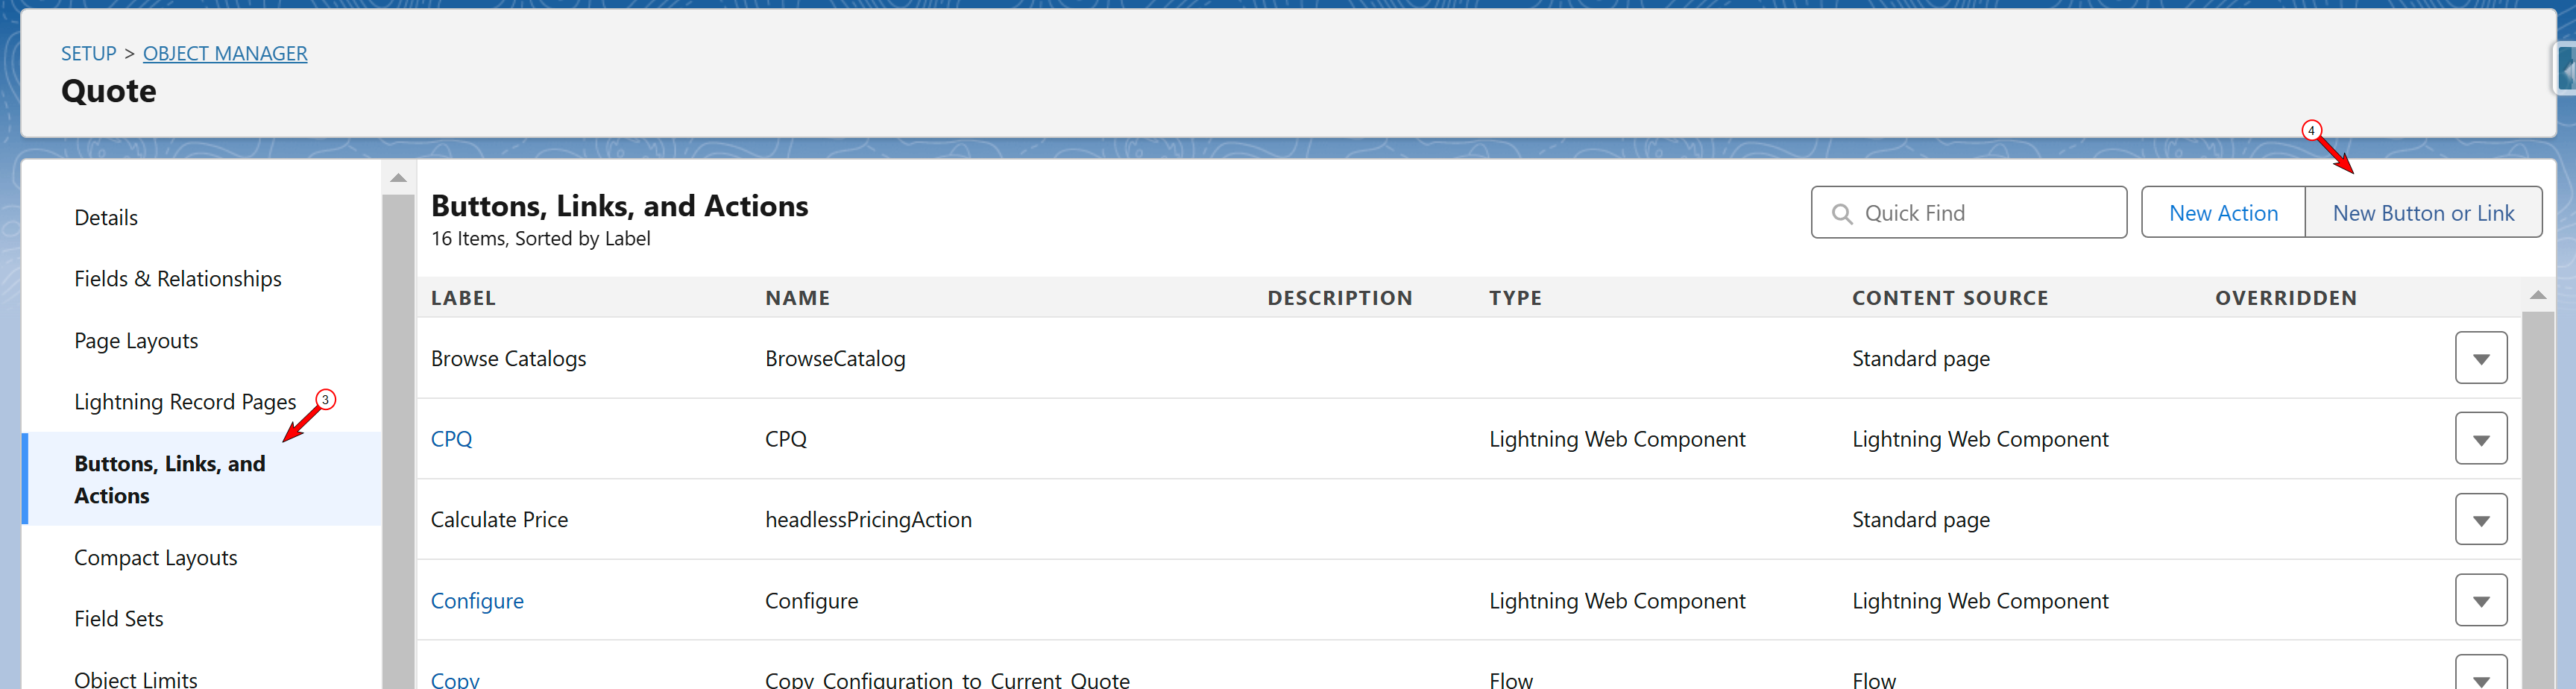
Navigate to Button, Links, and Actions.
-
Select New Button or Link.
-
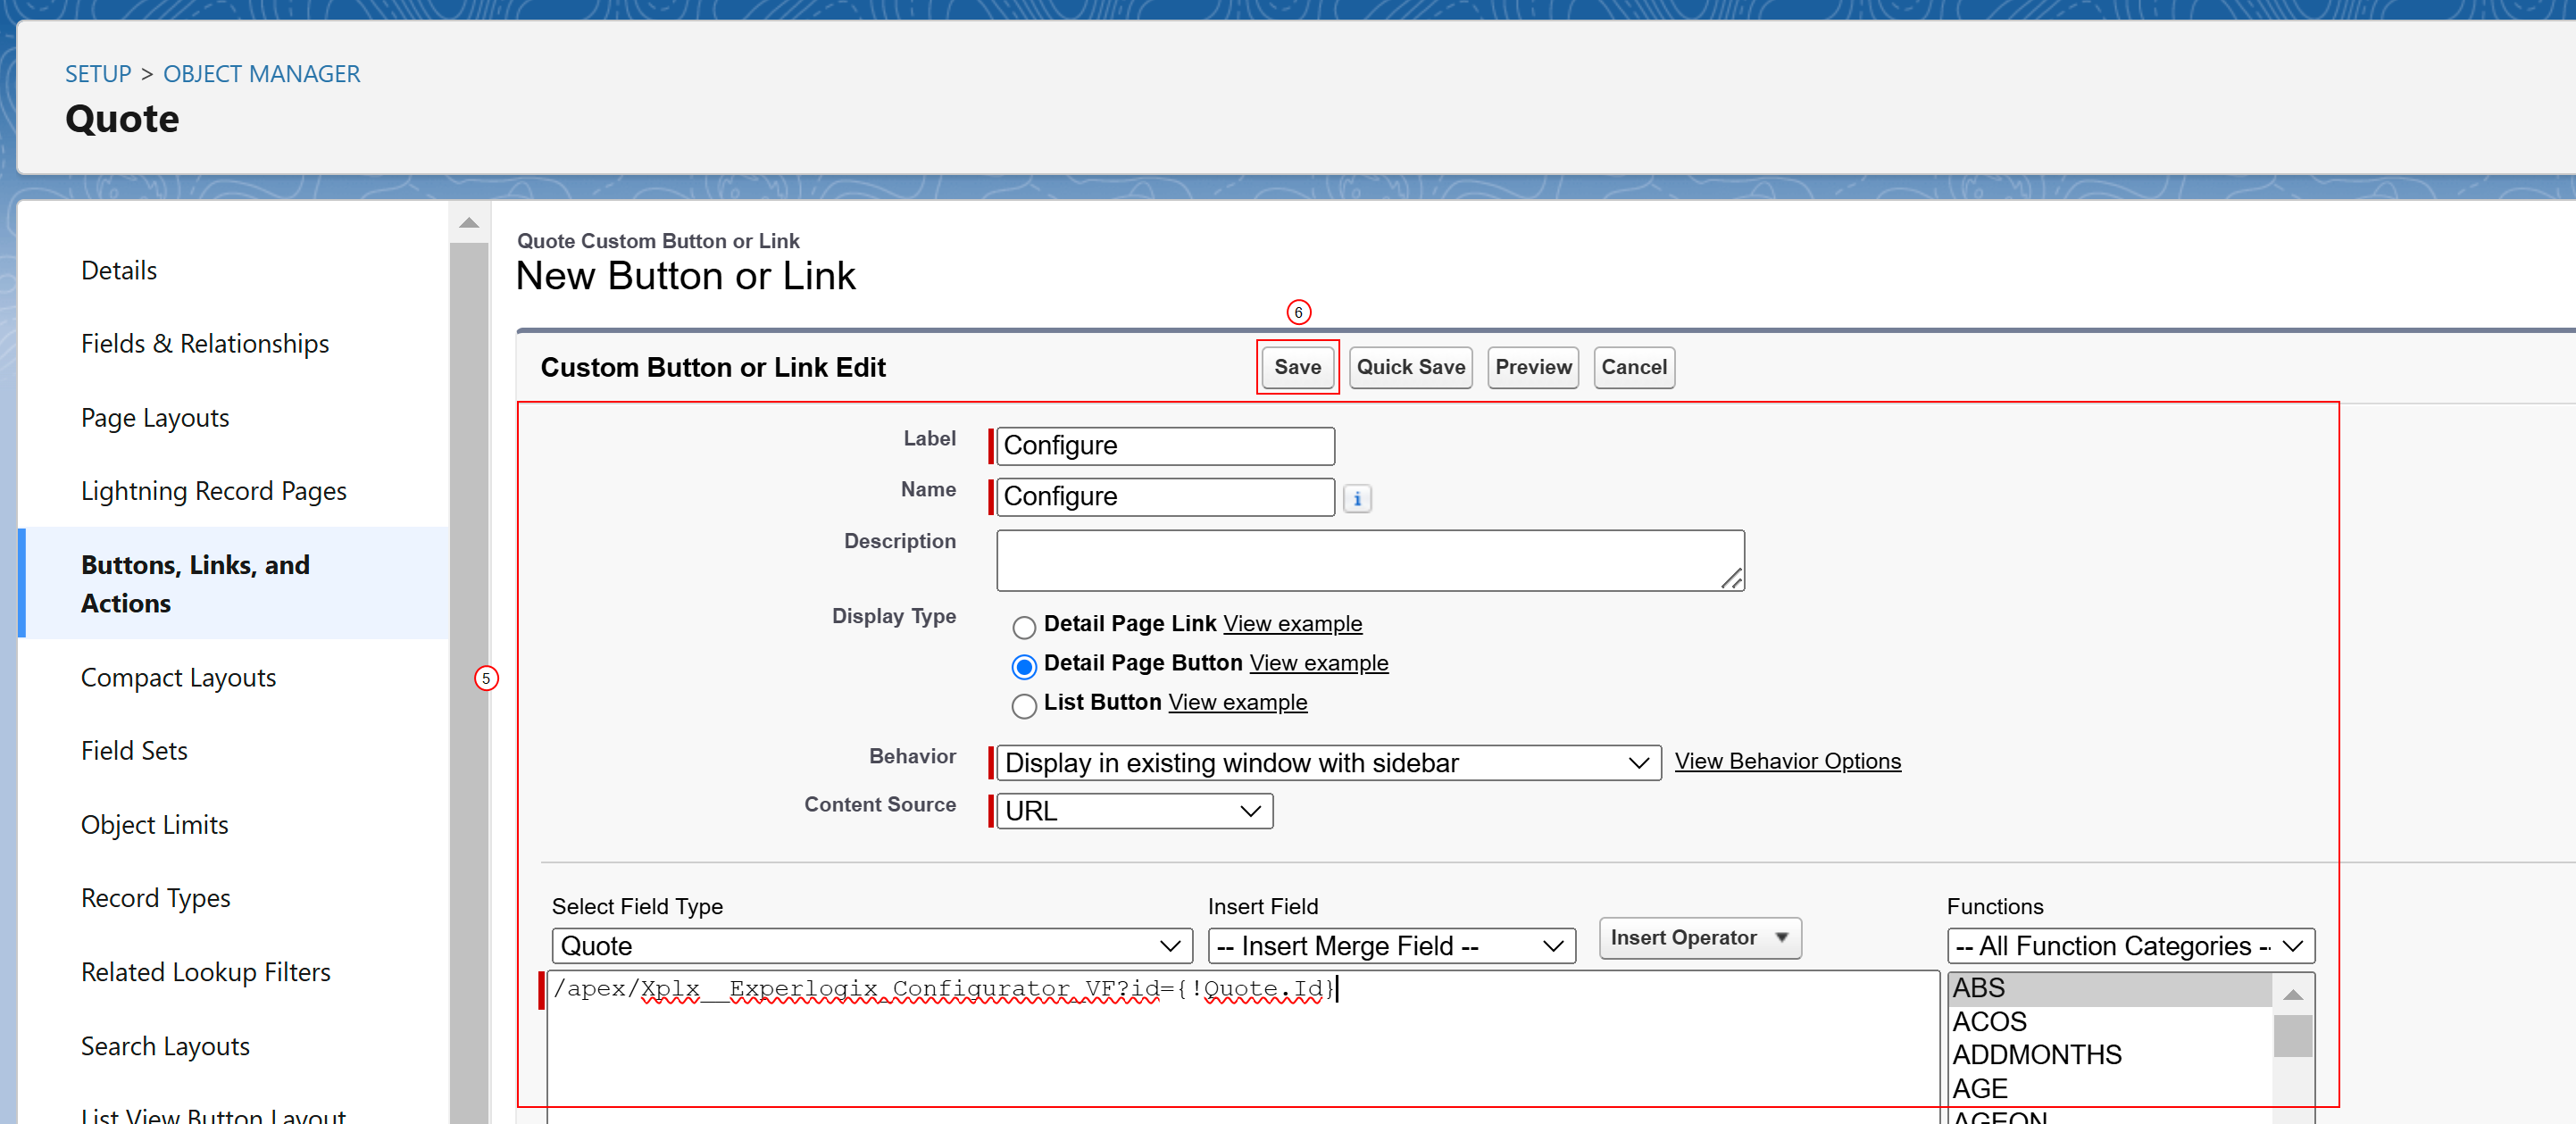
Parametrize the button as follows:
-
Enter a name in the Label field.
-
Enter a name in the Name field.
-
From the Display Type choices, select Detail Page Button.
-
From the Behavior drop-down menu, select Display in existing window with sidebar.
-
From the Content Source drop-down menu, select URL.
-
Add one of the following two buttons as a URL:
-
|
Action |
Value |
Description |
|---|---|---|
|
Configure |
Using the command above, the Configurator will open in a new tab. If you would prefer it open in a new browser window, you may use |
Launches the Configurator so the current user can create a configuration on the current entity. The "Quote.Id" portion assumes you're configuring a quote. This value can be changed to target other configurable entities as needed. |
|
Recalculate |
|
When the user selects Recalculate, the selected configuration(s) are loaded, any automatic Configurator logic is applied, and the updated configuration is saved and closed. The "Quote.Id" portion assumes you're recalculating a quote. This value can be changed to target other configurable entities as needed. |
-
Select Save.
Set up a Recalculate Button
For each object type for which CPQ is going to be used, a quick action on the required object has to be created and added to the page layout.
Create a Quick Action
-
In Salesforce, navigate to the Object Manager.
-
Select the required object from which you want to execute the recalculate action. In the image below, the Opportunity object is selected.
-
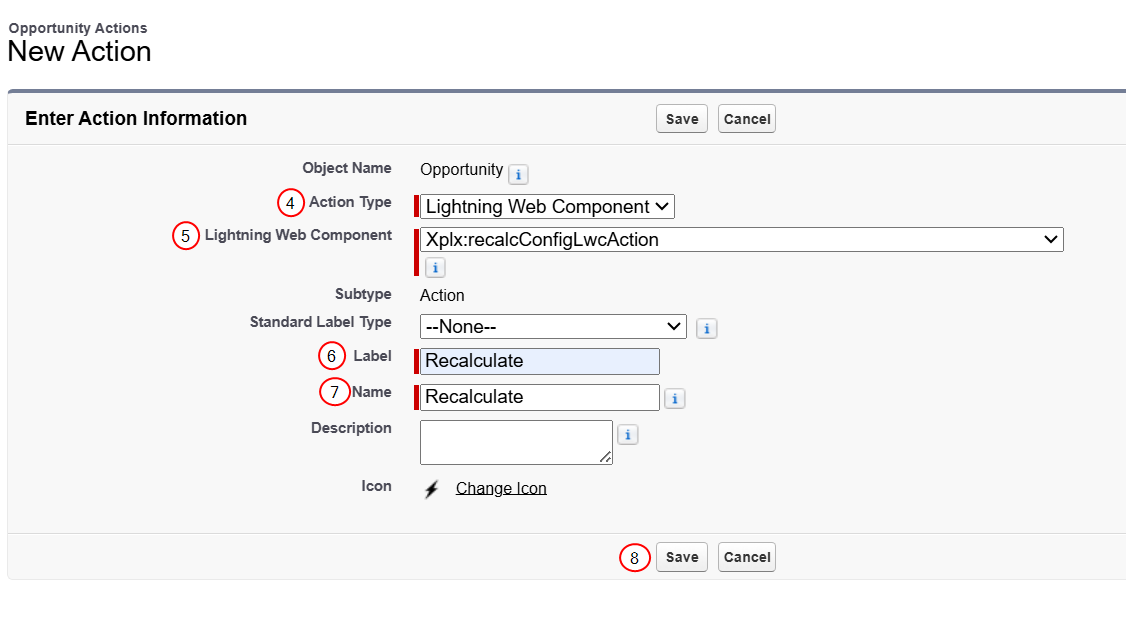
In the Buttons, Links, and Actions section, select the New Action button.
-
In the Action Type field, choose Lightning Web Component.
-
In the Lightning Web Component field, choose Xplx:recalcConfigLwcAction.
When using this recalculate button, the Configurator will open in a new browser tab.
-
In the Label field, enter Recalculate.
-
In the Name field, enter Recalculate.
-
Select Save.
Adding Buttons to the Layout
-
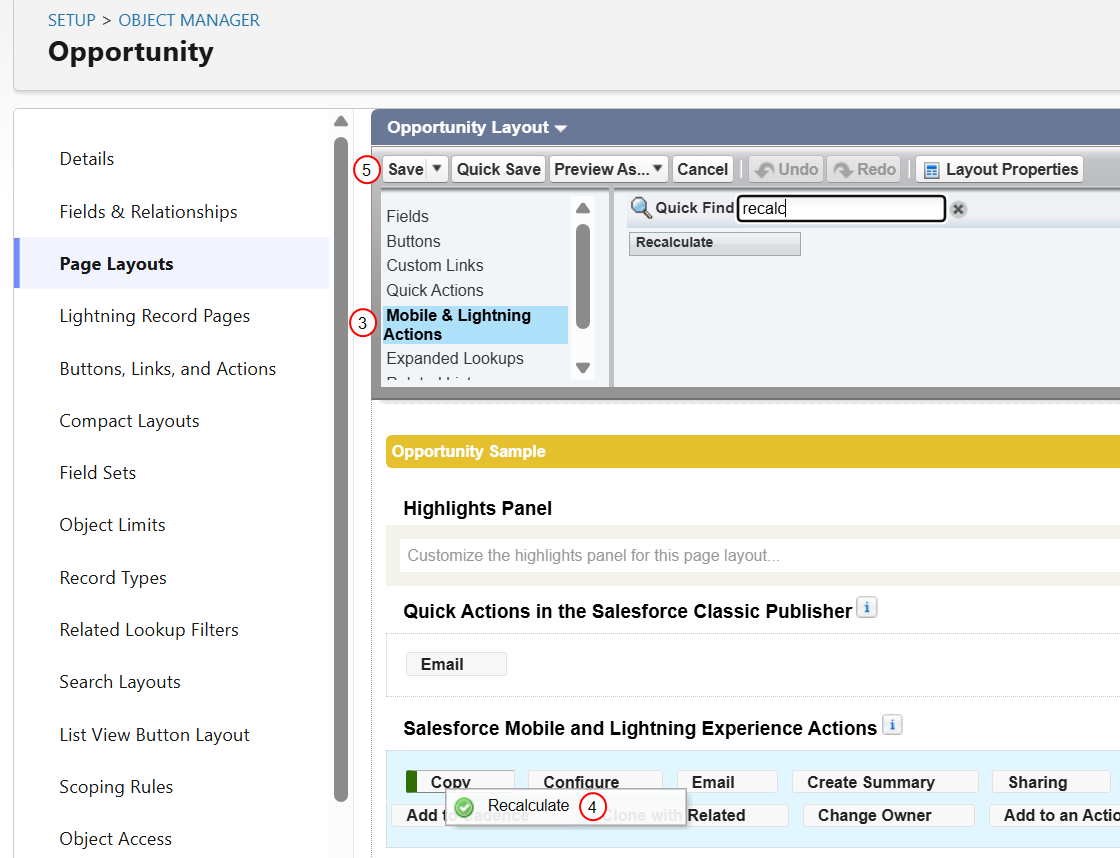
While in the required object's settings, navigate to Page Layouts.
-
Select a layout where buttons should be added.
-
Select Mobile and Lightning Actions.
-
Drag the Recalculate action into the Salesforce Mobile and Lightning Experience Actions section.
You might need to select Overwrite first to unlock this section.
-
Select Save.