
The Copy Configuration Flow Setup streamlines configuration copying in Salesforce. This guide is divided into two main sections: Quick Setup and Create Package. The Quick Setup involves installing a package with buttons and flows, allowing users to quickly add these buttons to their page layouts and perform configuration copies. The Create Package section offers an advanced setup, enabling customization for any object within the system. Following these steps, users can manage and tailor their configuration copying processes to meet specific business needs.
Installation of the Unlocked Package with Flow Templates, Quick Actions, and Buttons
Install the unlocked package to equip your Salesforce environment with tools like flow templates, quick actions, and buttons. This package simplifies the setup by providing pre-configured elements you can integrate.
Unlocked Package Installation
Users can install unlocked packages from the CLI or from a browser, similar to how they install managed packages. Anyone with the installation URL and a valid Salesforce org login can install managed packages.
-
Login to Salesforce.
-
Install the package. See Cloud Connect Installers for the latest versions.
-
Install for all users.
Once the package is installed, you can add buttons and configure flows as needed. Completing the Unlocked Package Installation equips your Salesforce environment with essential tools like flow templates, quick actions, and buttons. With the package installed, you are ready to configure these modify these elements to meet your specific business needs in the next section.
Adding buttons to the Layout
Users can add a button to a page layout in Salesforce. Buttons offer direct access to critical actions, making workflows more efficient.
-
Login to Salesforce.
-
Launch the Experlogix app.
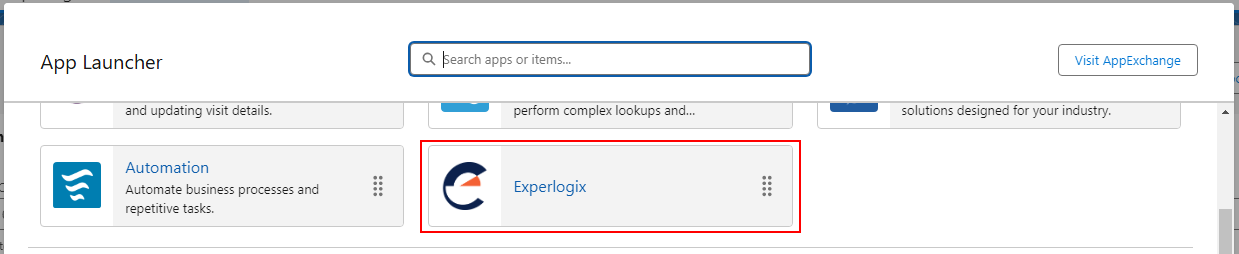
-
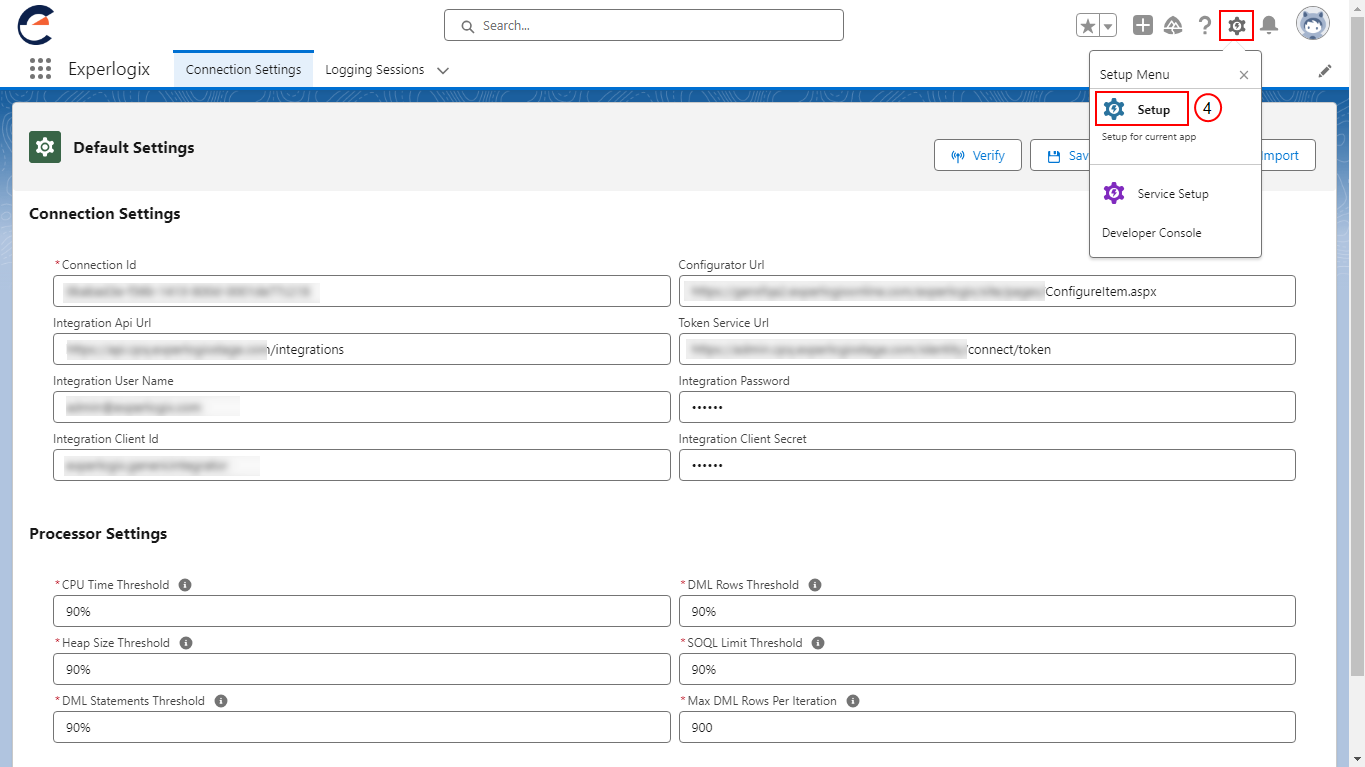
On the Experlogix App page, select the Settings icon.
-
Select Setup.
-
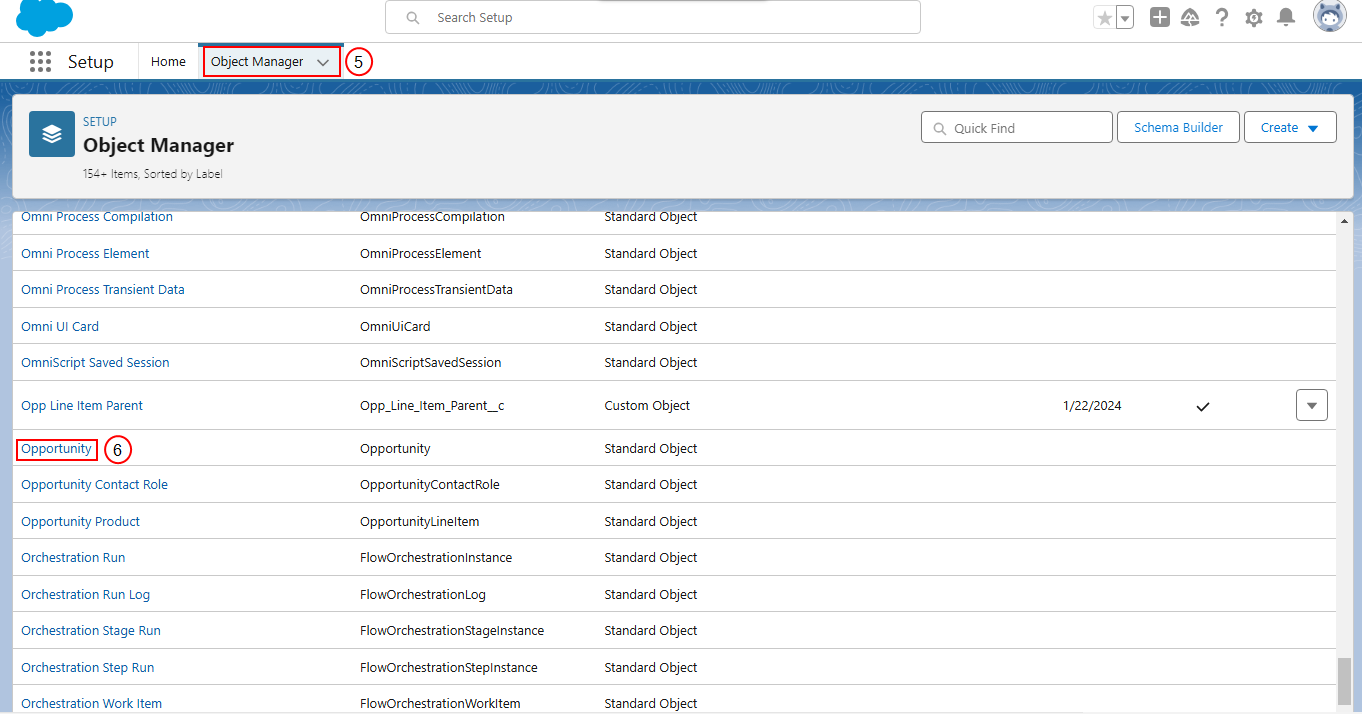
Select Object Manager.
-
Select Opportunity or Quote.
When configuring the Copy Configuration Flow in Experlogix for Salesforce, select Opportunity or Quote based on your workflow's specific context and requirements.
-
Opportunity: Use this Option to copy configurations related to sales opportunities. This helps you replicate configurations from one opportunity to another, ensuring consistency in your sales process.
-
Quote: Choose this Option to copy configurations specific to quotes. This allows you to duplicate quote details, including line items and pricing, to another quote or opportunity, maintaining accuracy and efficiency in your quoting process.
-
-
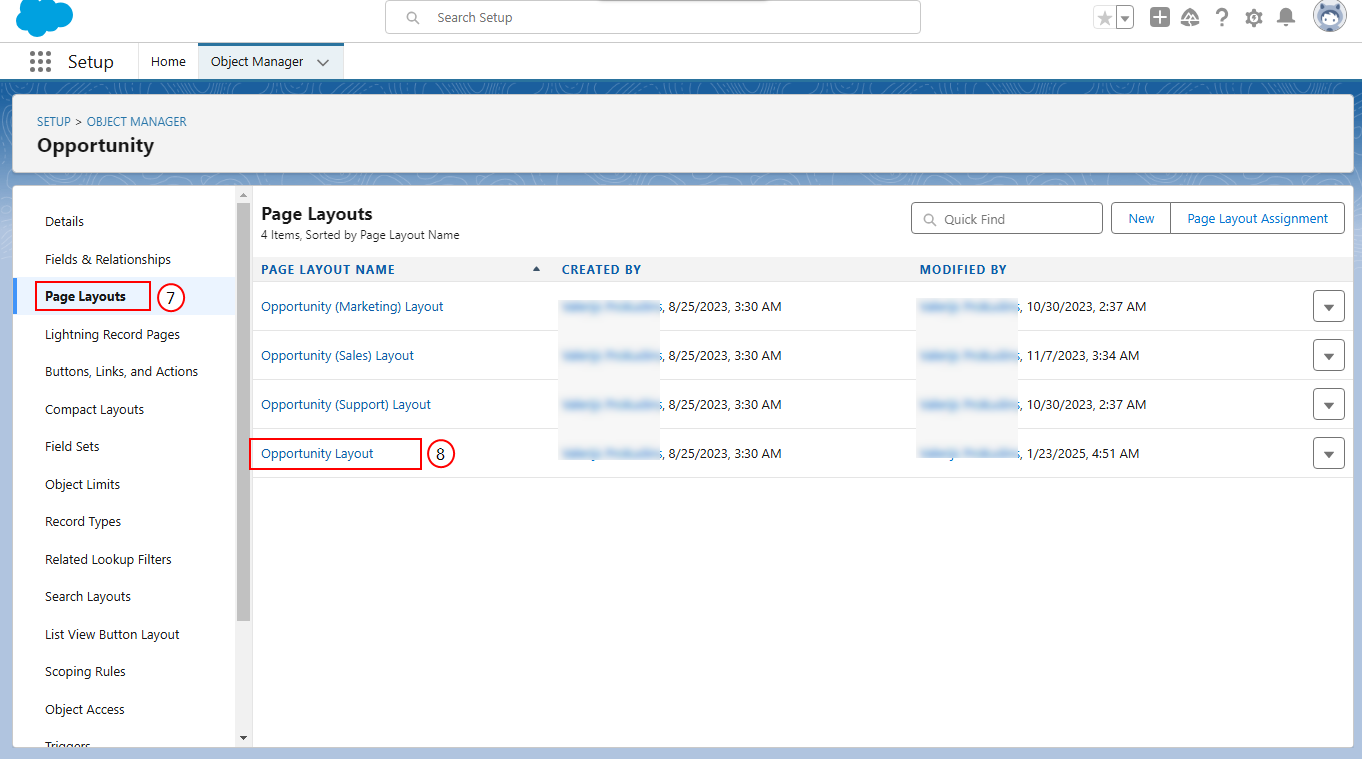
Select Page Layouts.
-
Select the required layout.
-
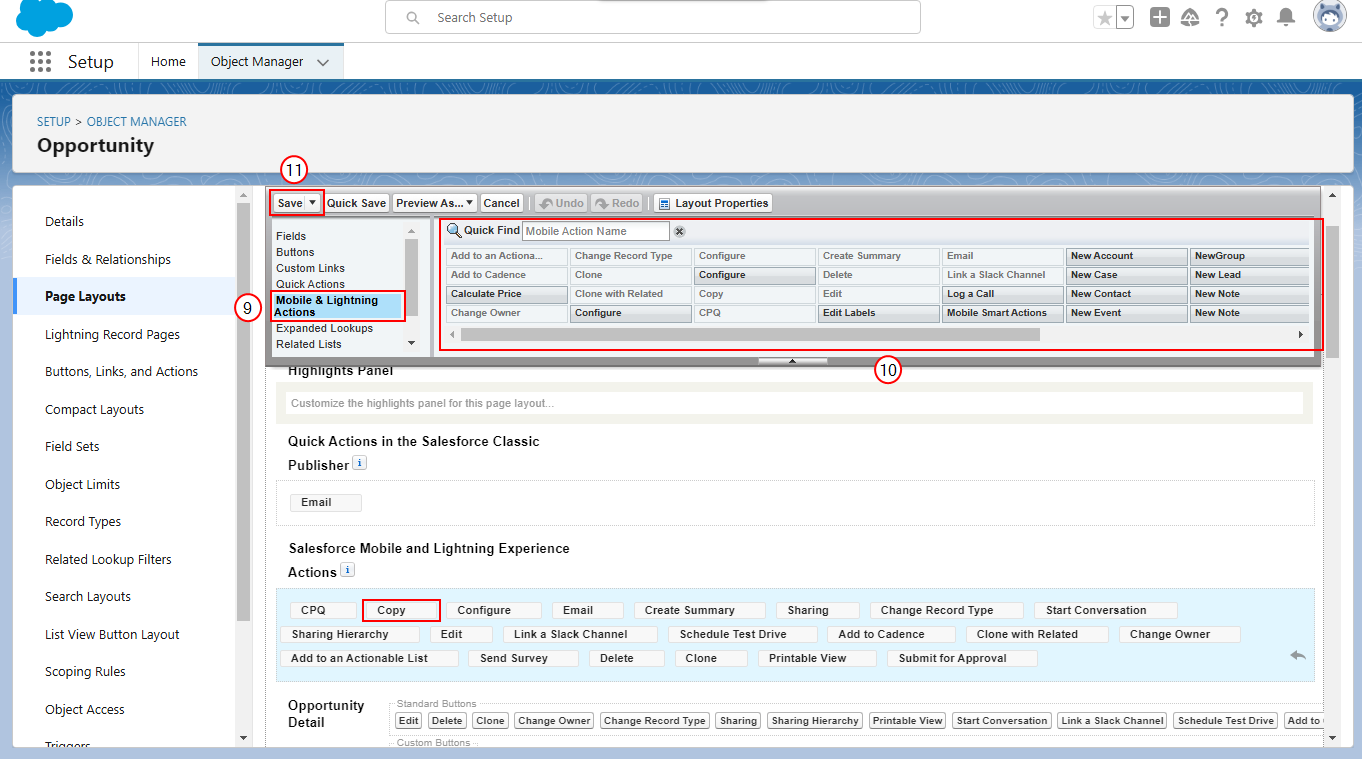
Select Mobile & Lightning Actions in the toolbar.
-
Drag the Copy Configuration to Current Opportunity button to the Salesforce Mobile and Lightning Experience Actions.
-
Select Save.
Adding buttons to the layout integrates actions into your Salesforce environment, streamlining user workflows and enhancing efficiency. With the buttons added, you can configure and utilize these tools to optimize your processes in the next section.
Creating a Custom Copy Configuration Flow on Any Object
Users customize their Copy Configuration Flow to tailor the process to their business needs. This customization ensures flexibility and precision, allowing users to manage configurations across any object in their Salesforce environment.
Creating the Flow and Variables
-
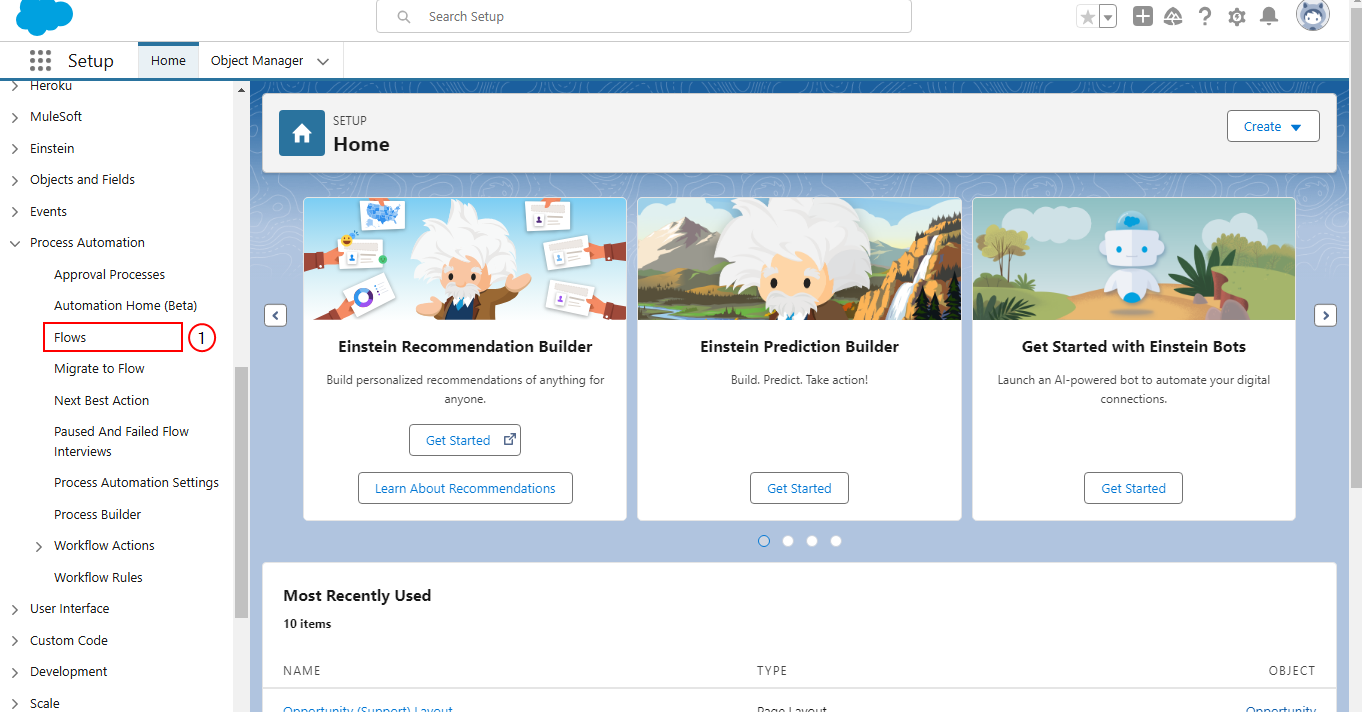
On the Home page, select Flows.
-
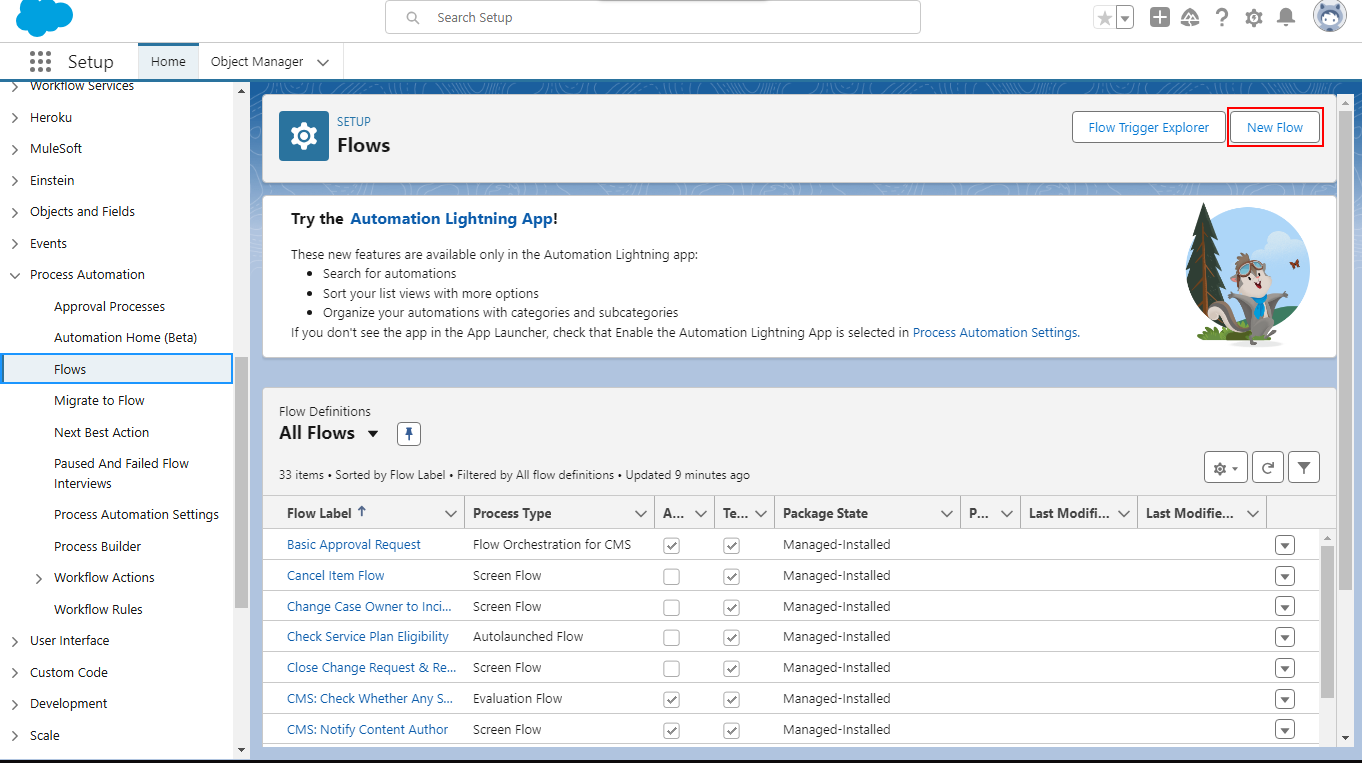
Select New Flow.
-
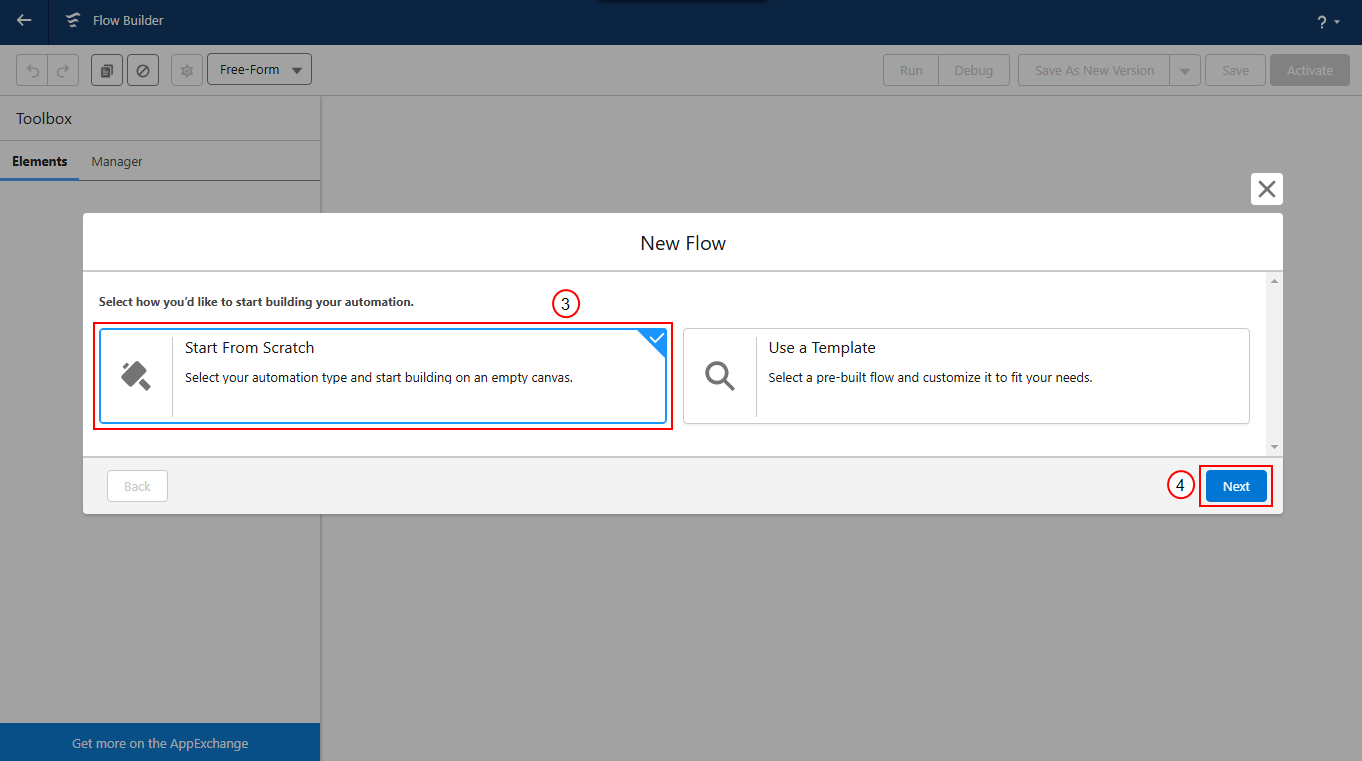
Select Start from Scratch.
-
Select Next.
-
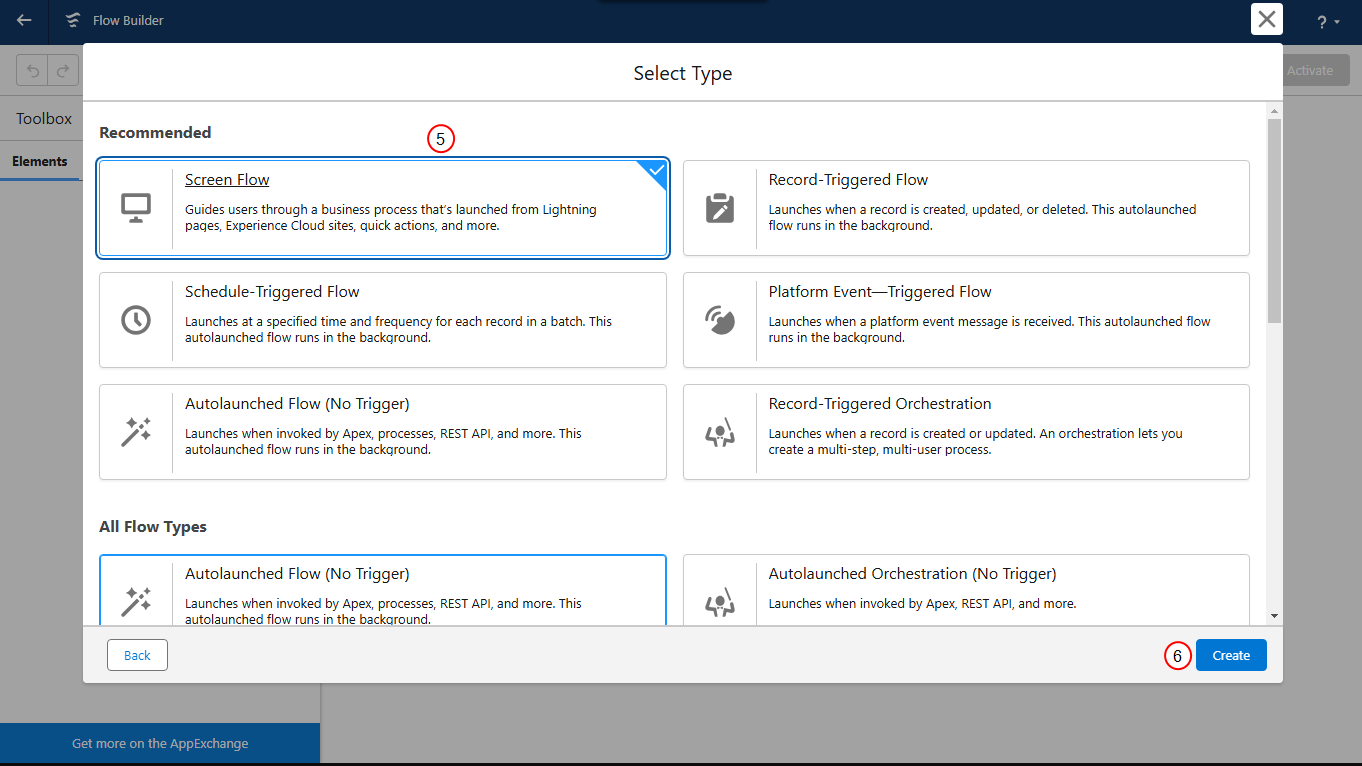
Select Screen Flow.
-
Select Create.
-
In the left pane, select New Resource.
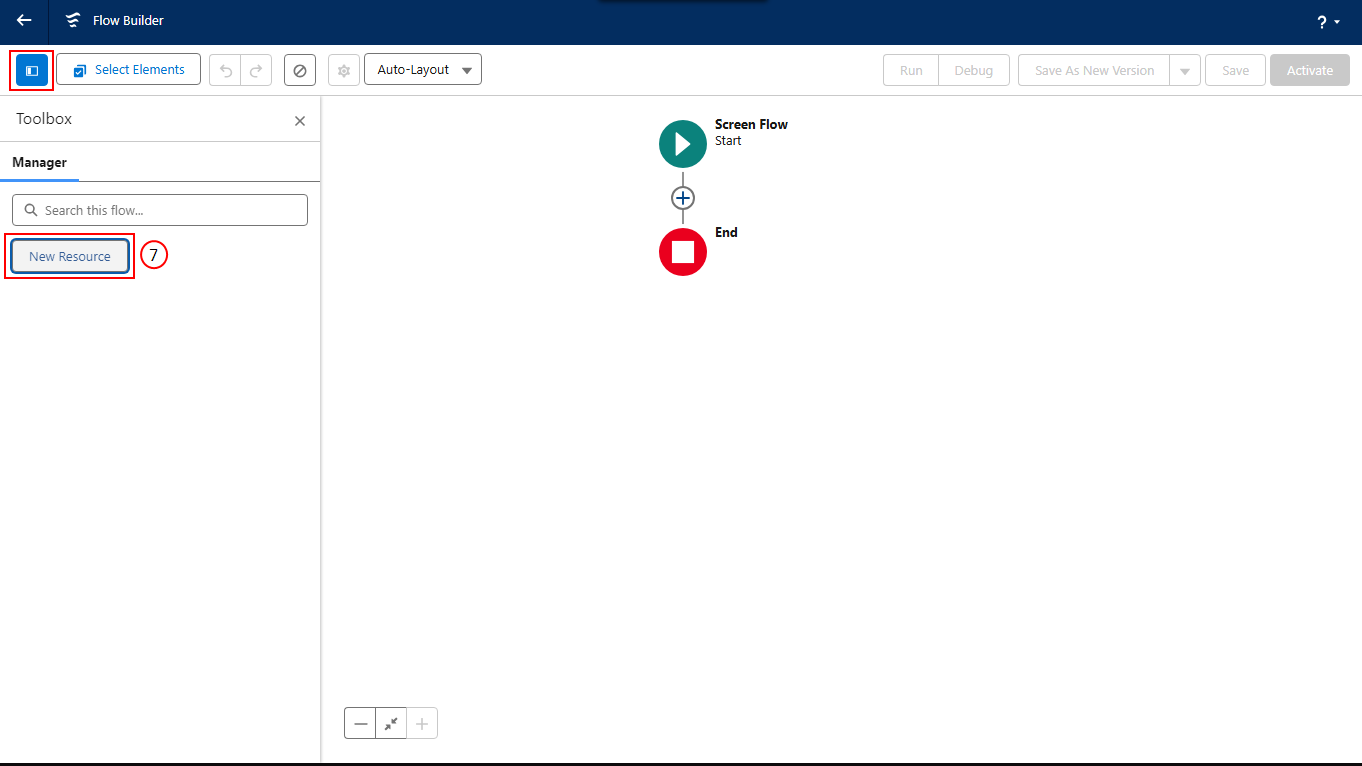
You can select the Toggle Toolbox icon to turn it ON or OFF.
-
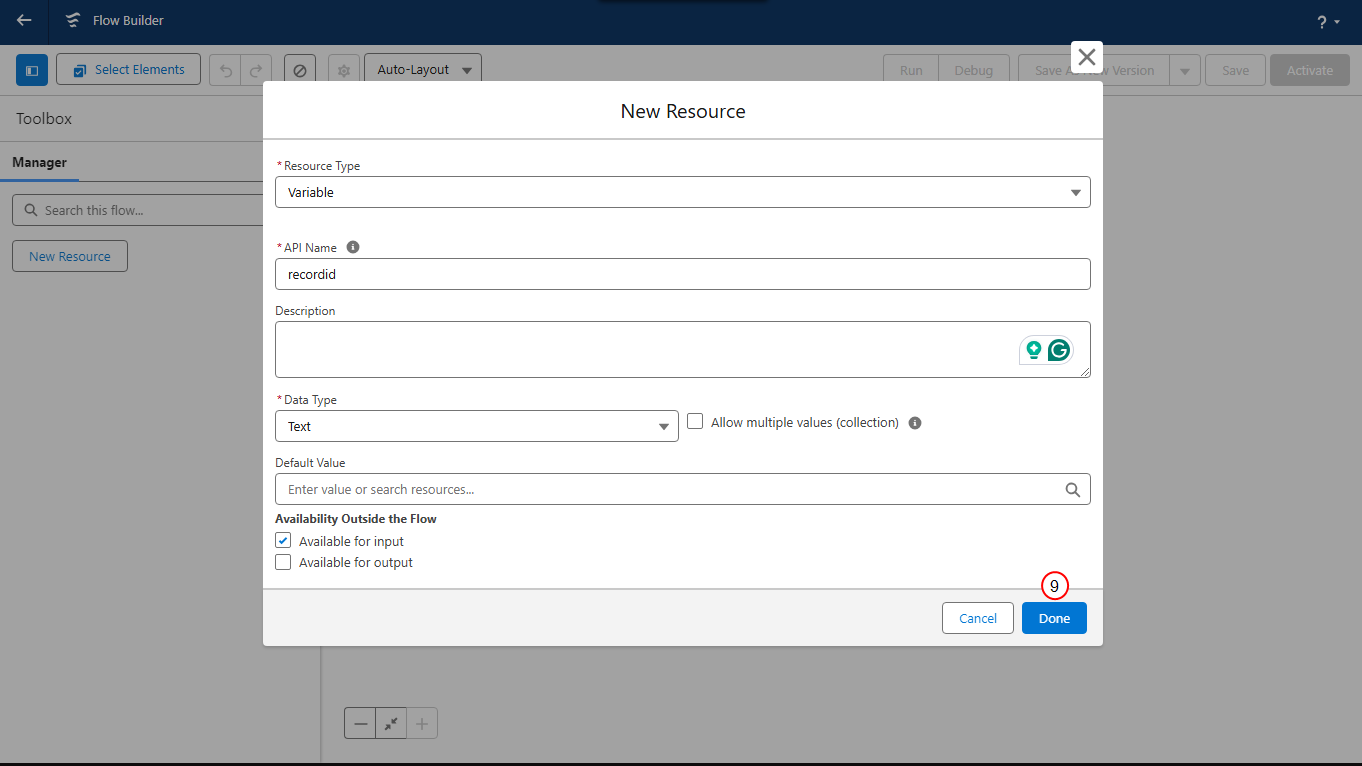
In the Resource Type drop-down menu, select Variable.
-
In the API name field, enter the name for this variable.
-
In the Resource Type drop-down menu, select Text.
-
Select the Available for input checkbox.
-
Select Done.
With the custom flow created, users can easily configure and copy settings between objects. With the custom flow in place, you can explore advanced configuration options and further optimize your system's capabilities in the next section.
Creation of the Source Opportunity Selection Screen
-
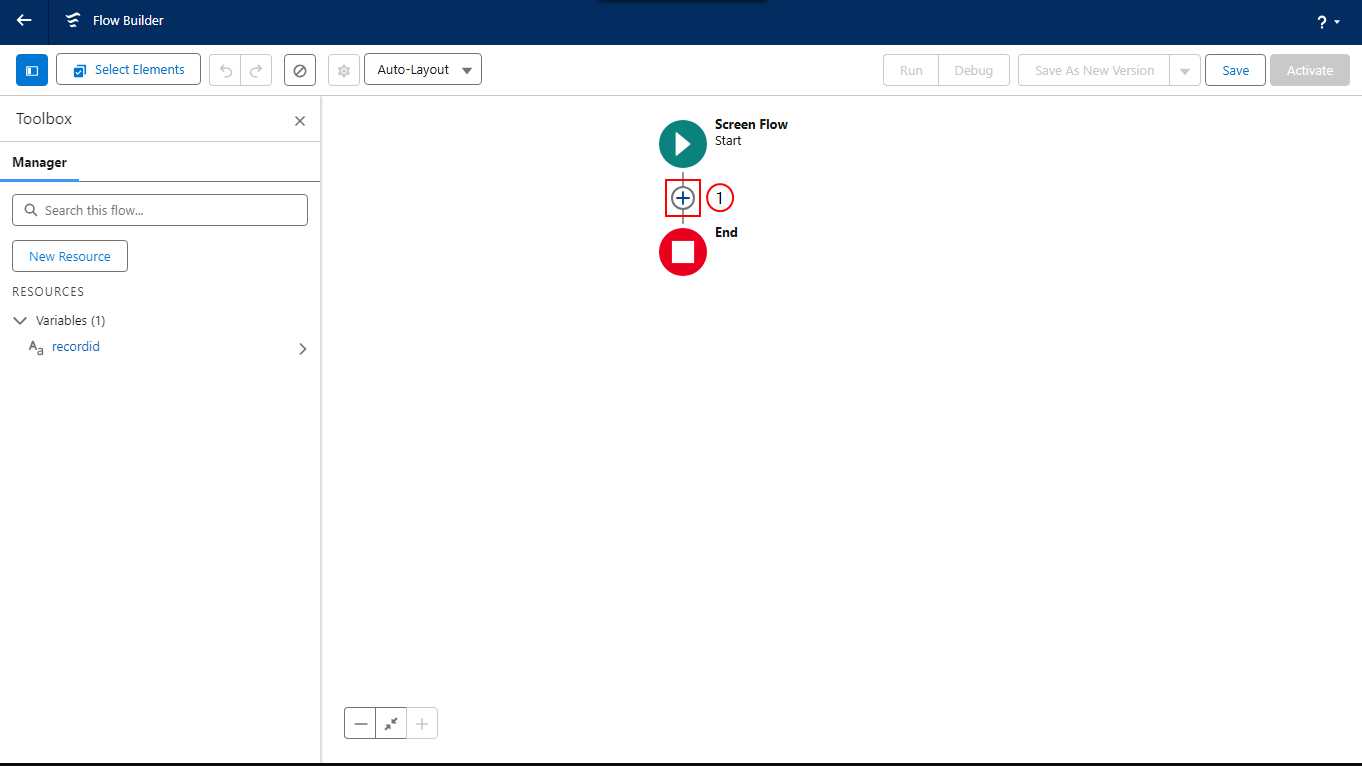
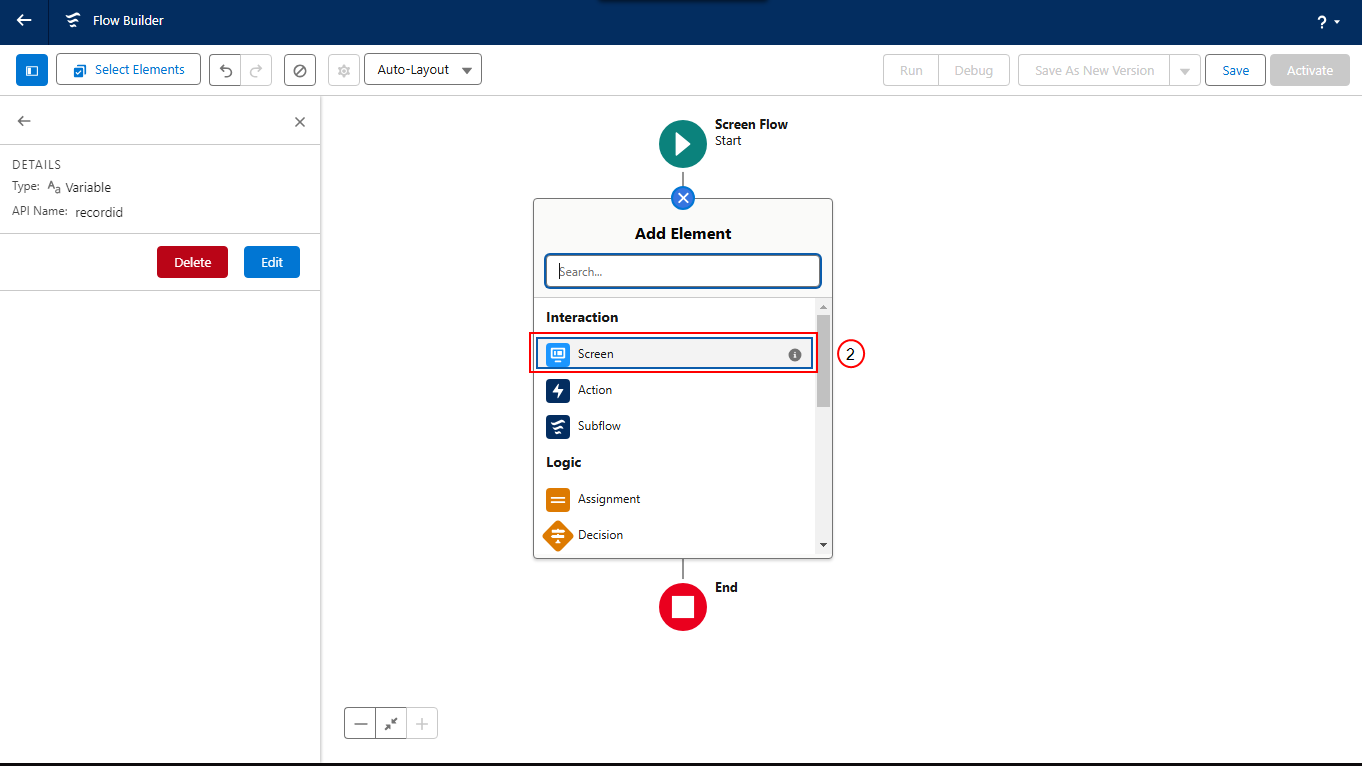
In Flow Builder, select the Plus icon to create a new element after the Start element.
-
Select Screen.
-
In the Label field, enter Select Source Opportunity.
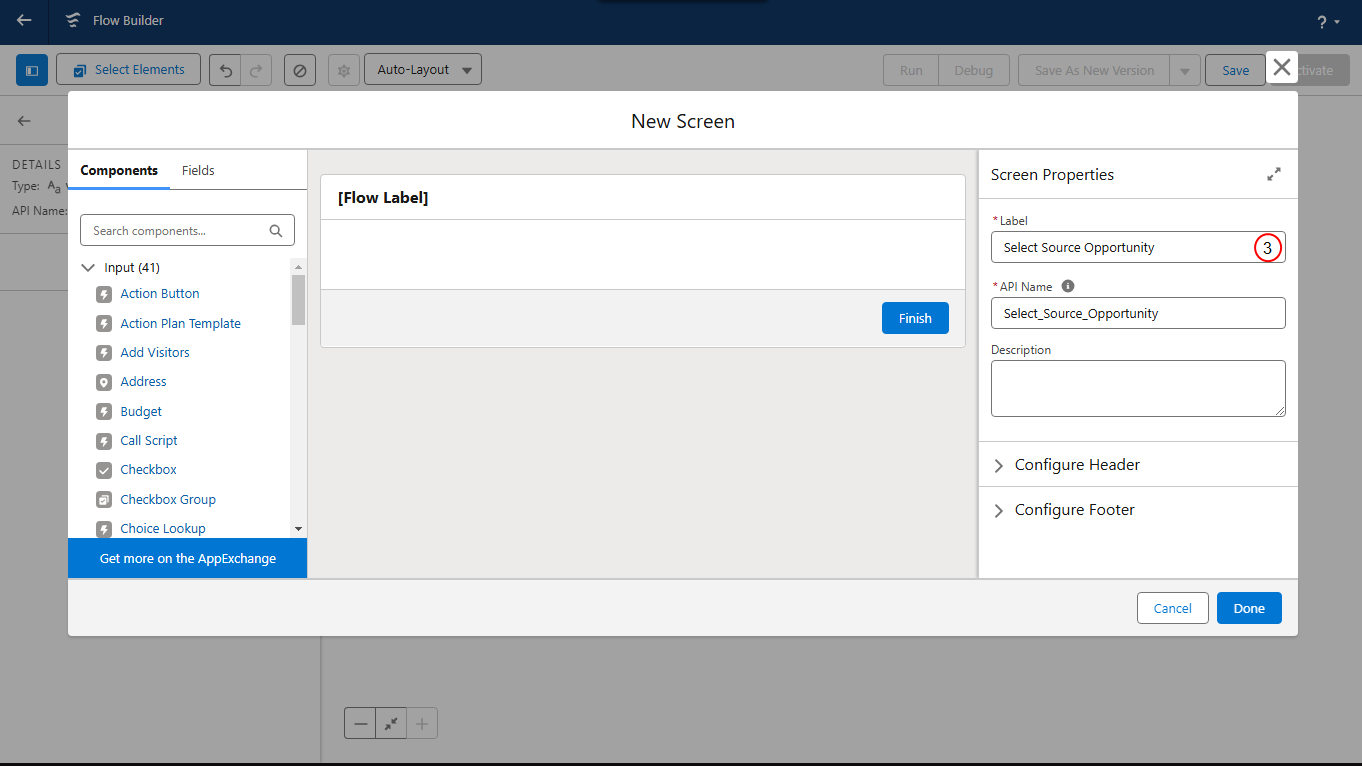
API Name defaults to Select_Source_Opportunity.
-
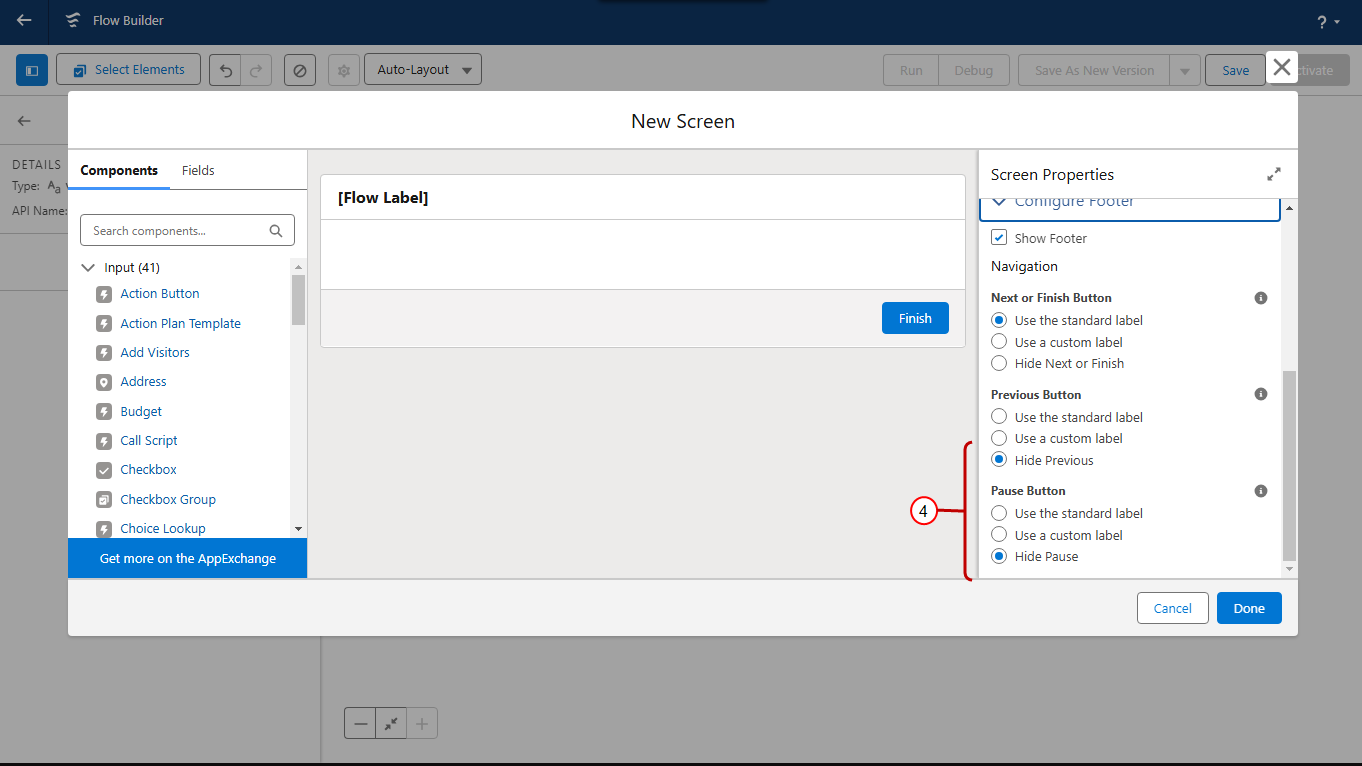
In the Configure Footer section, select the Hide Previous and Hide Pause checkboxes.
-
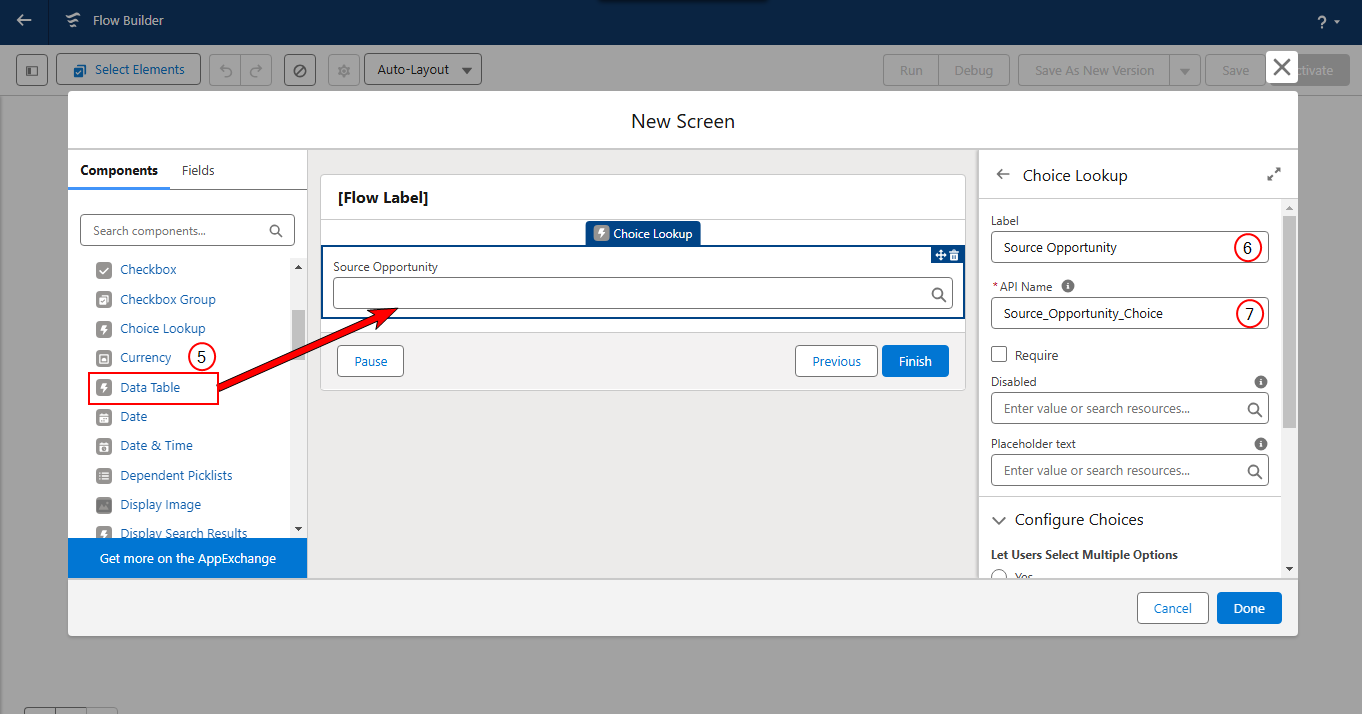
Drag and drop the Choice Lookup component from the components pane to below the header.
-
In the Label field, enter Source Opportunity.
-
In the API Name field, enter Source_Opportunity_Choice.
-
In the Configure Choices section, in the Choice field, select New Choice Resource.
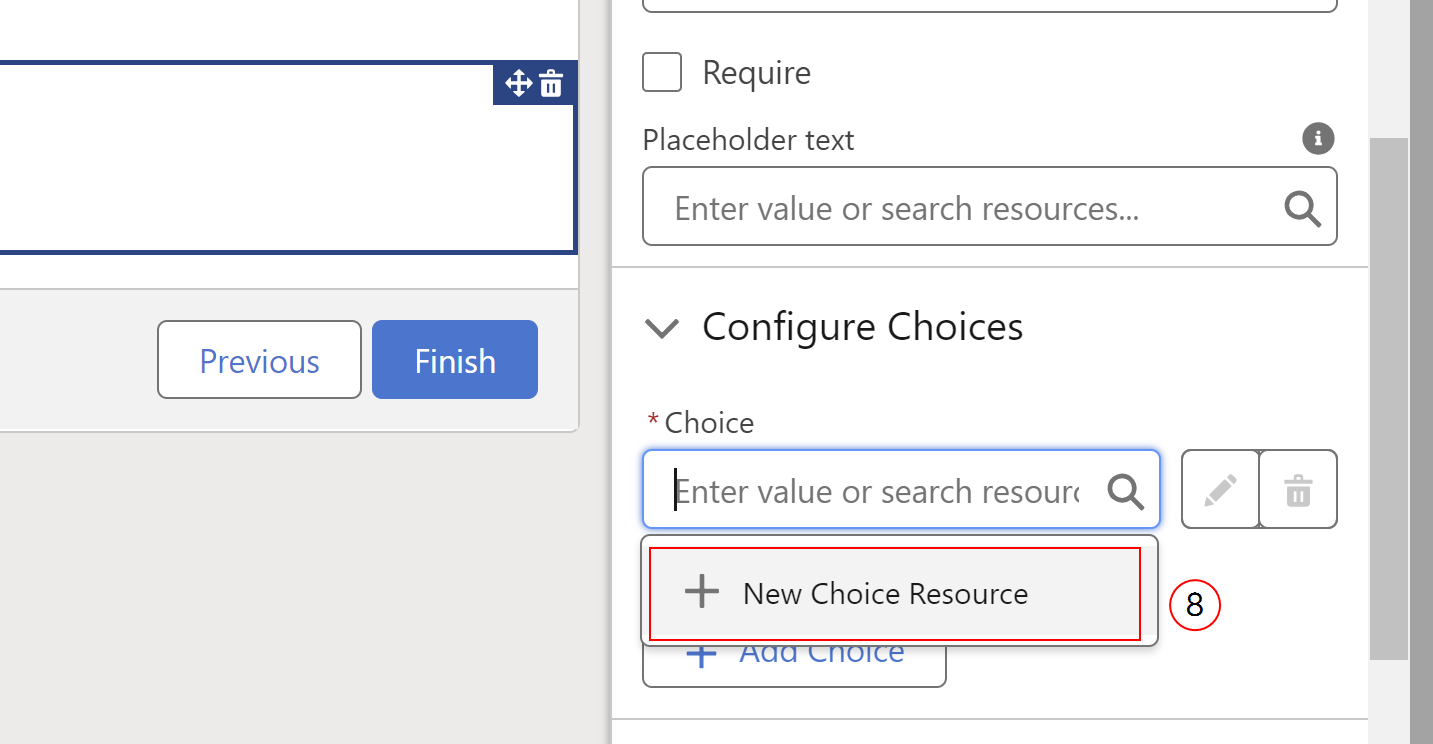
-
In the New Choice Resource drop-down menu, select Record Choice Set . The Resource Type field auto populates with the value Record Choice Set.
-
In the API Name field, enter Opportunities_Choice_Record_Set.
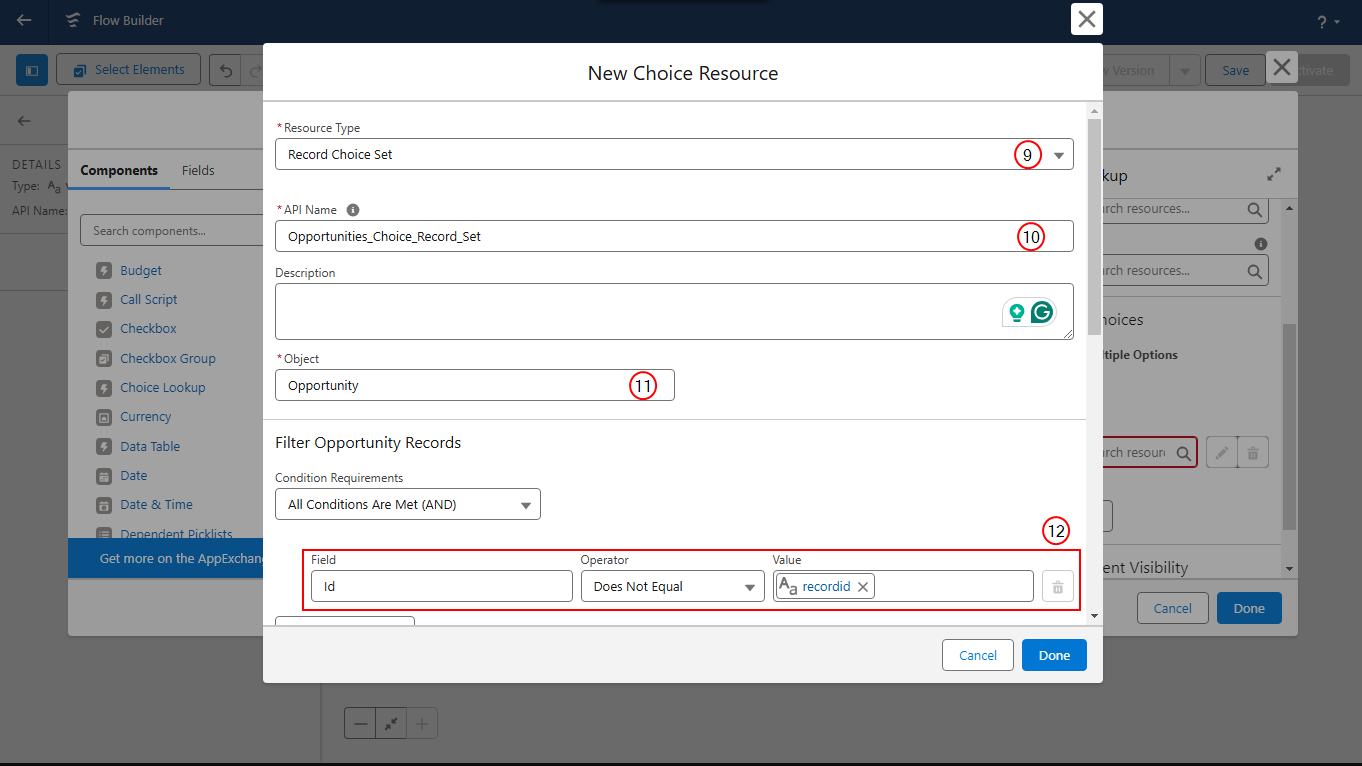
-
In the Object field, select Opportunity.
-
In the Filter Opportunity Records section, create the condition Id Does Not Equal recordId.
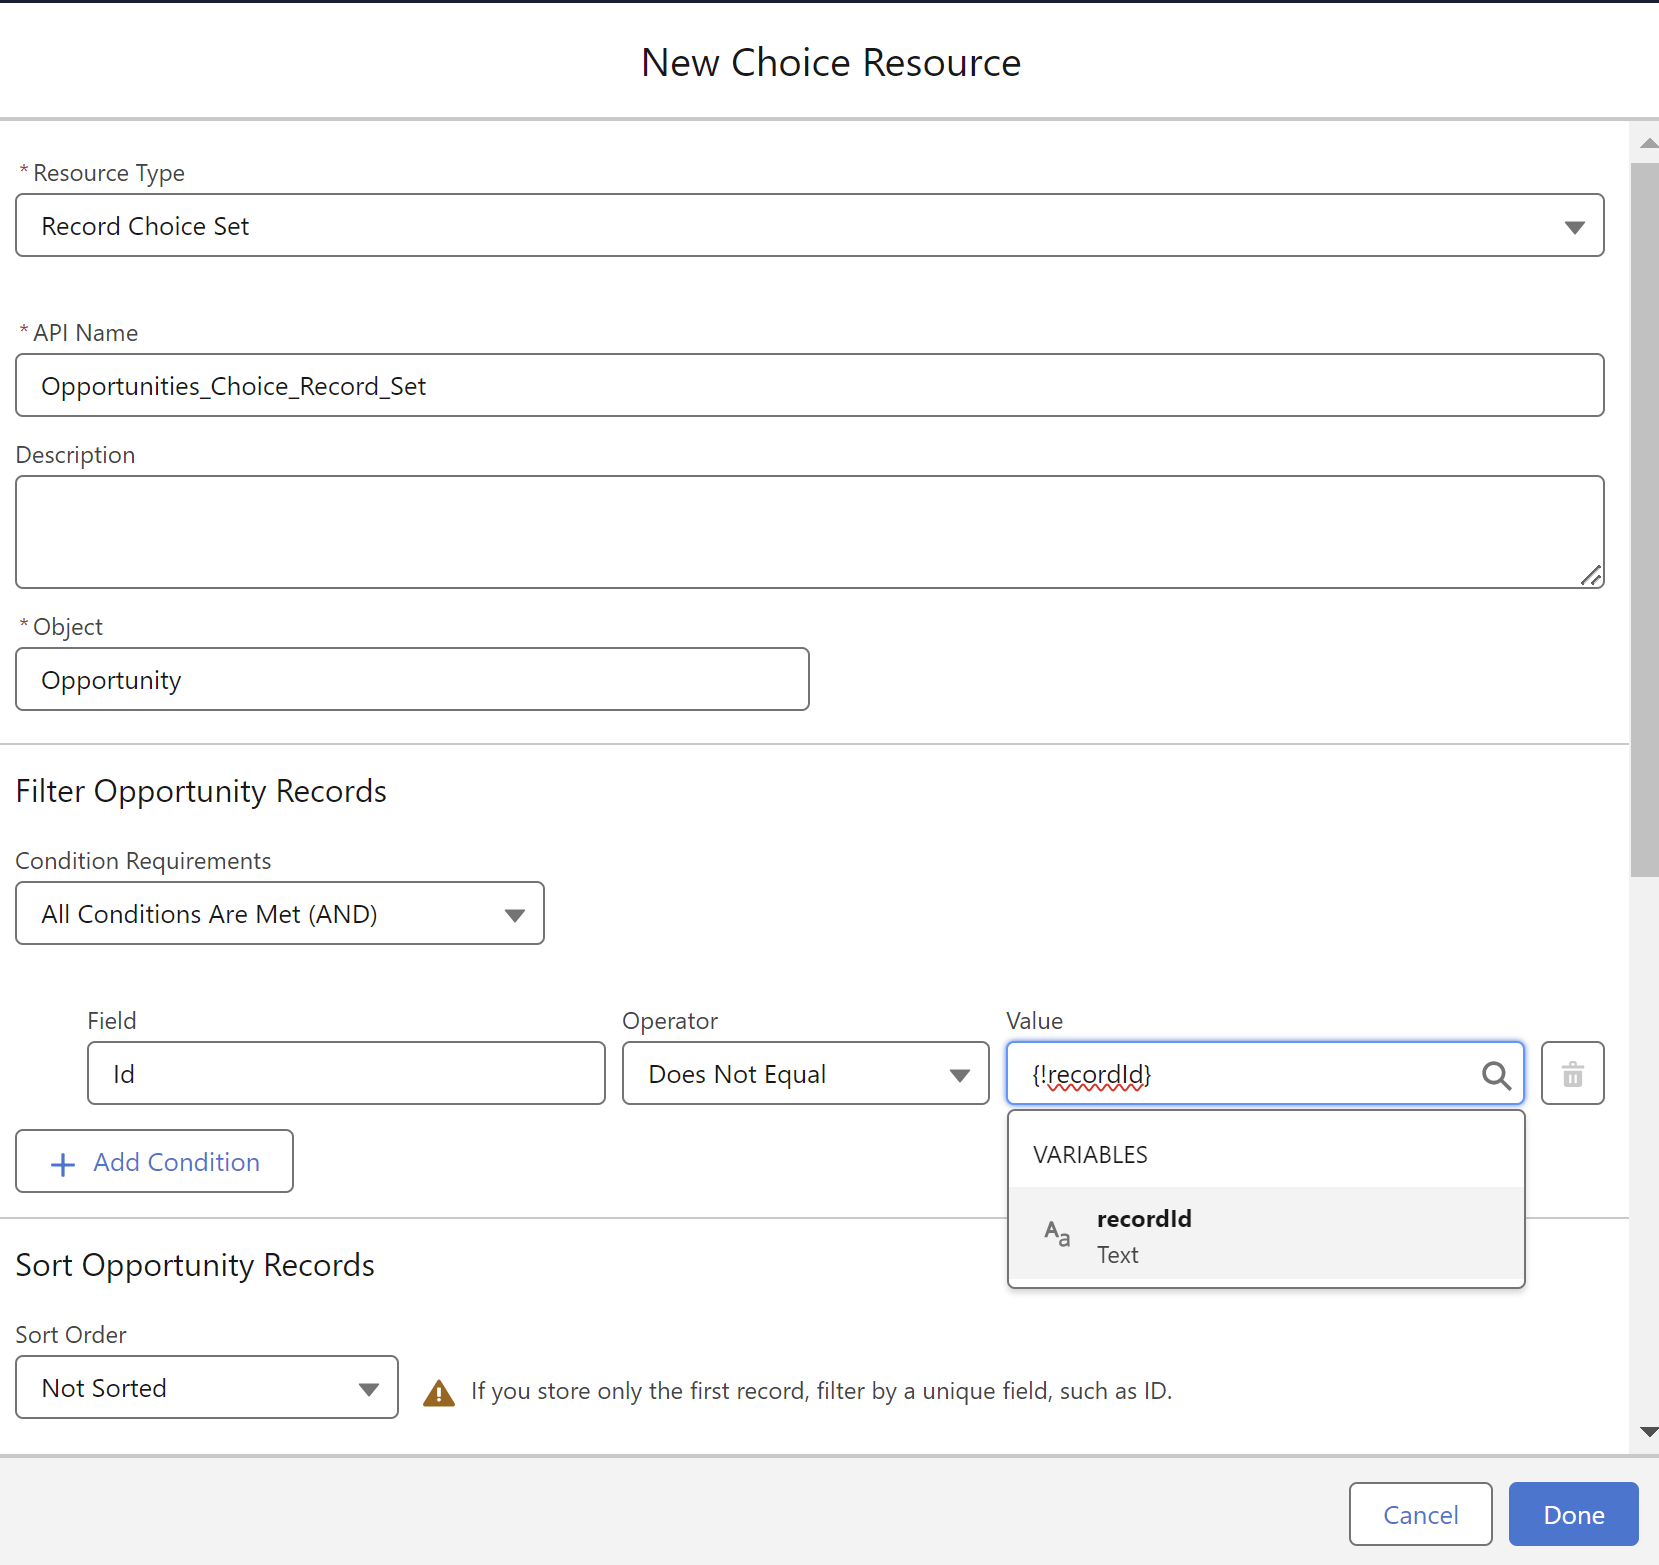
-
In Configure Each Choice section, in the Choice Label field, select Name .
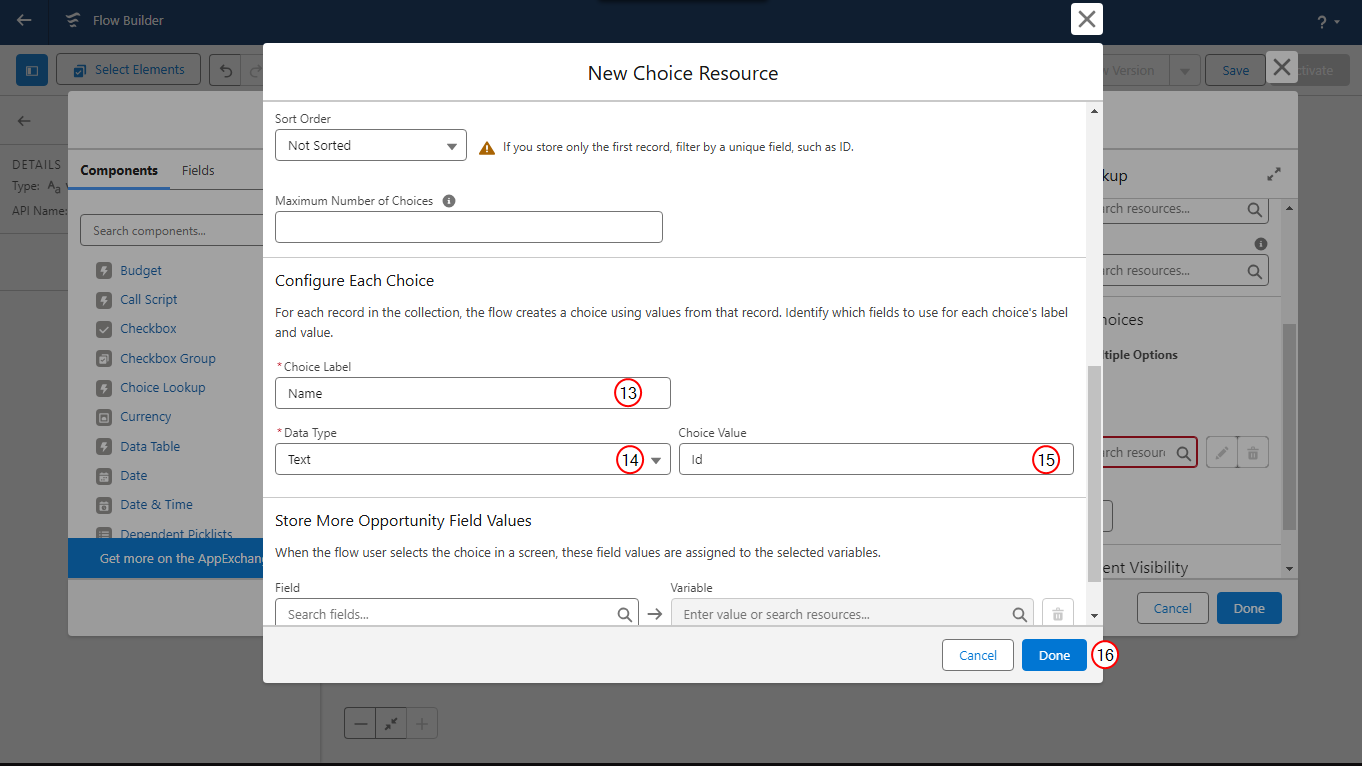
-
In the Data Type drop-down, select Text.
-
In the Choice Value field, select Id.
-
Select Done.
Creating the Source Opportunity Selection Screen allows users to choose the source opportunity for copying configurations. Once this screen is created, you can set up an error screen. This error screen will inform users if they have not selected a source, ensuring effective usage of the flow.
Creation of the Source Opportunity Not Selected Error Screen
Setting up an error screen allows you to inform users if they have not selected a source. This ensures you can proactively support effective usage of the flow. The error screen provides a plain text error and informs the user on the corrective action to take. Follow these steps to create the error screen.
-
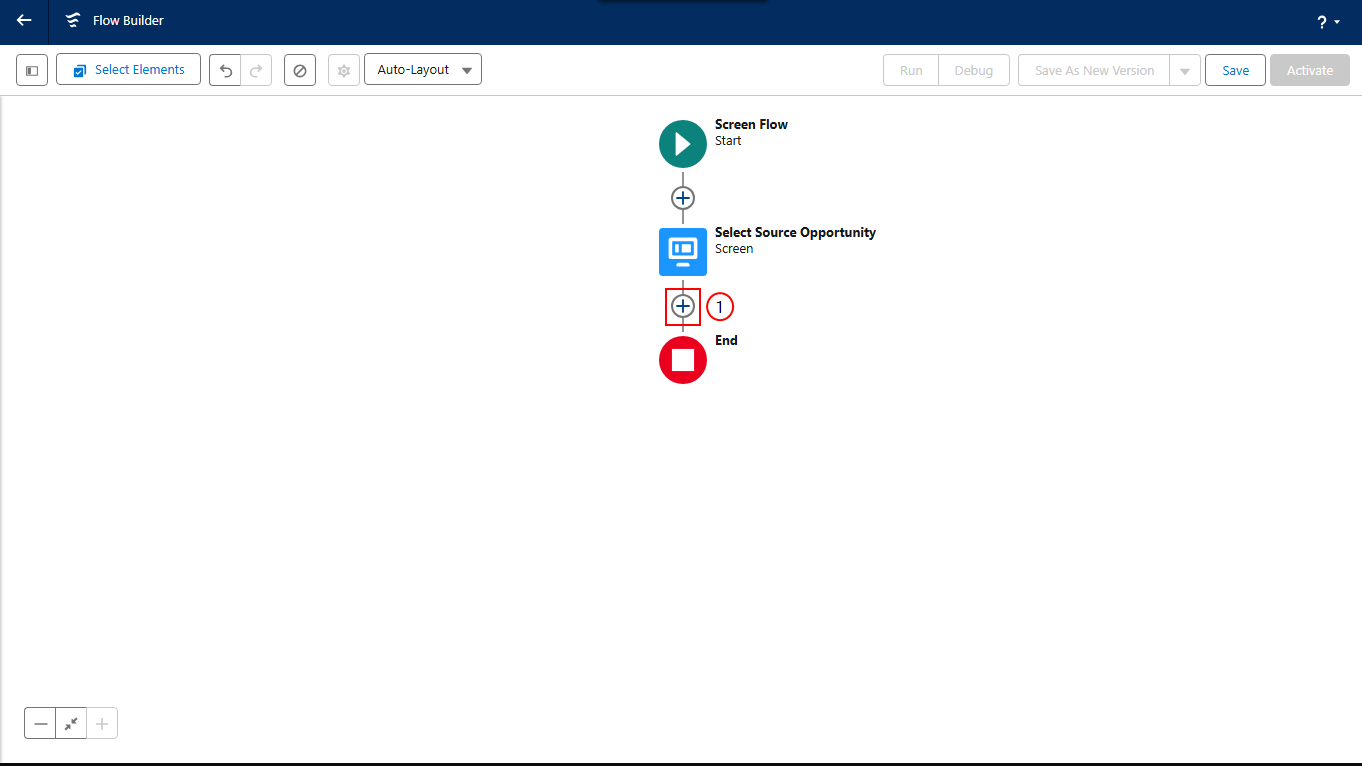
In Flow Builder, select the Plus icon to create a new decision element after the Select Source Opportunity screen.
-
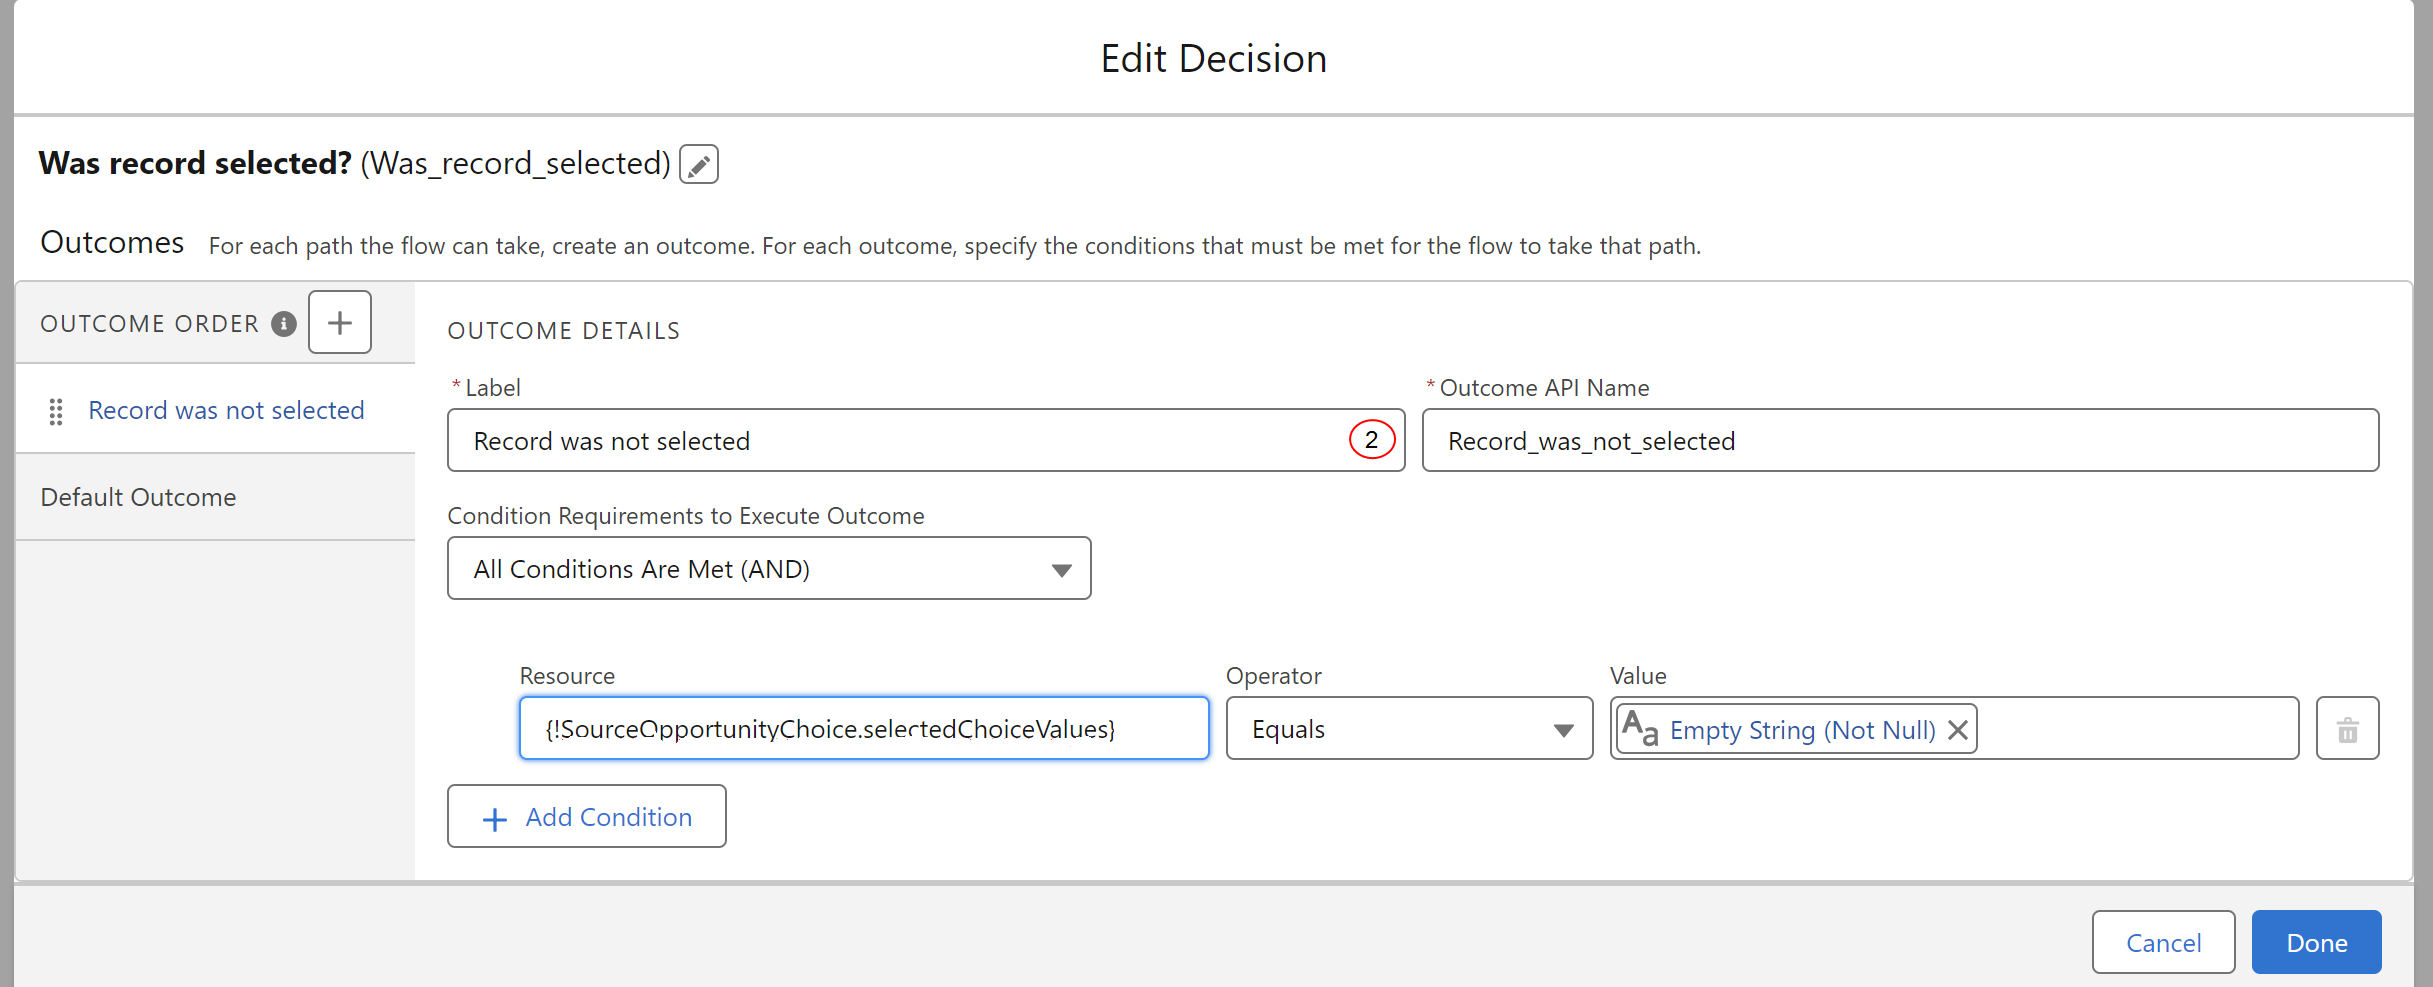
In the Label field, enter Record was not selected.
-
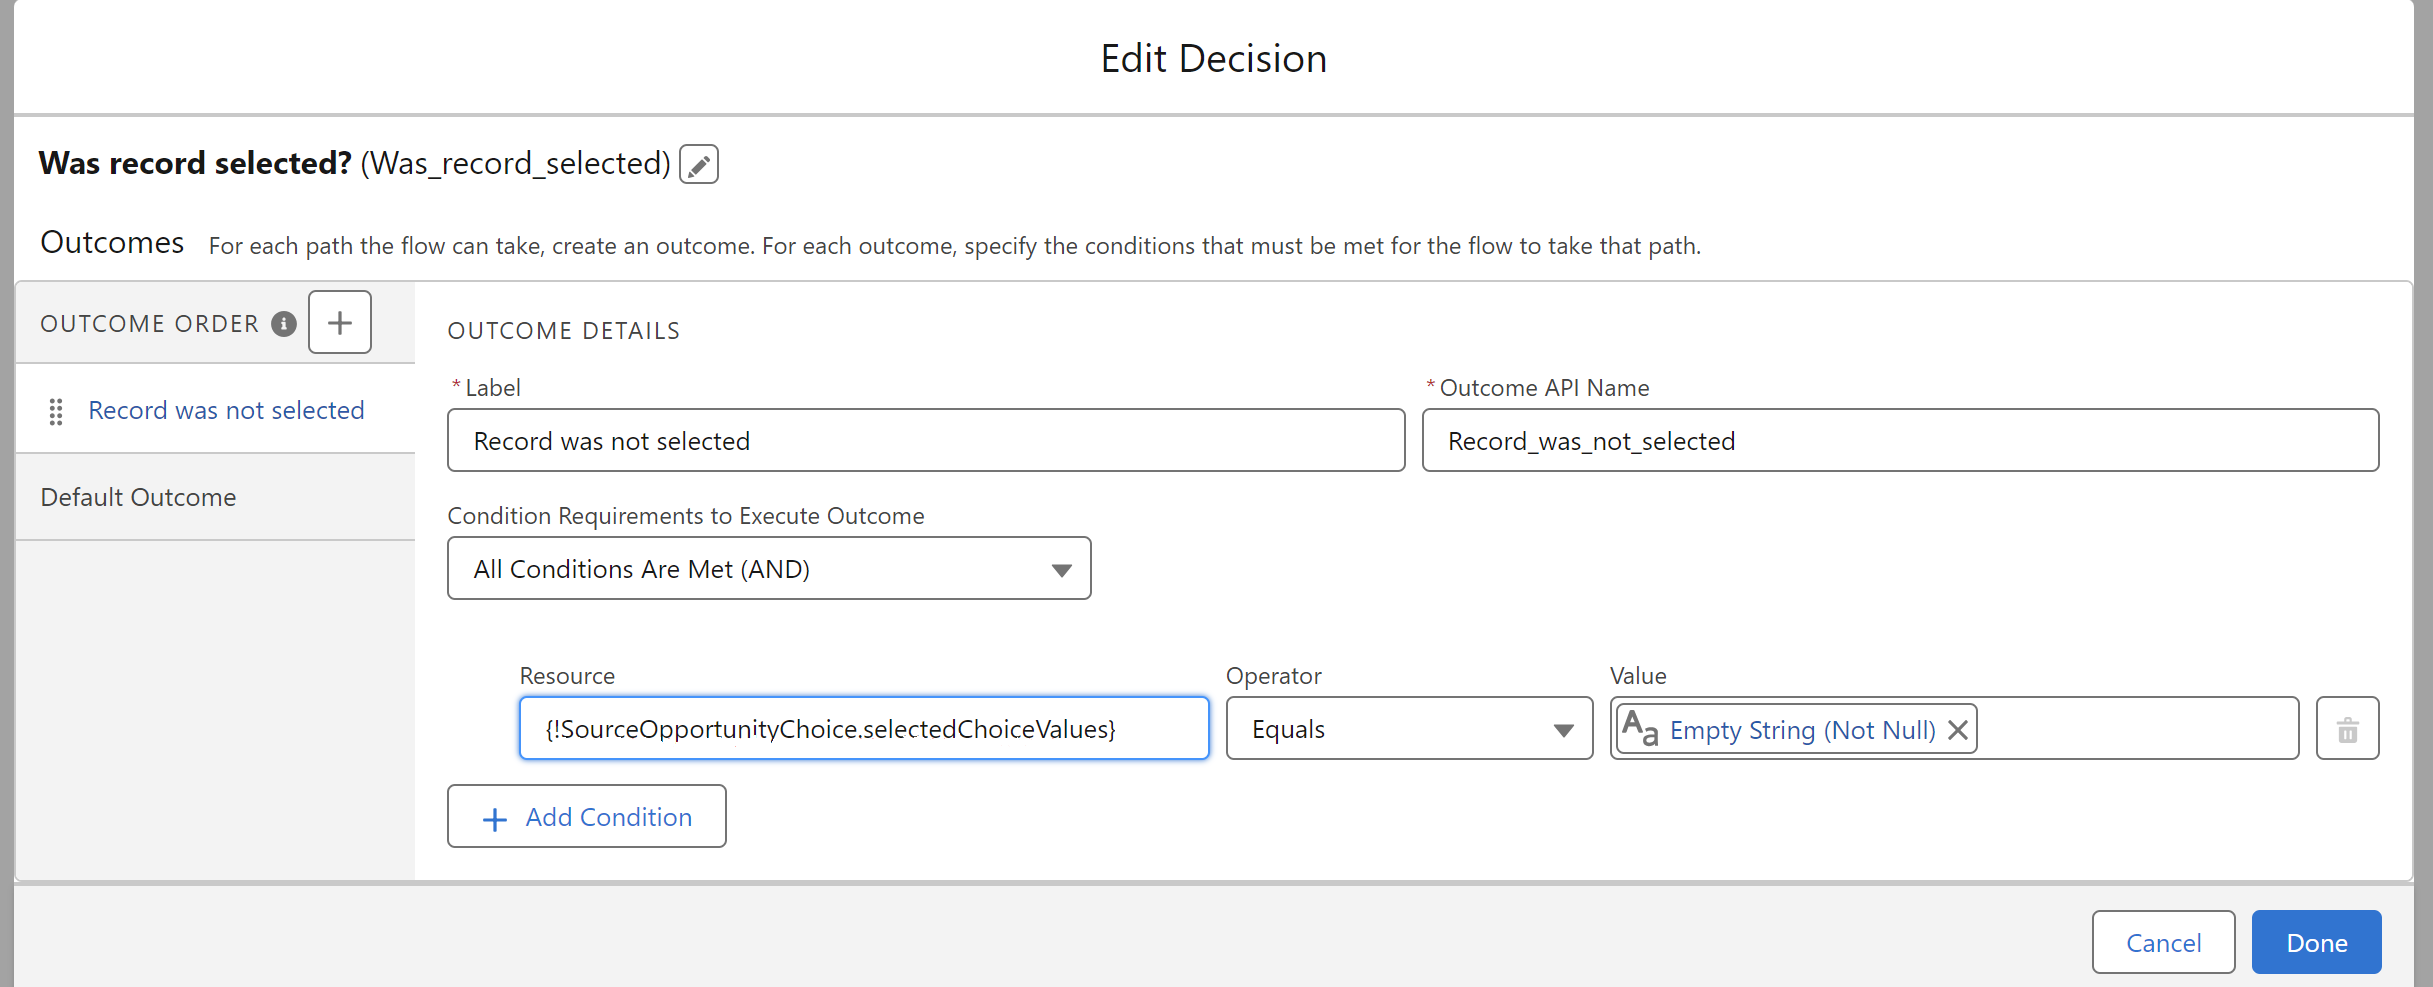
Setup the remaining fields for Record Not Selected as shown in the screenshot.
-
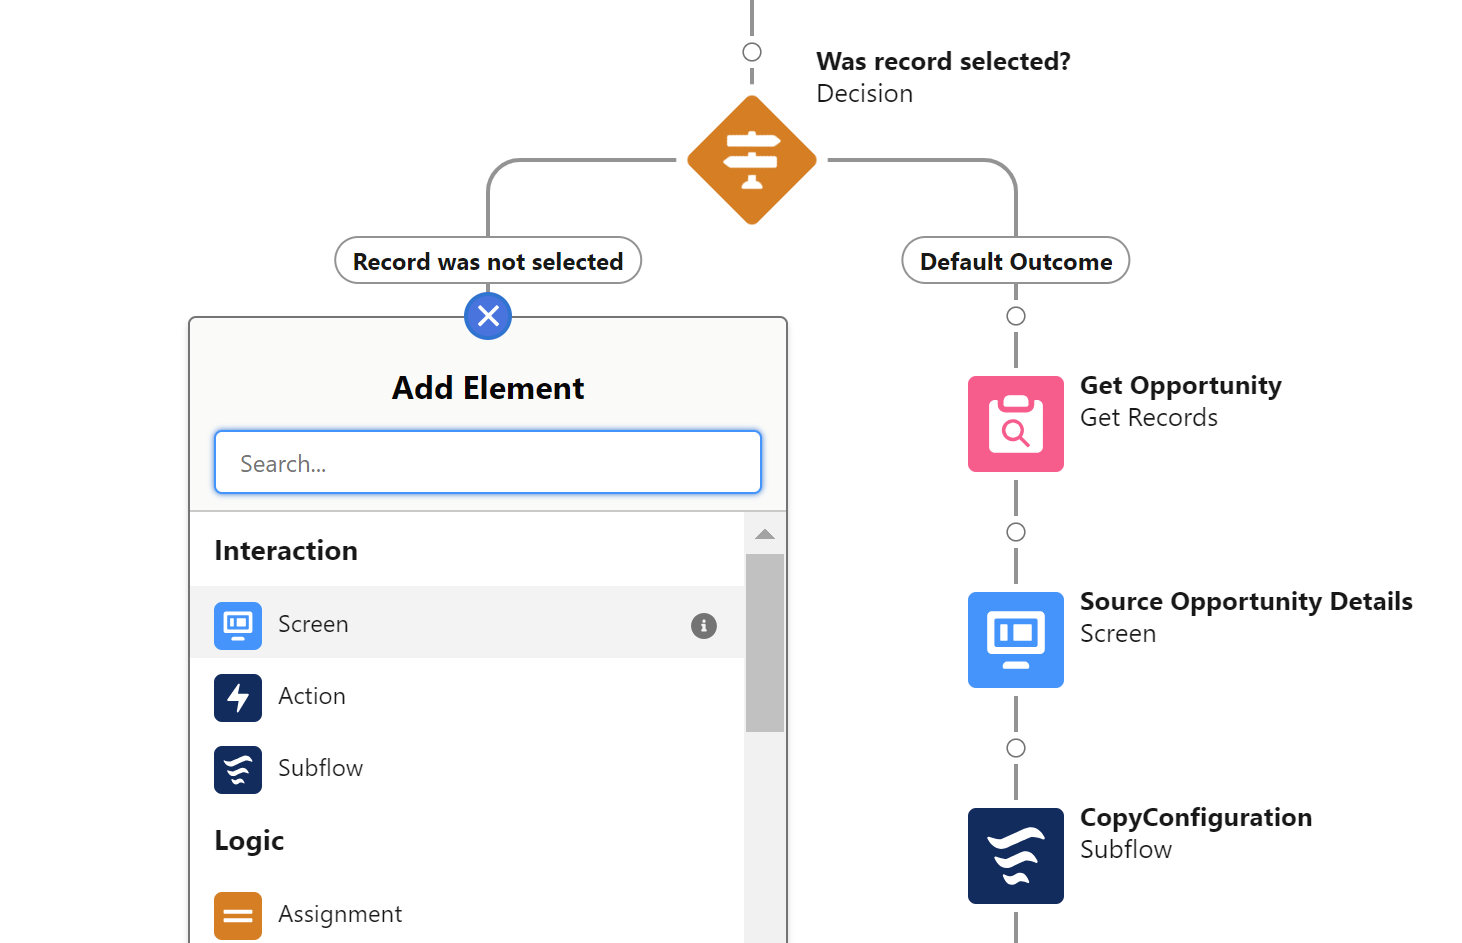
After the Record was not selected element, add a new Screen element.
-
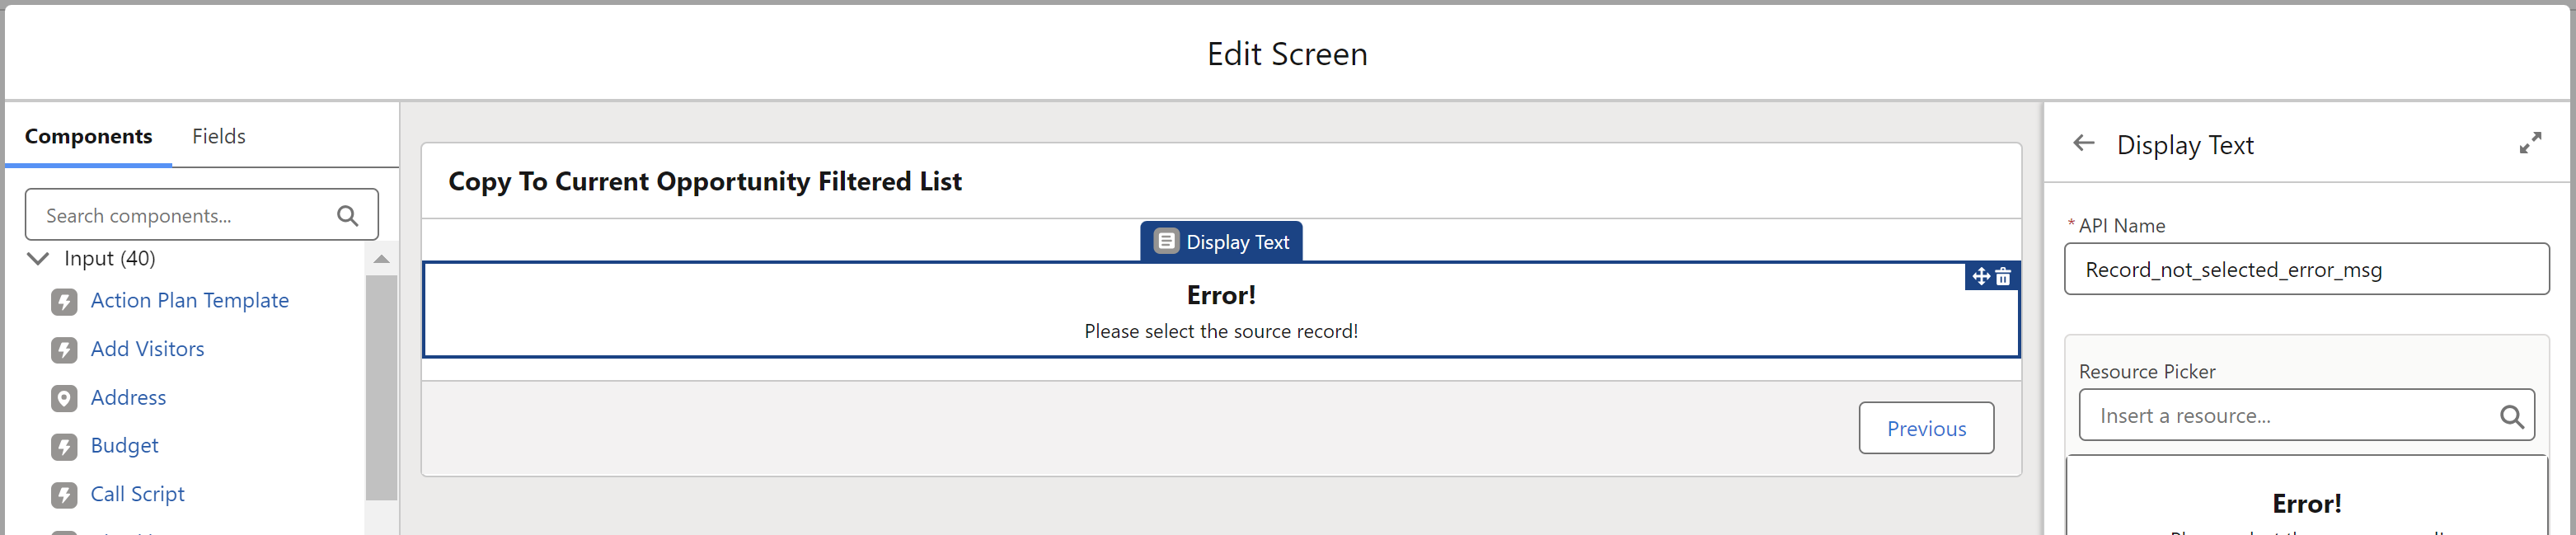
Add the required Error message text using the Display Text component.
-
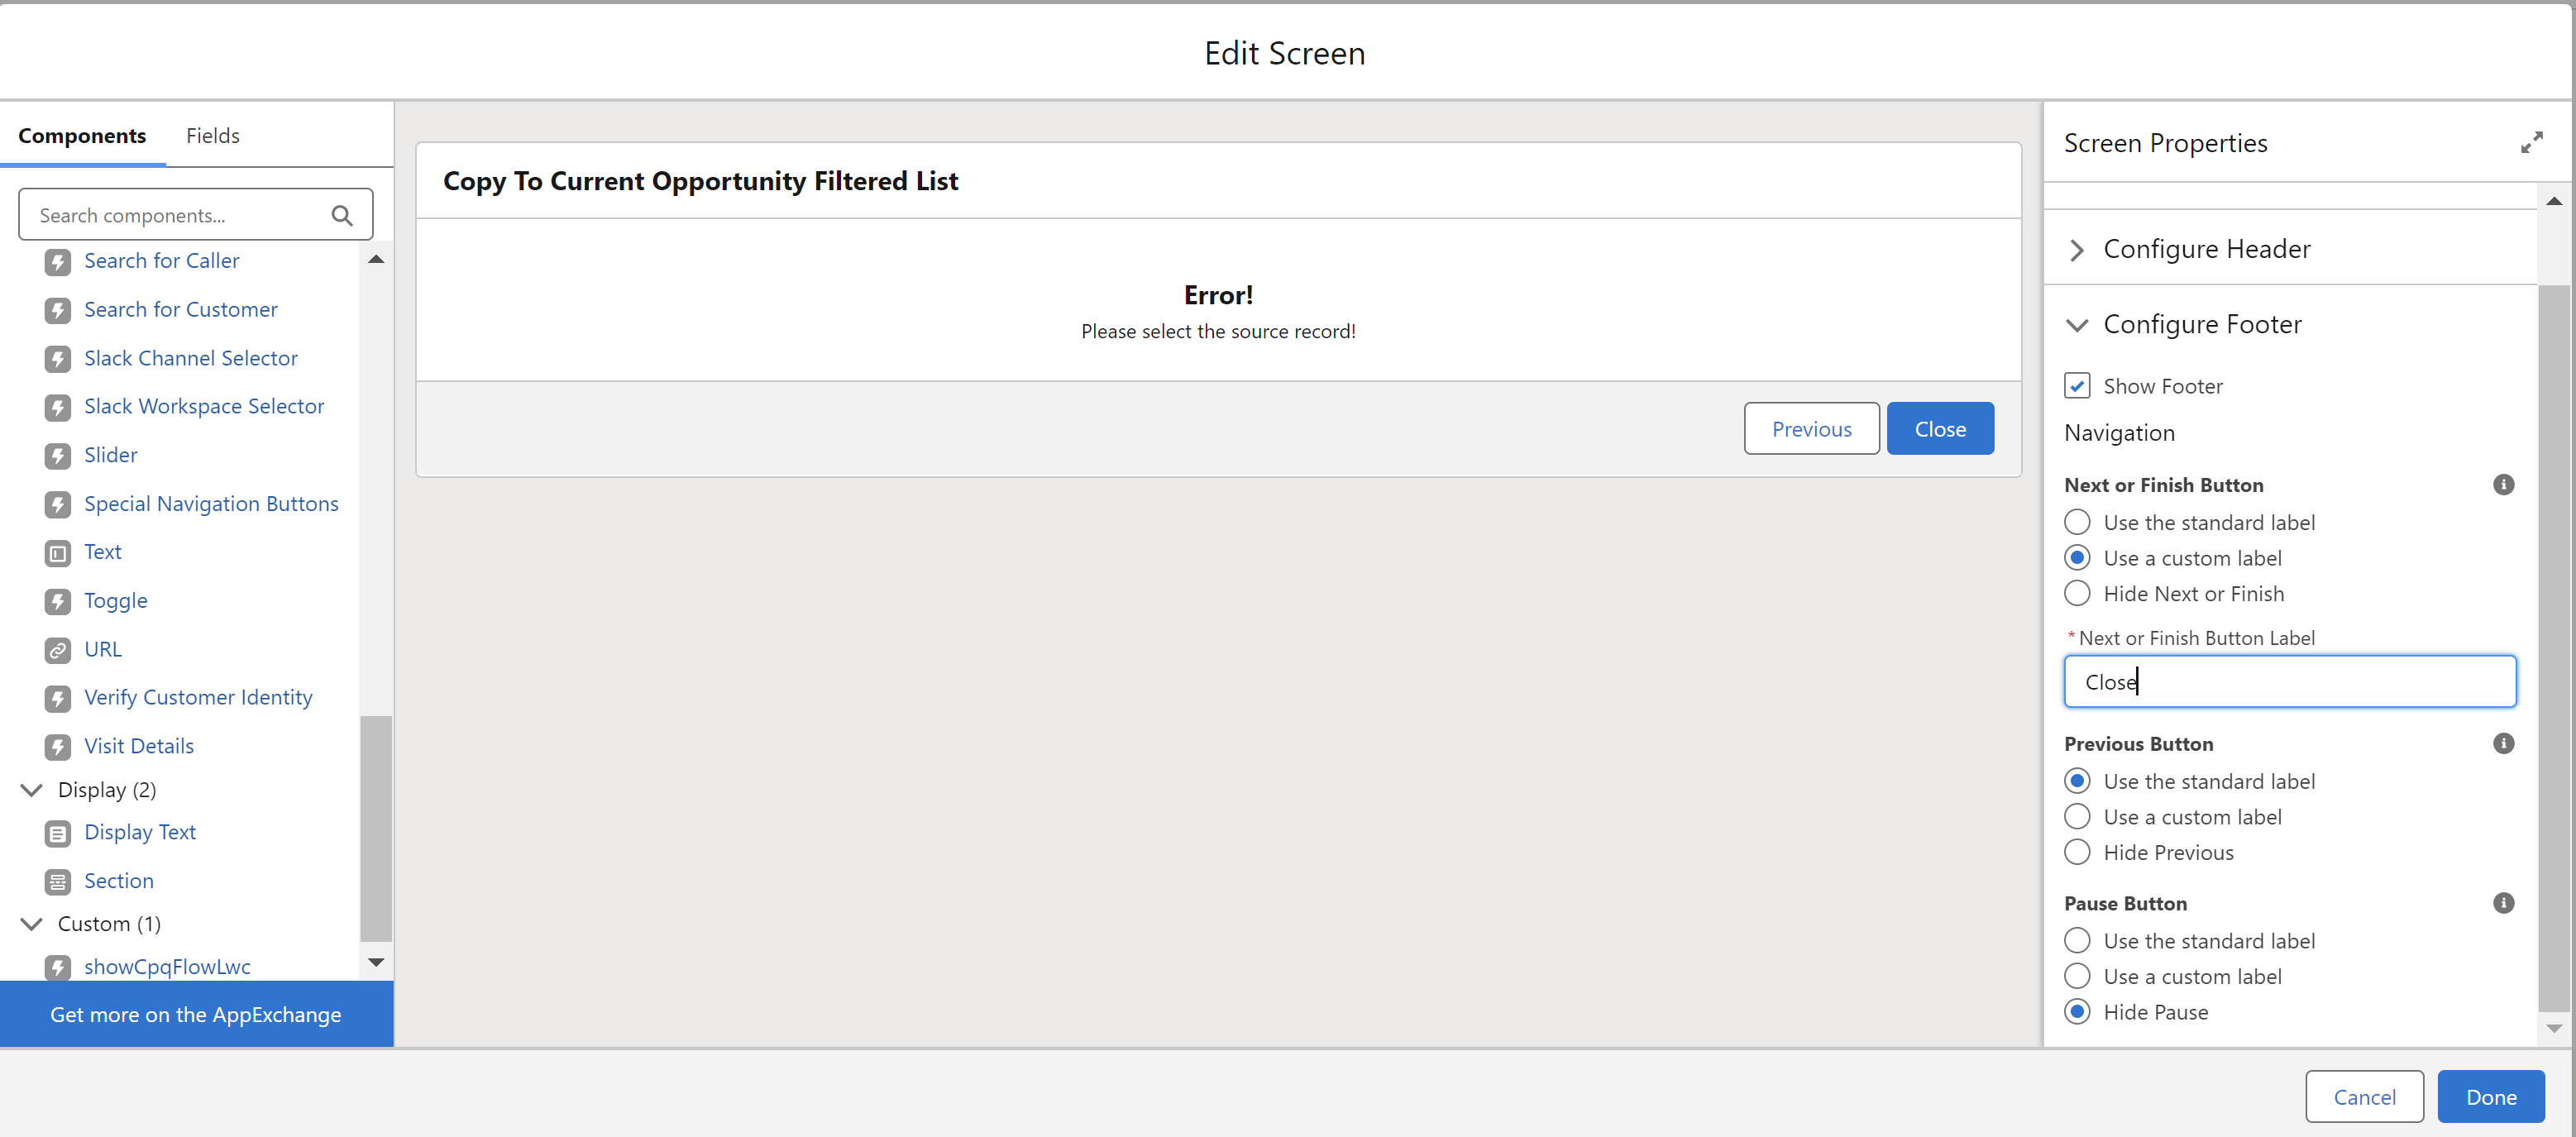
Configure the footer buttons as shown in the screenshot.
-
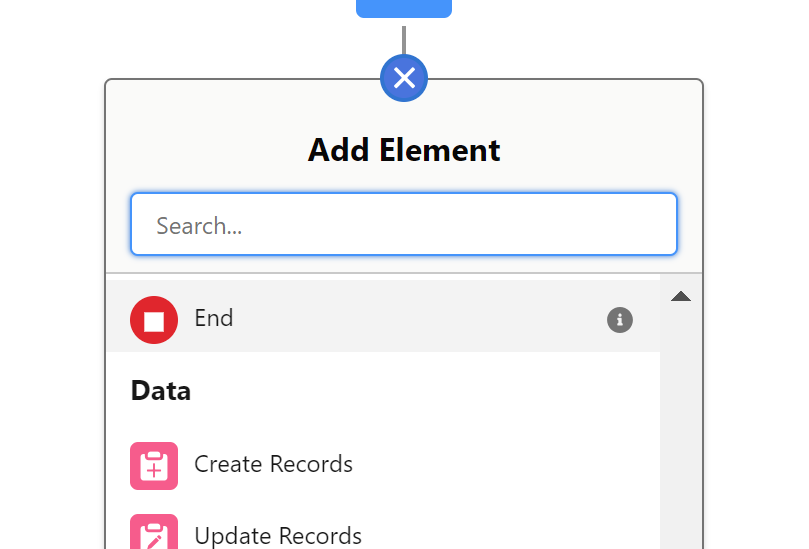
Add an End element after the Error message screen.
The Source Opportunity Not Selected Error Screen provides clear feedback, improving usability and accuracy by ensuring users complete all required fields for the flow. You can now proceed to configure additional error handling and validation.
Creation of the Source Opportunity Verification Screen
Users can create a verification screen to display details of the selected source opportunity. Follow these steps to set up the verification screen.
-
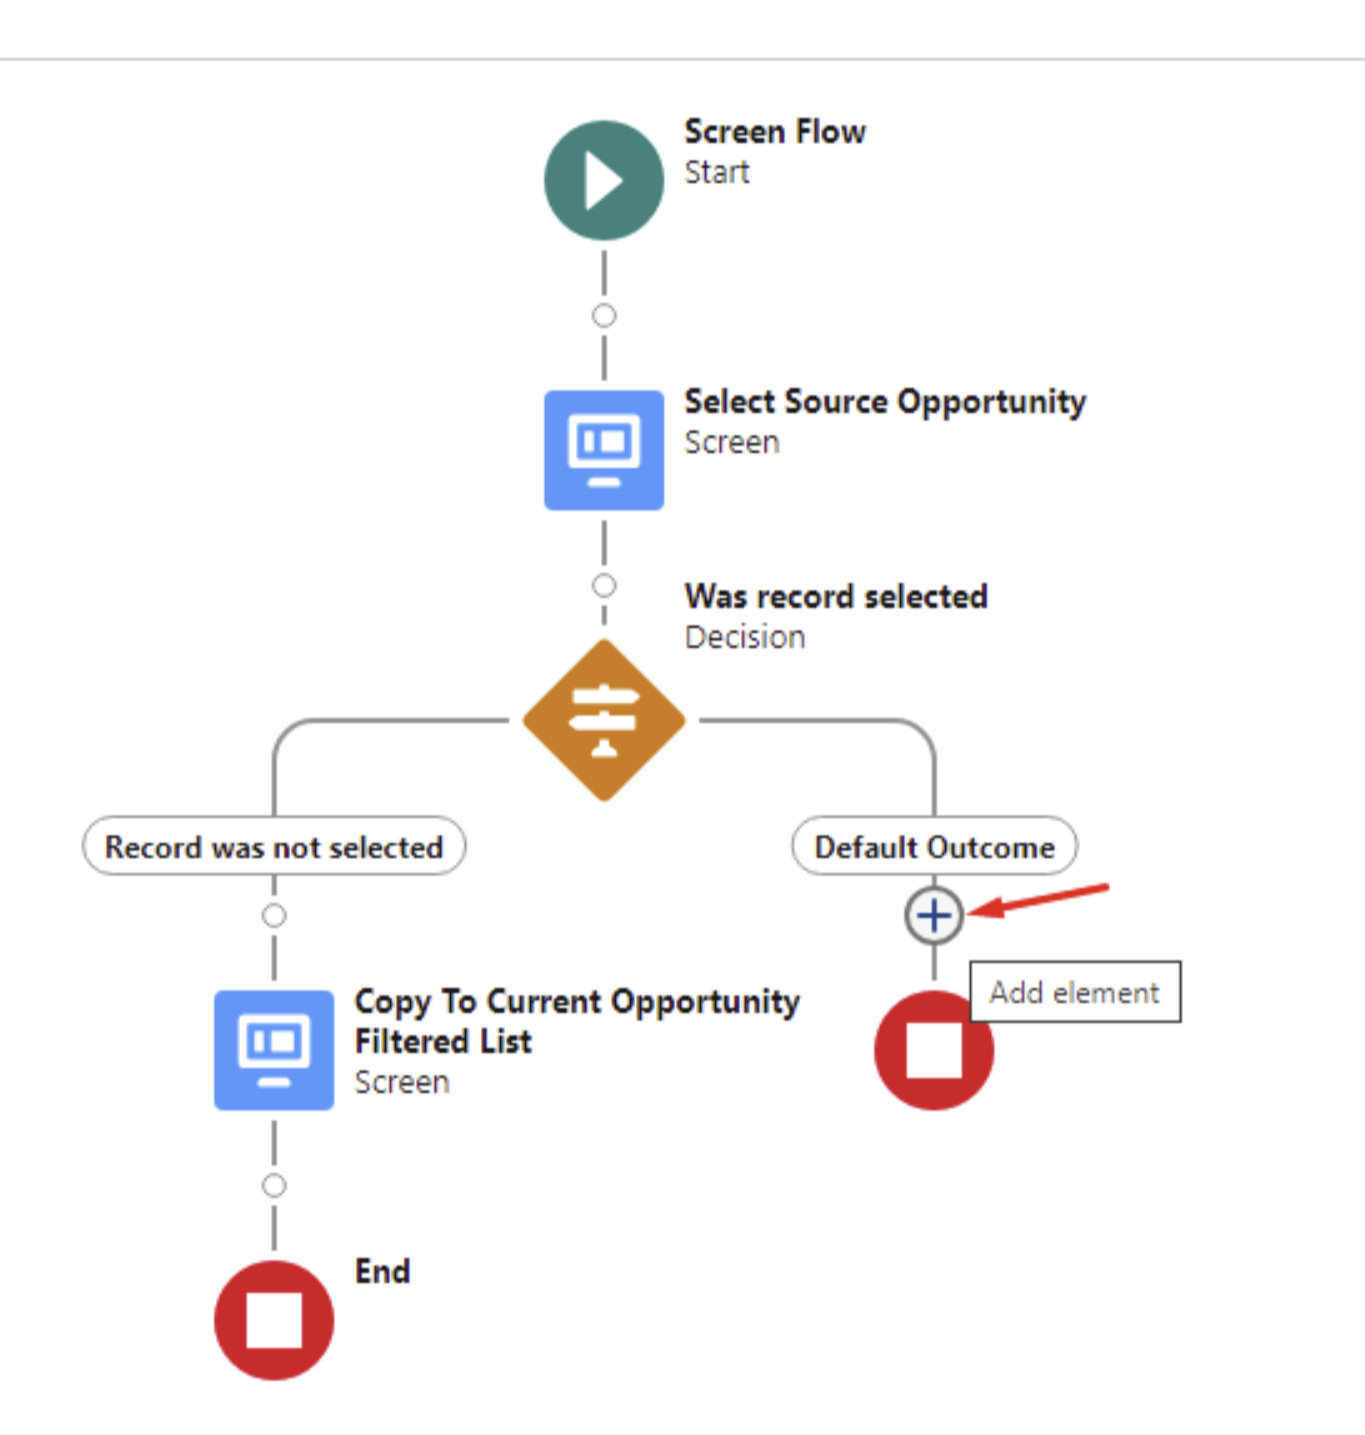
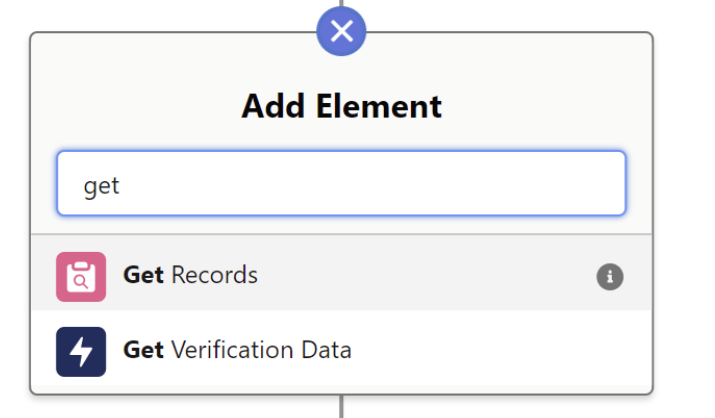
Under the Default Outcome path add a new Get Records element.
-
Name this element Get Opportunity.
-
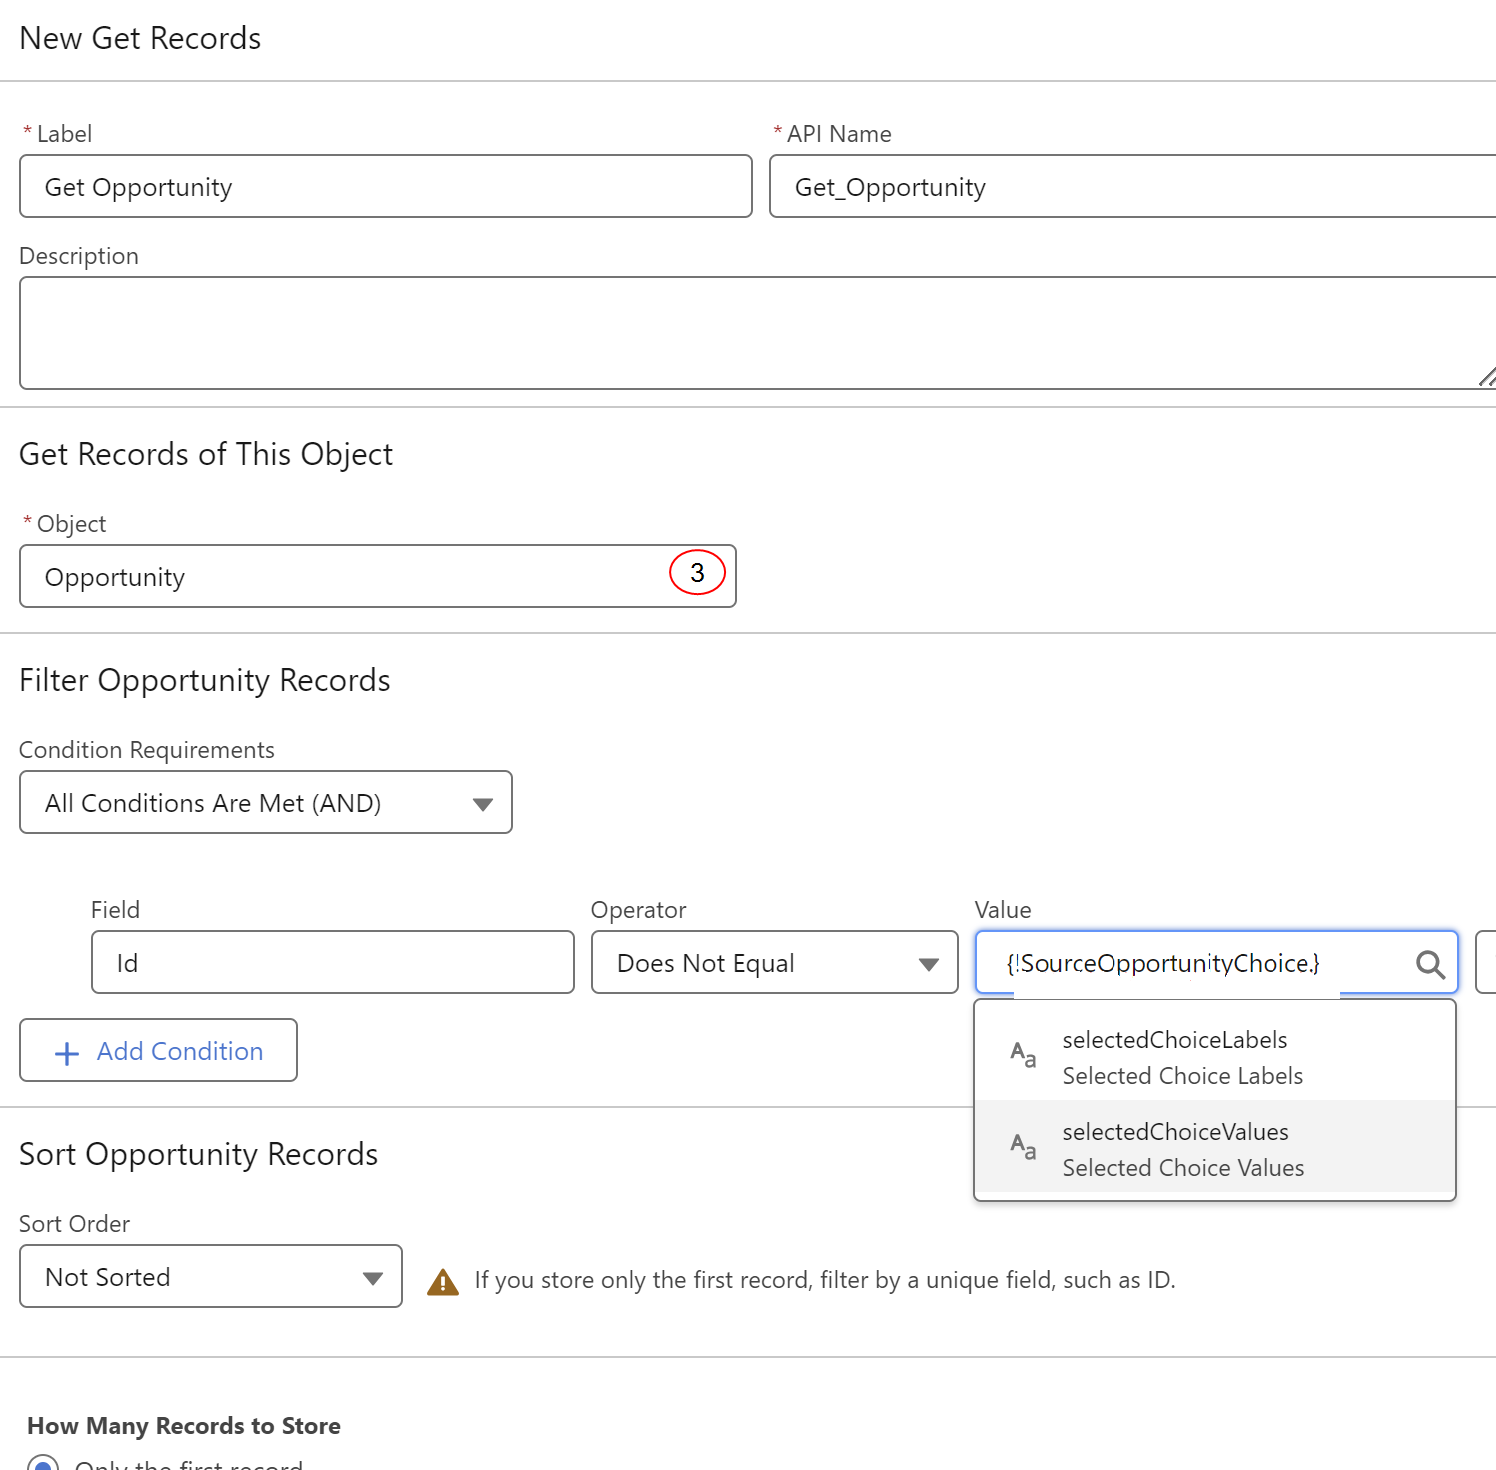
For the Object field, select Opportunity .
-
Set filter to Id Equals {!Source_Opportunity_Choice.selectedChoiceValues}.
-
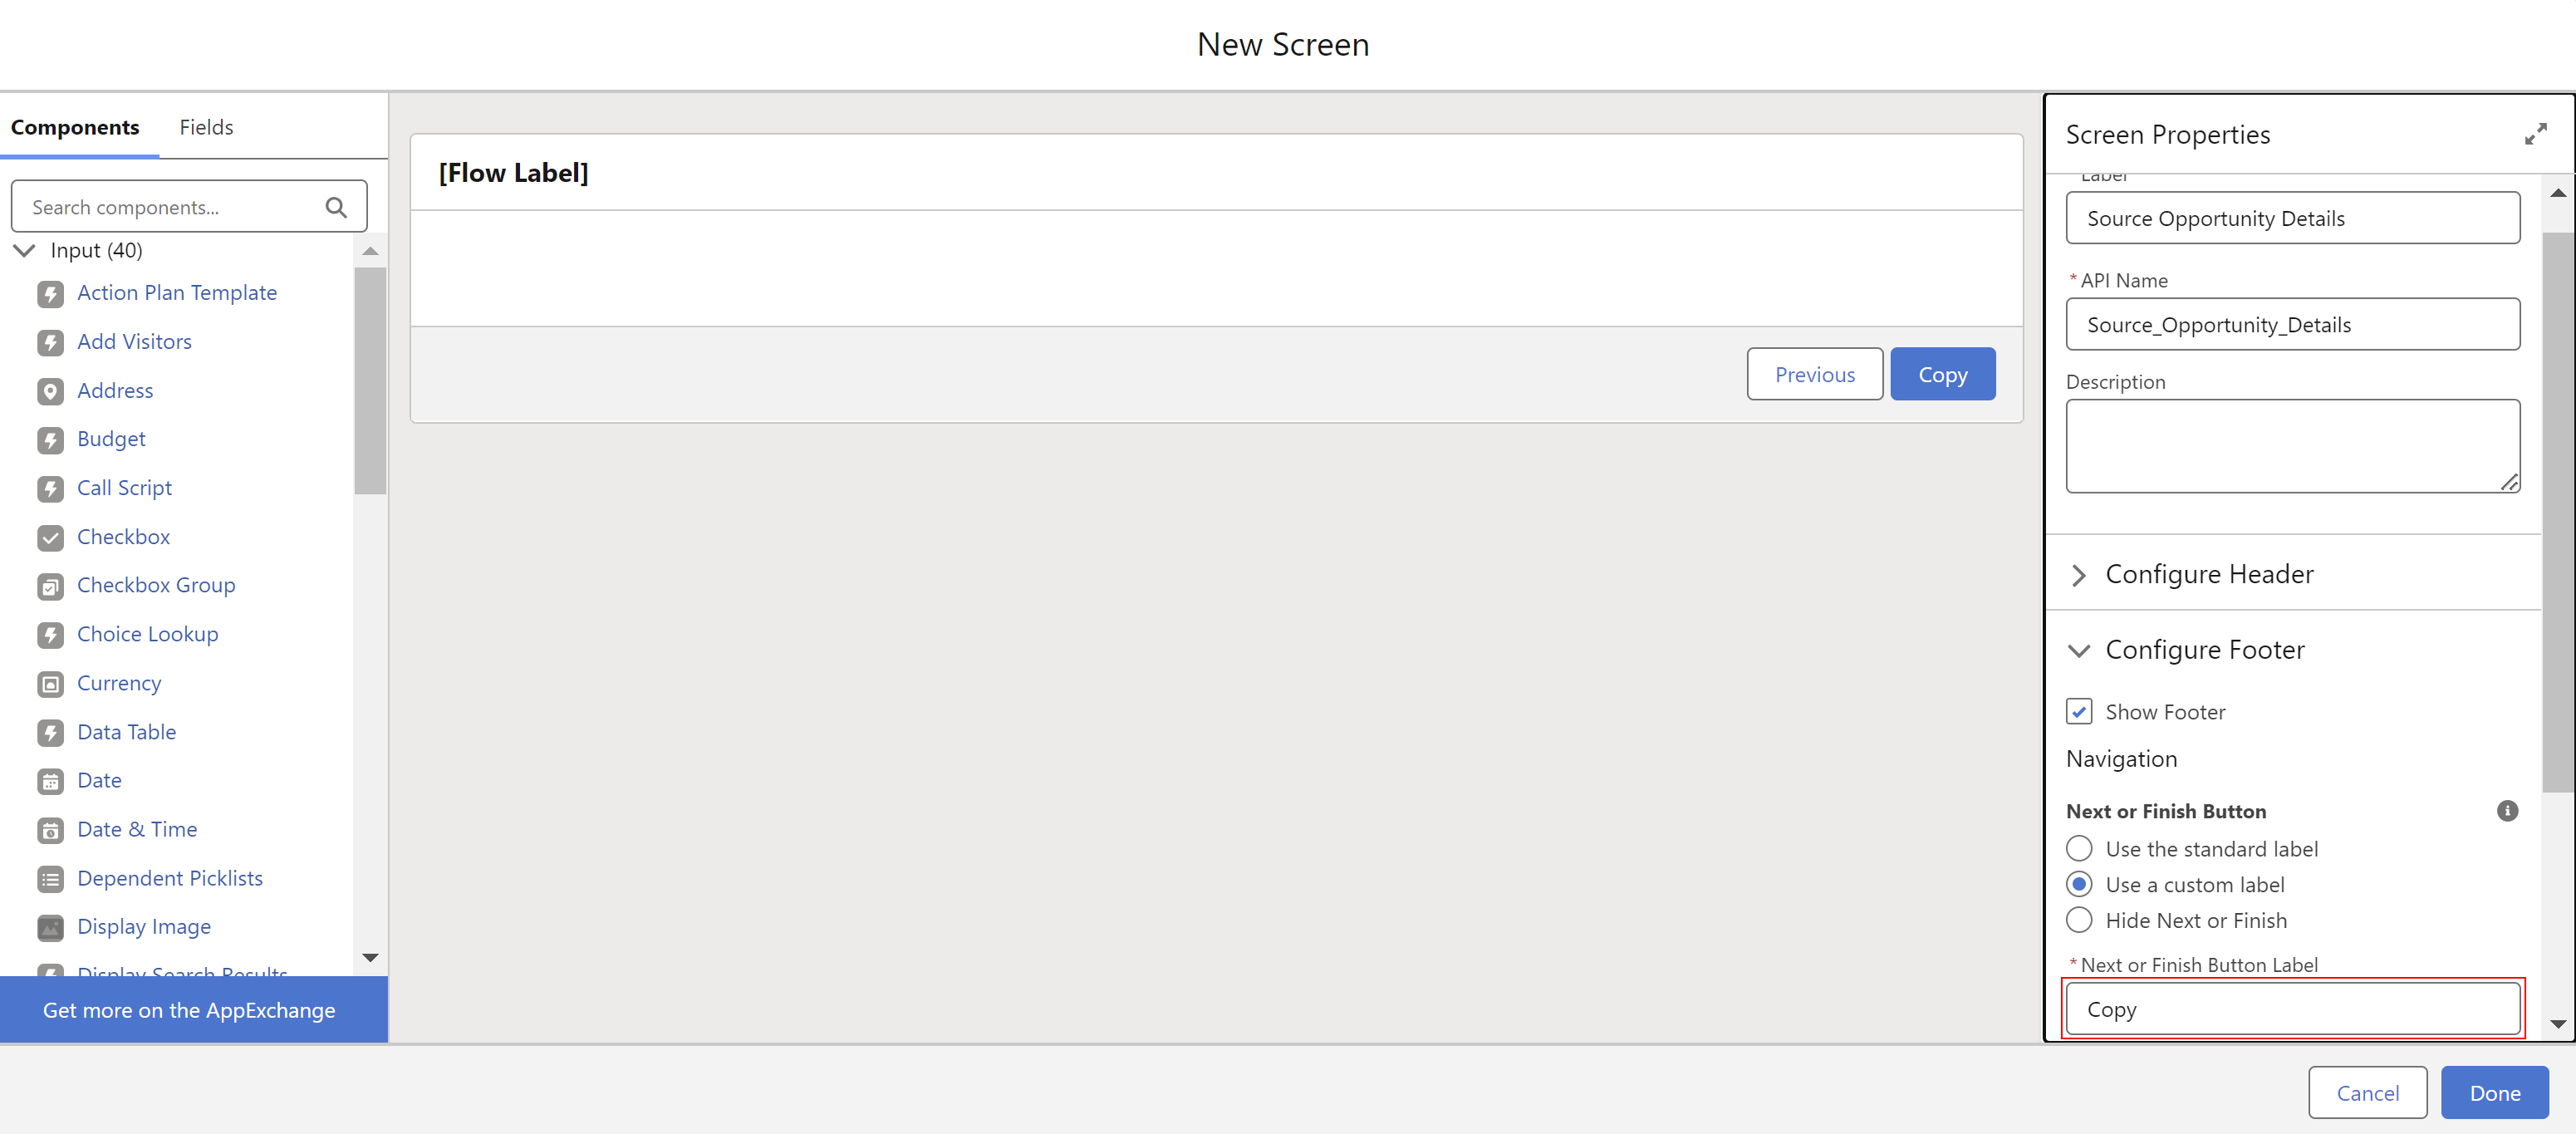
Add a new Screen Element Source Opportunity Details/Source_Opportunity_Details.
-
Update the label of the Finish button to Copy.
-
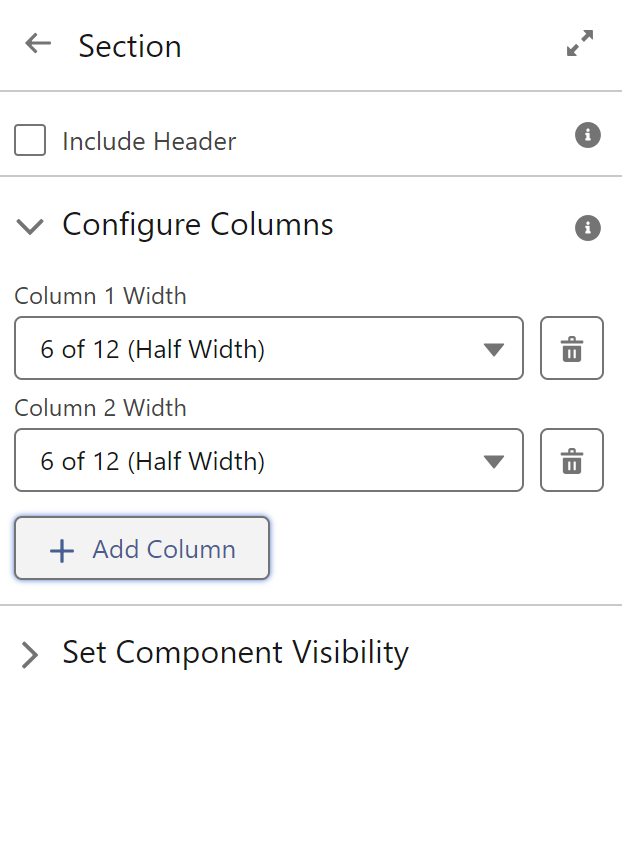
Add a new section component and make an extra column as shown in the screenshot.
-
Using the Resource Picker field in the Display Text component, build the verification layout.
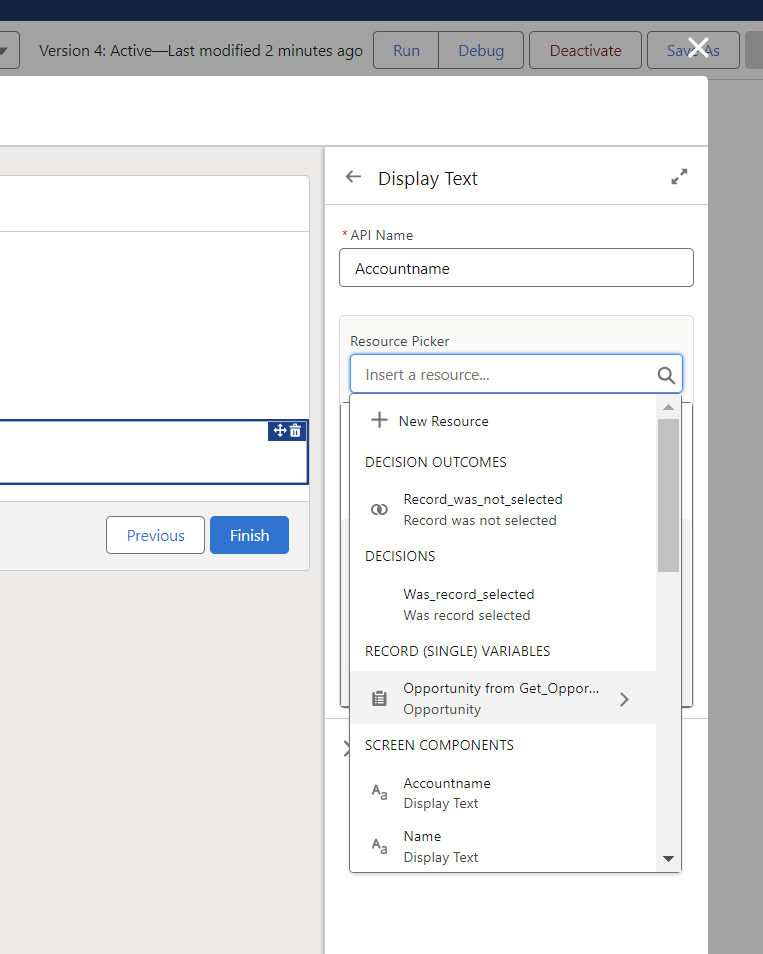
Fields may vary depending on object or business requirement.
-
To easily get data from previously selected Opportunity, find the Get Opportunity element in the Resource picker.
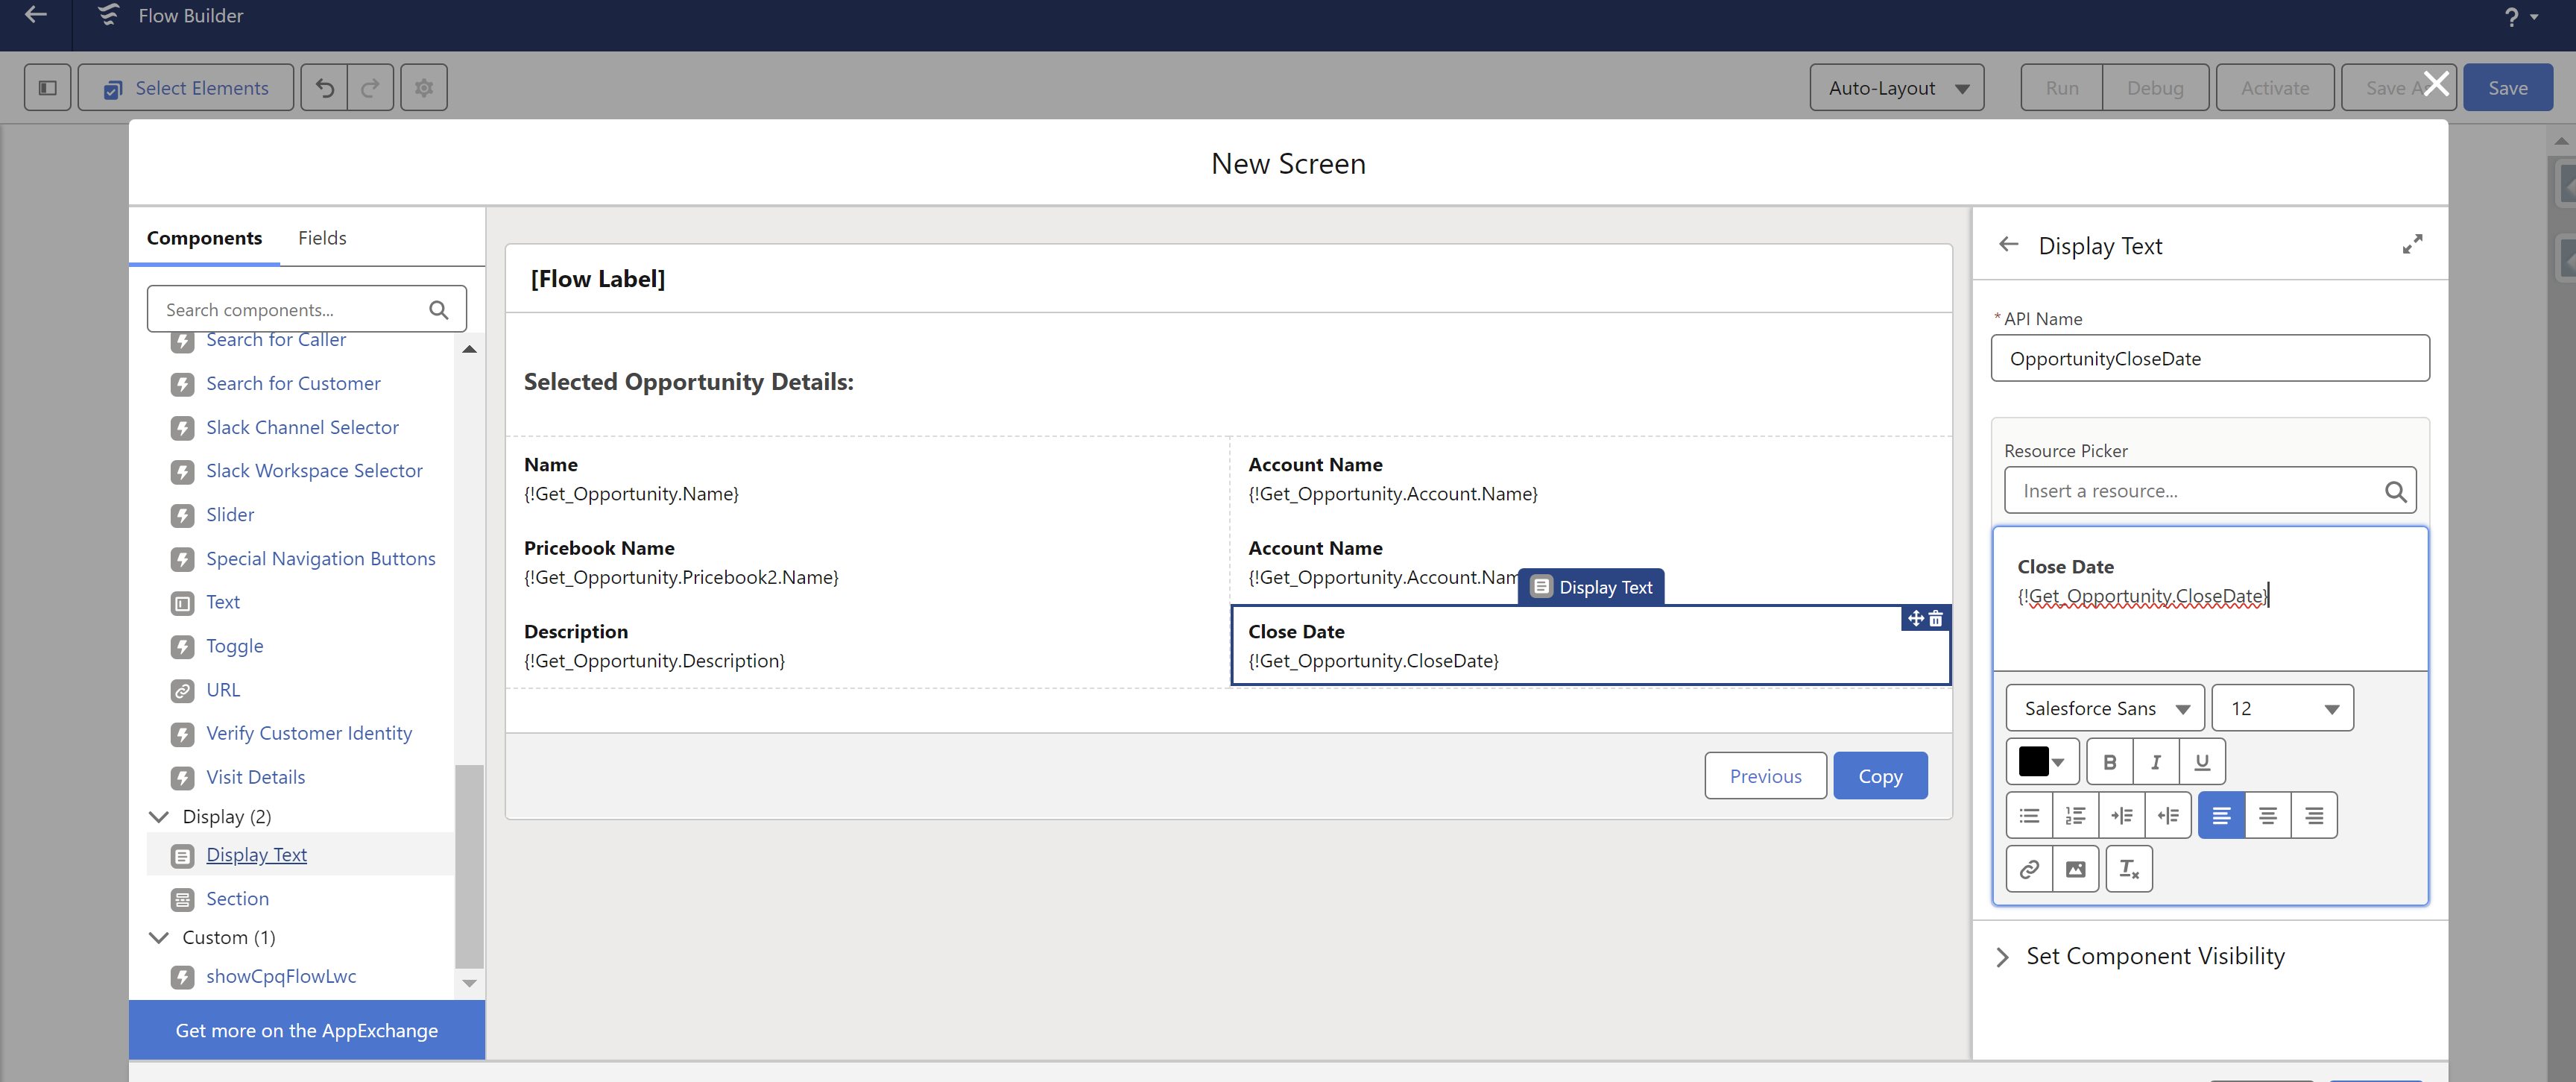
Creating the Source Opportunity Verification Screen ensures that users can confirm their selected source opportunity, enhancing the accuracy and reliability of the configuration copying process. With this verification screen created, you are now ready to proceed to the next section, where you will finalize and test the flow to ensure it meets your business requirements.
Copy Configuration Managed Subflow Utilisation
-
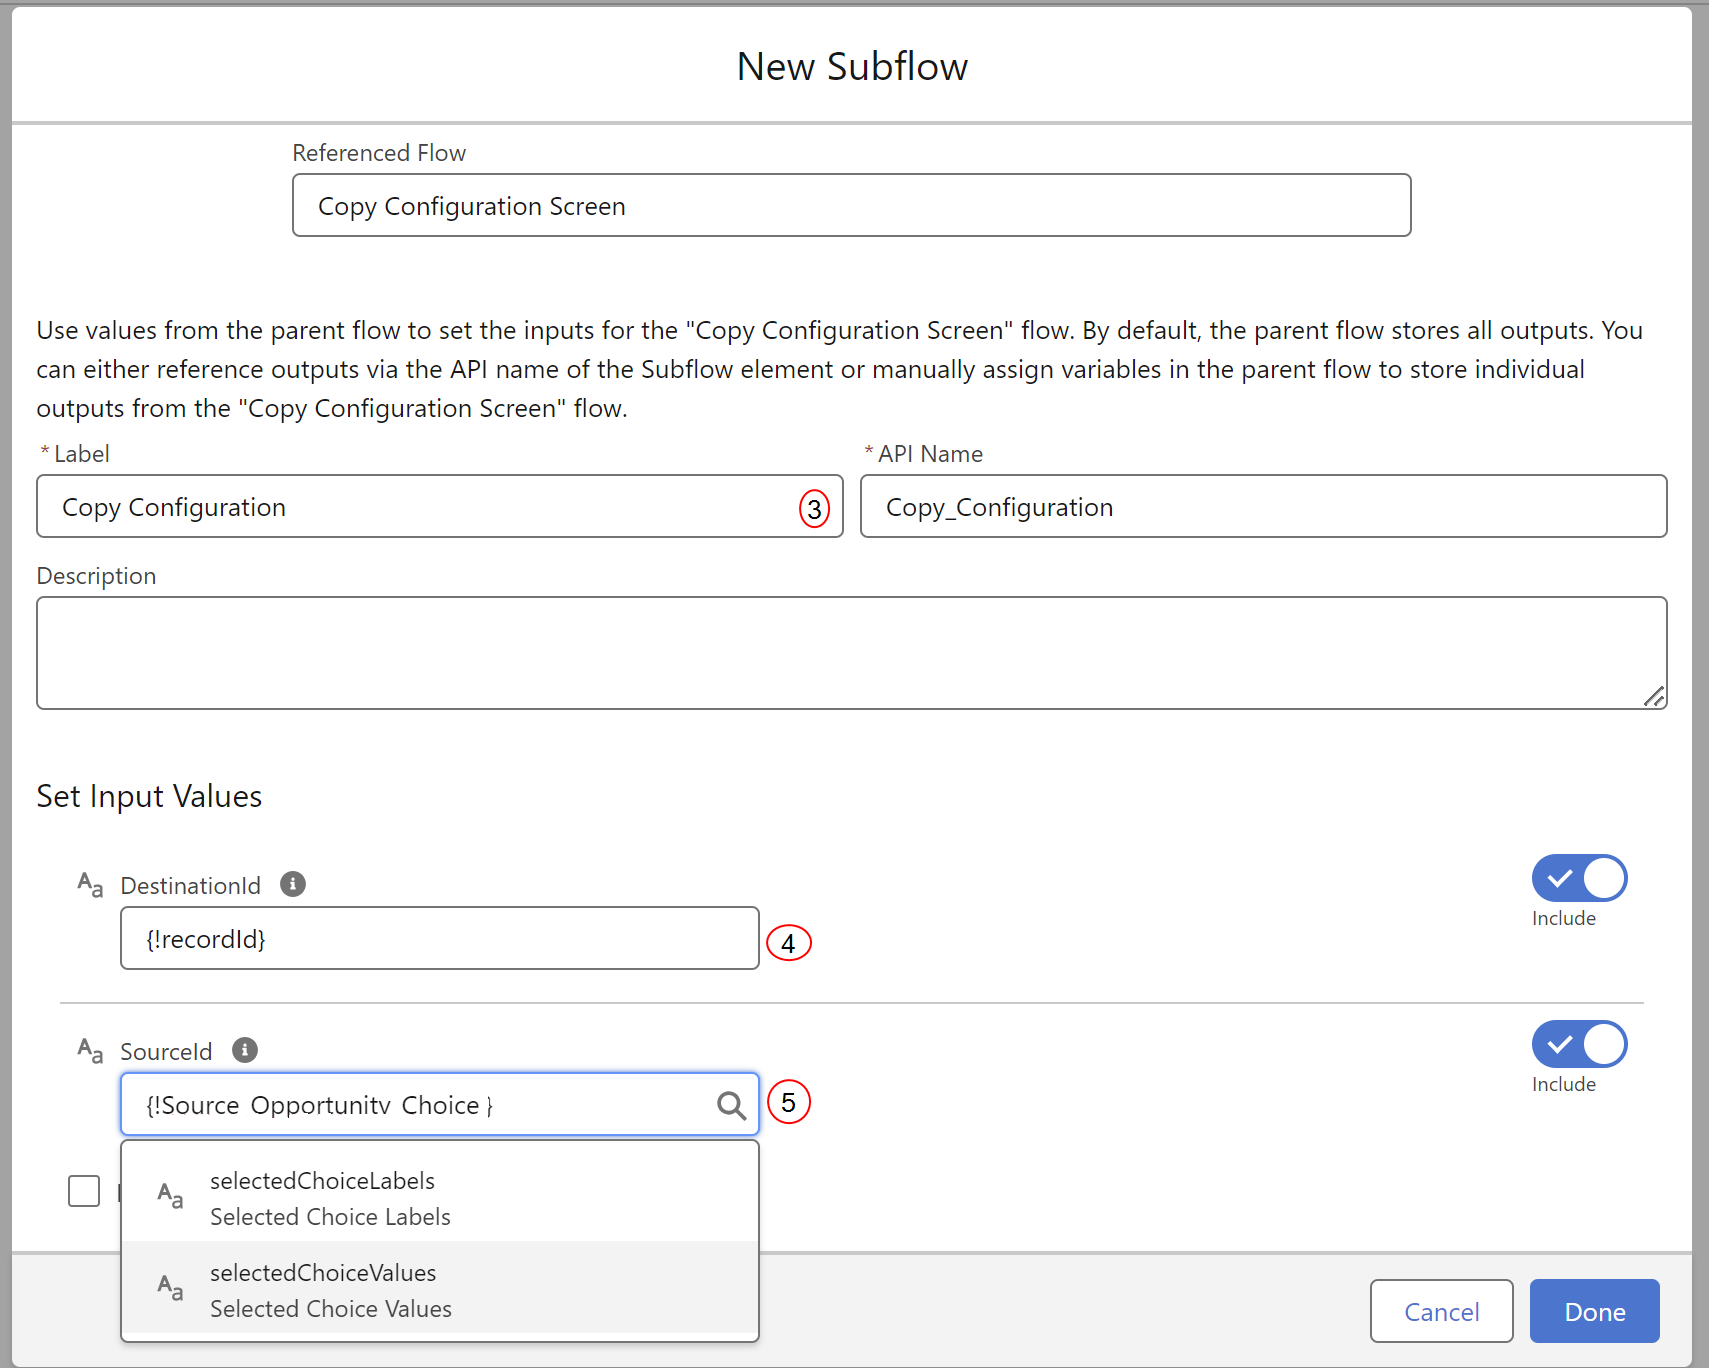
Add a new Subflow element.
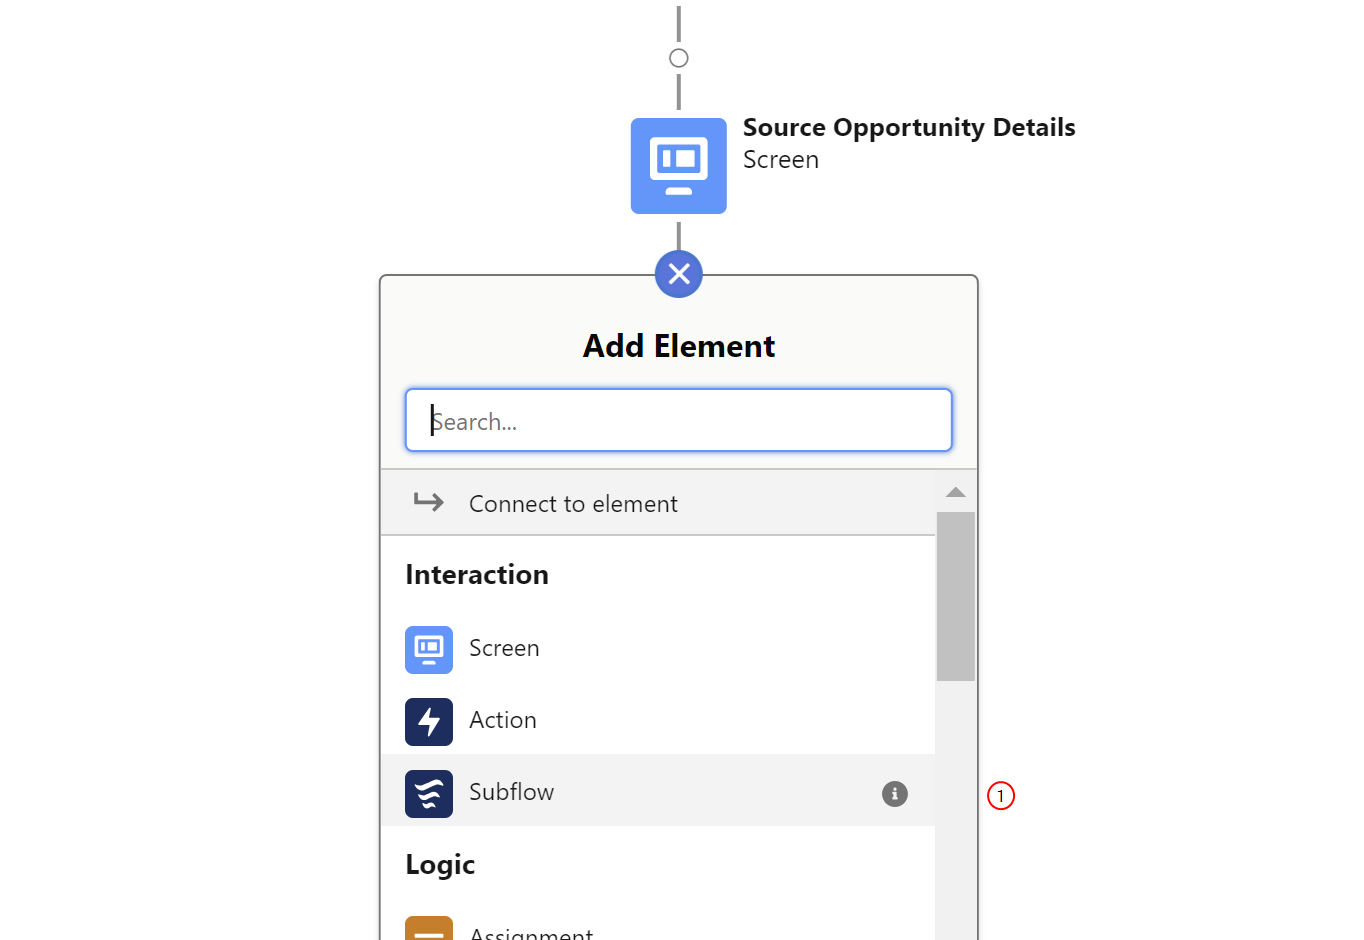
-
Select Copy Configuration Screen/Xplx__CopyConfigScreen.
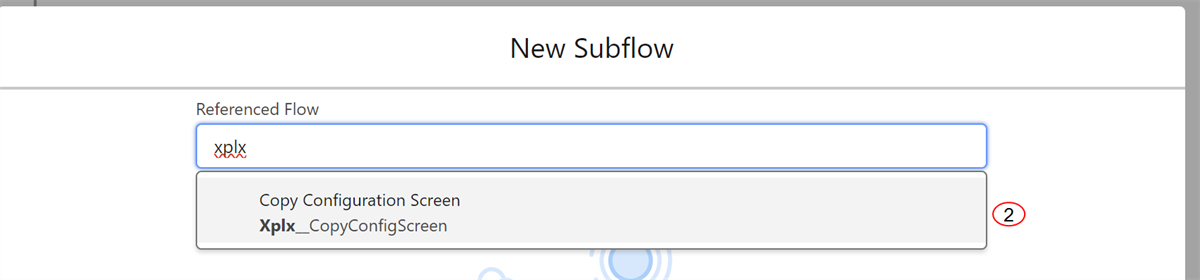
-
In the Name field, enter Copy Configuration.
-
Select {!recordId}.
-
Select {!Source_Opportunity_Choice.selectedChoiceValues}.
-
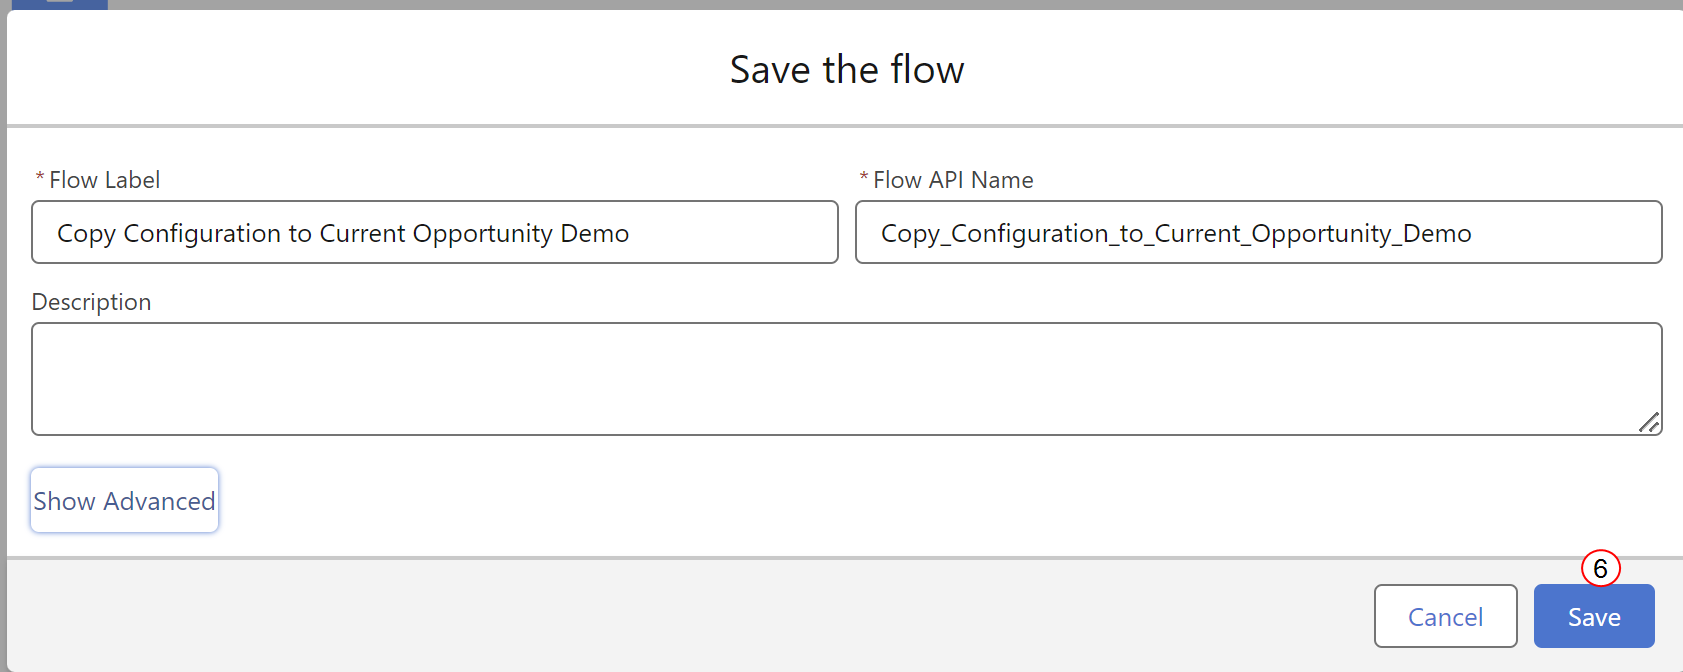
Select Save . The flow gets activated.
By integrating the Copy Configuration managed subflow, you automate the process of replicating configurations With the subflow integrated, you are now ready to proceed to the next section, where you will test and validate the entire configuration flow to ensure it meets your business requirements.
Quick ActionButton Creation
Users can create a quick action button to trigger the Copy Configuration flow. The quick action button allows users to easily access the Copy Configuration flow from the layout.
-
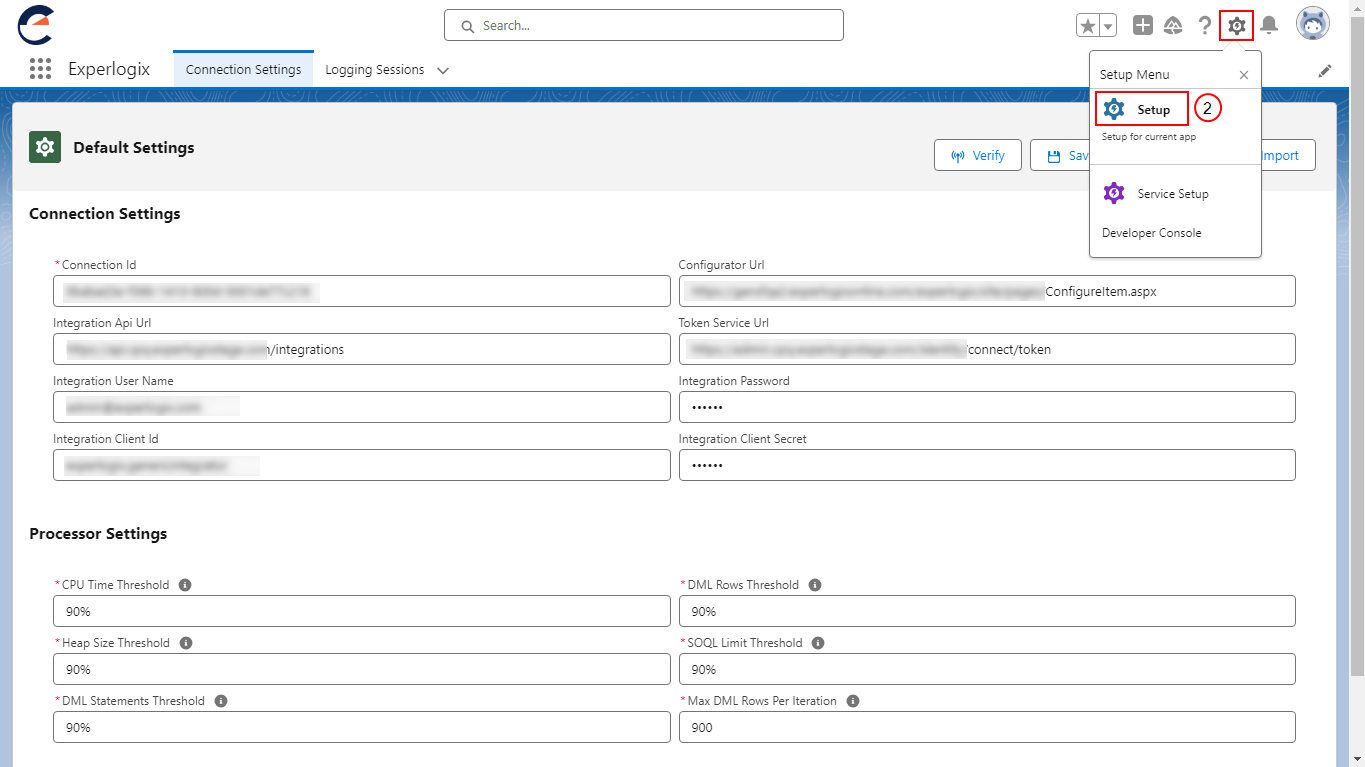
Select the Settings icon.
-
Select Setup.
-
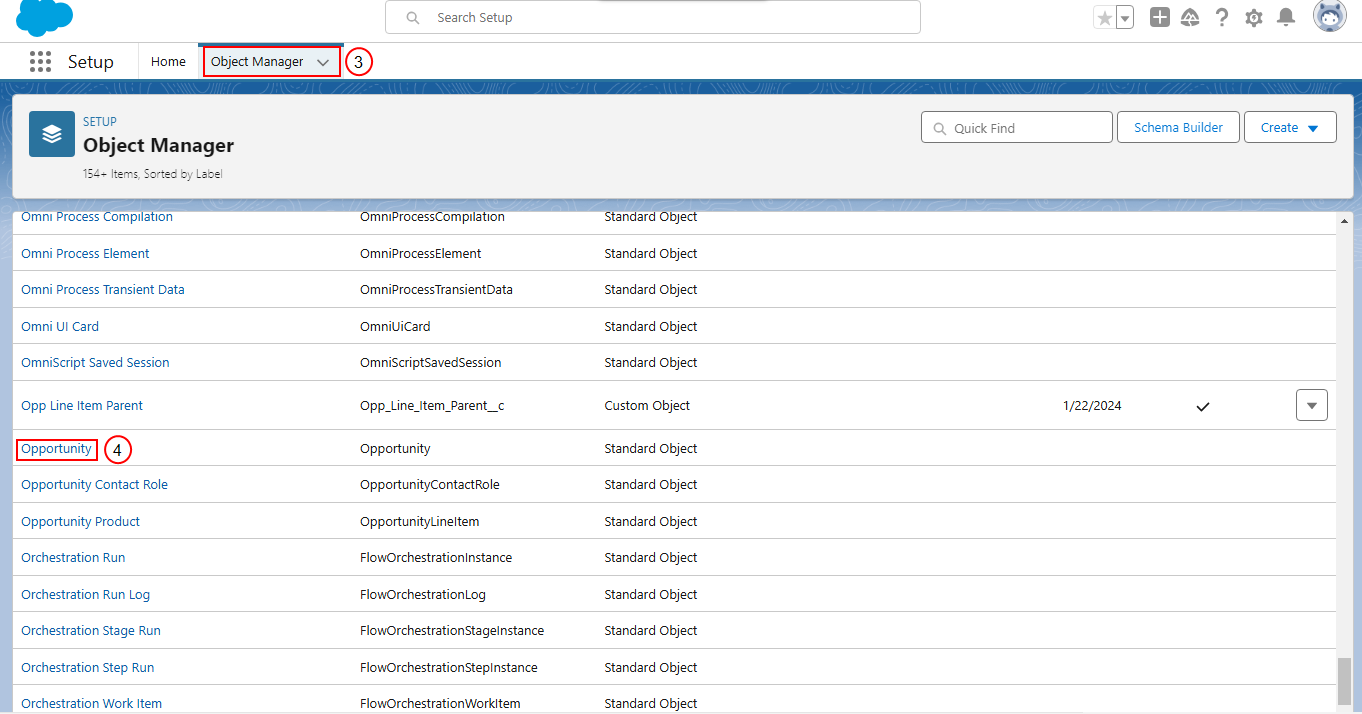
Select Object Manager.
-
Select Opportunity (or) Quote.
-
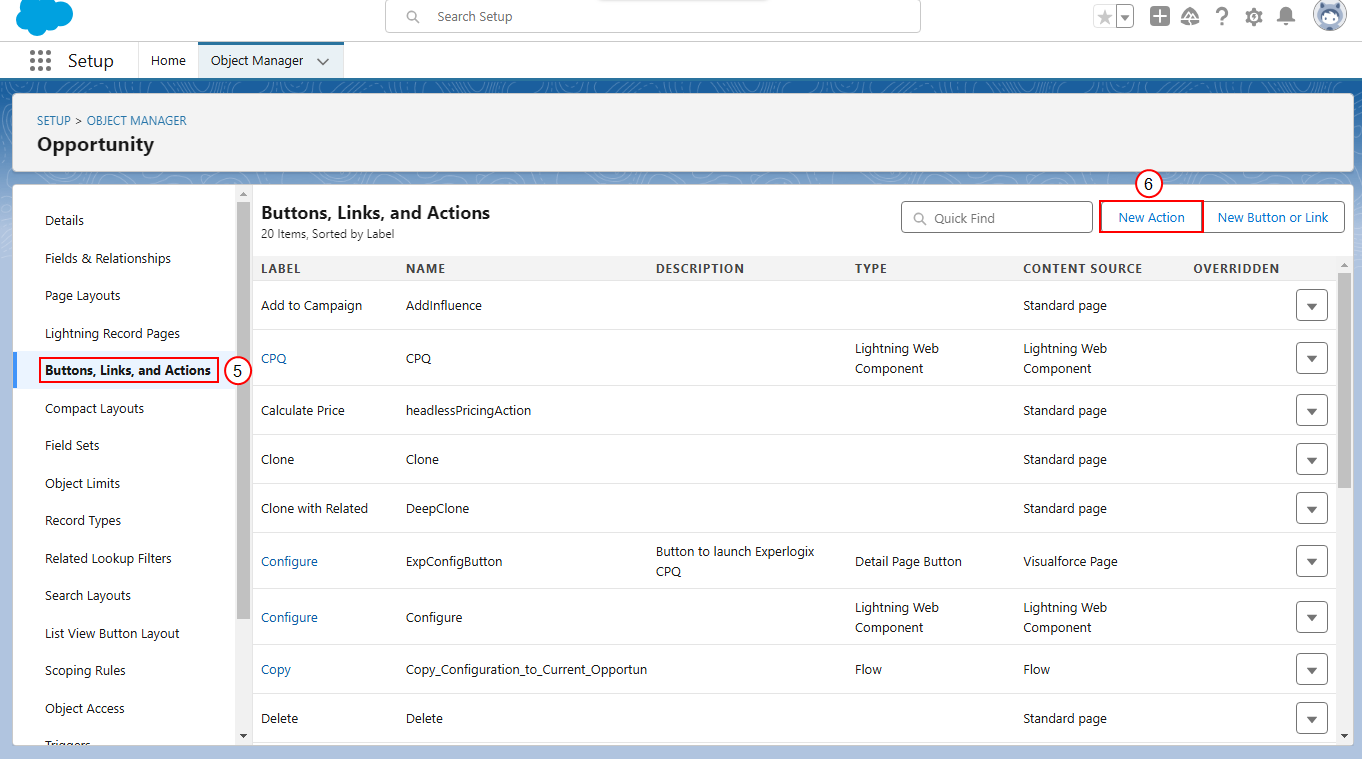
Select Buttons, Links, and Actions.
-
Select New Action .
Only actions work when referencing this flow; buttons or links have limited functionality. For details on difference between Quick Action, Action and Buttons, refer to the official Salesforce documentation.
-
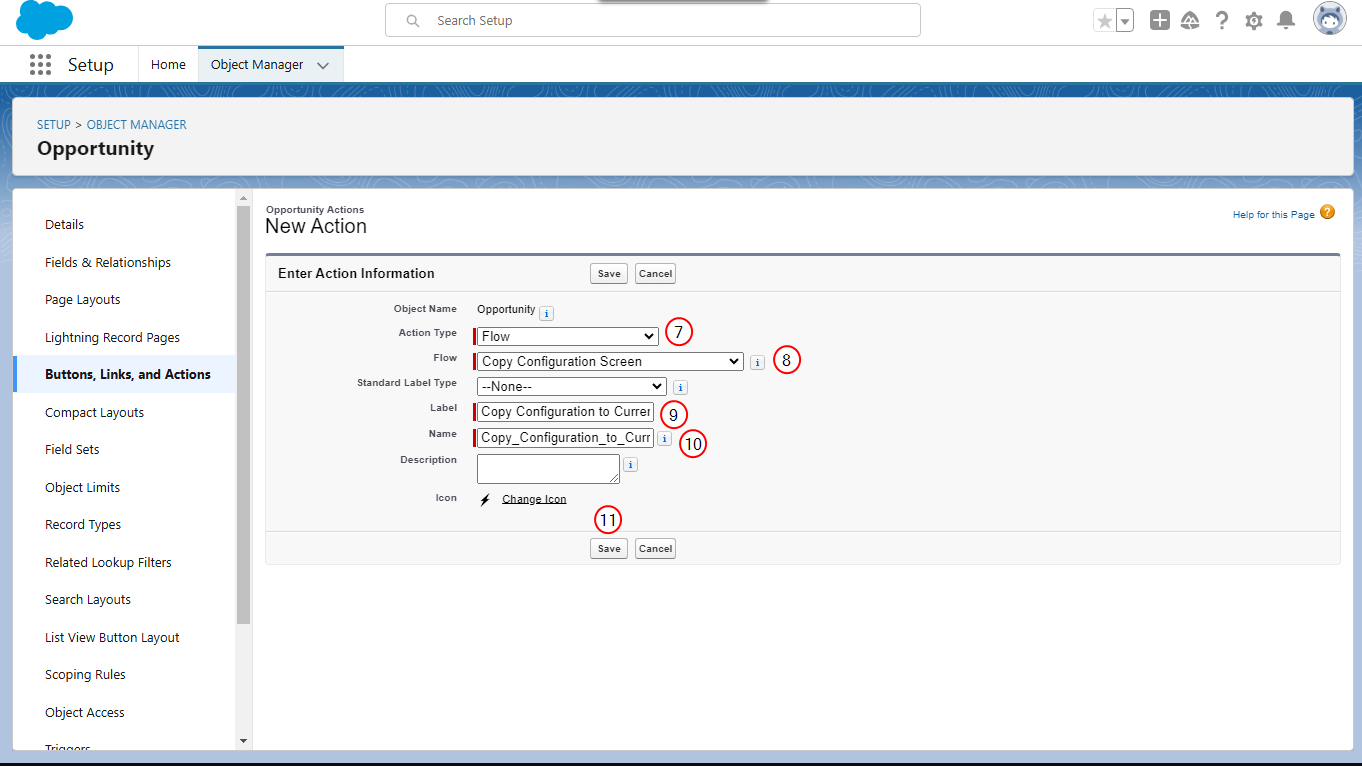
On the New Action page, select the Action Type Flow.
-
Select the flow that was created.
-
In the Label field, enter Copy Configuration to Current Opportunity.
-
In the Name field, enter a name for the API.
-
Select Save.
Creating quick actions (buttons) integrates essential tasks directly into your Salesforce environment, streamlining user workflows and enhancing efficiency. With the quick actions created, you are now ready to proceed to the next section, where you will configure the layout to provide button and flow directly at the point of use for your team.

Adding a Button to the Opportunity layout
Adding a button to the Opportunity layout integrates actions directly into your Salesforceenvironment. With the button added to the Opportunity layout, users can configure and utilize this tool to optimize their processes.
-
Select the Settings icon.
-
Select Setup.
-
Select Object Manager.
-
Select Opportunity or Quote.
-
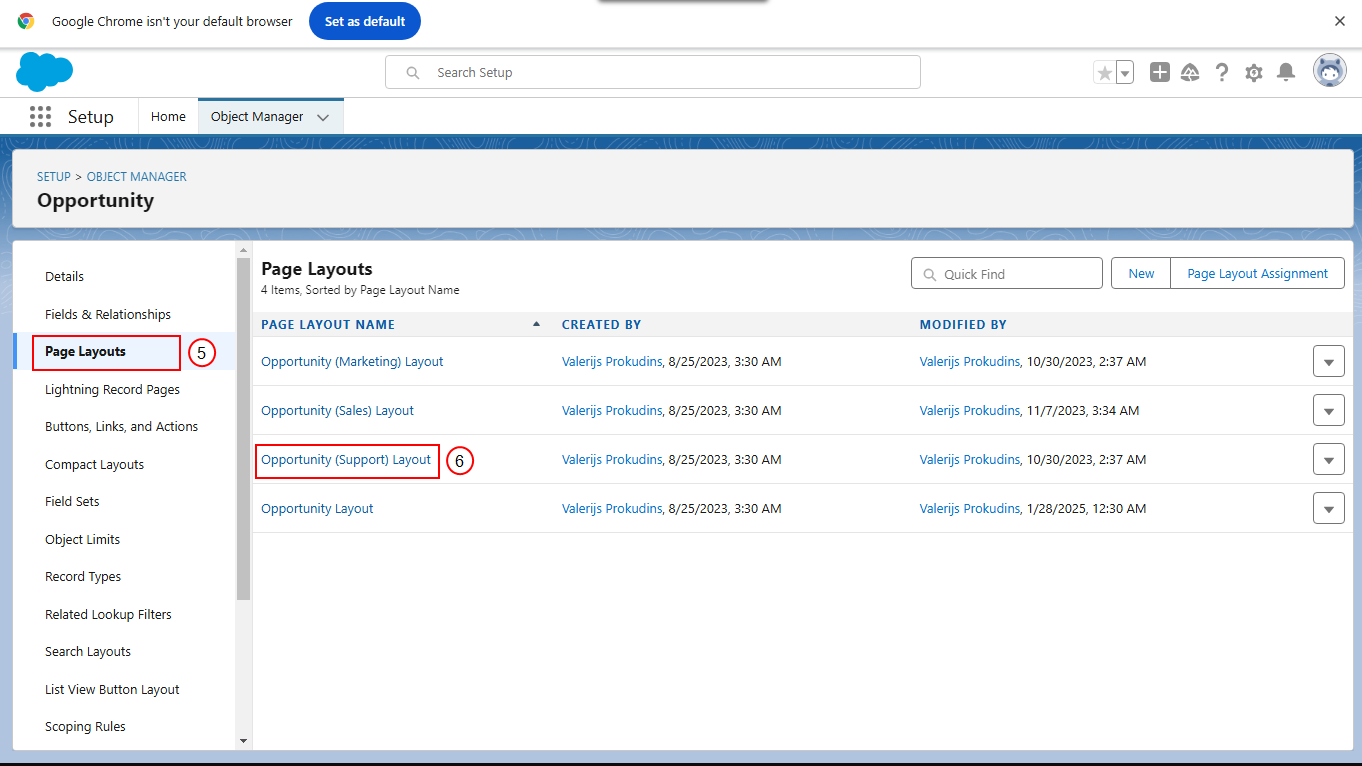
Select Page Layouts.
-
Select the necessary layout.
-
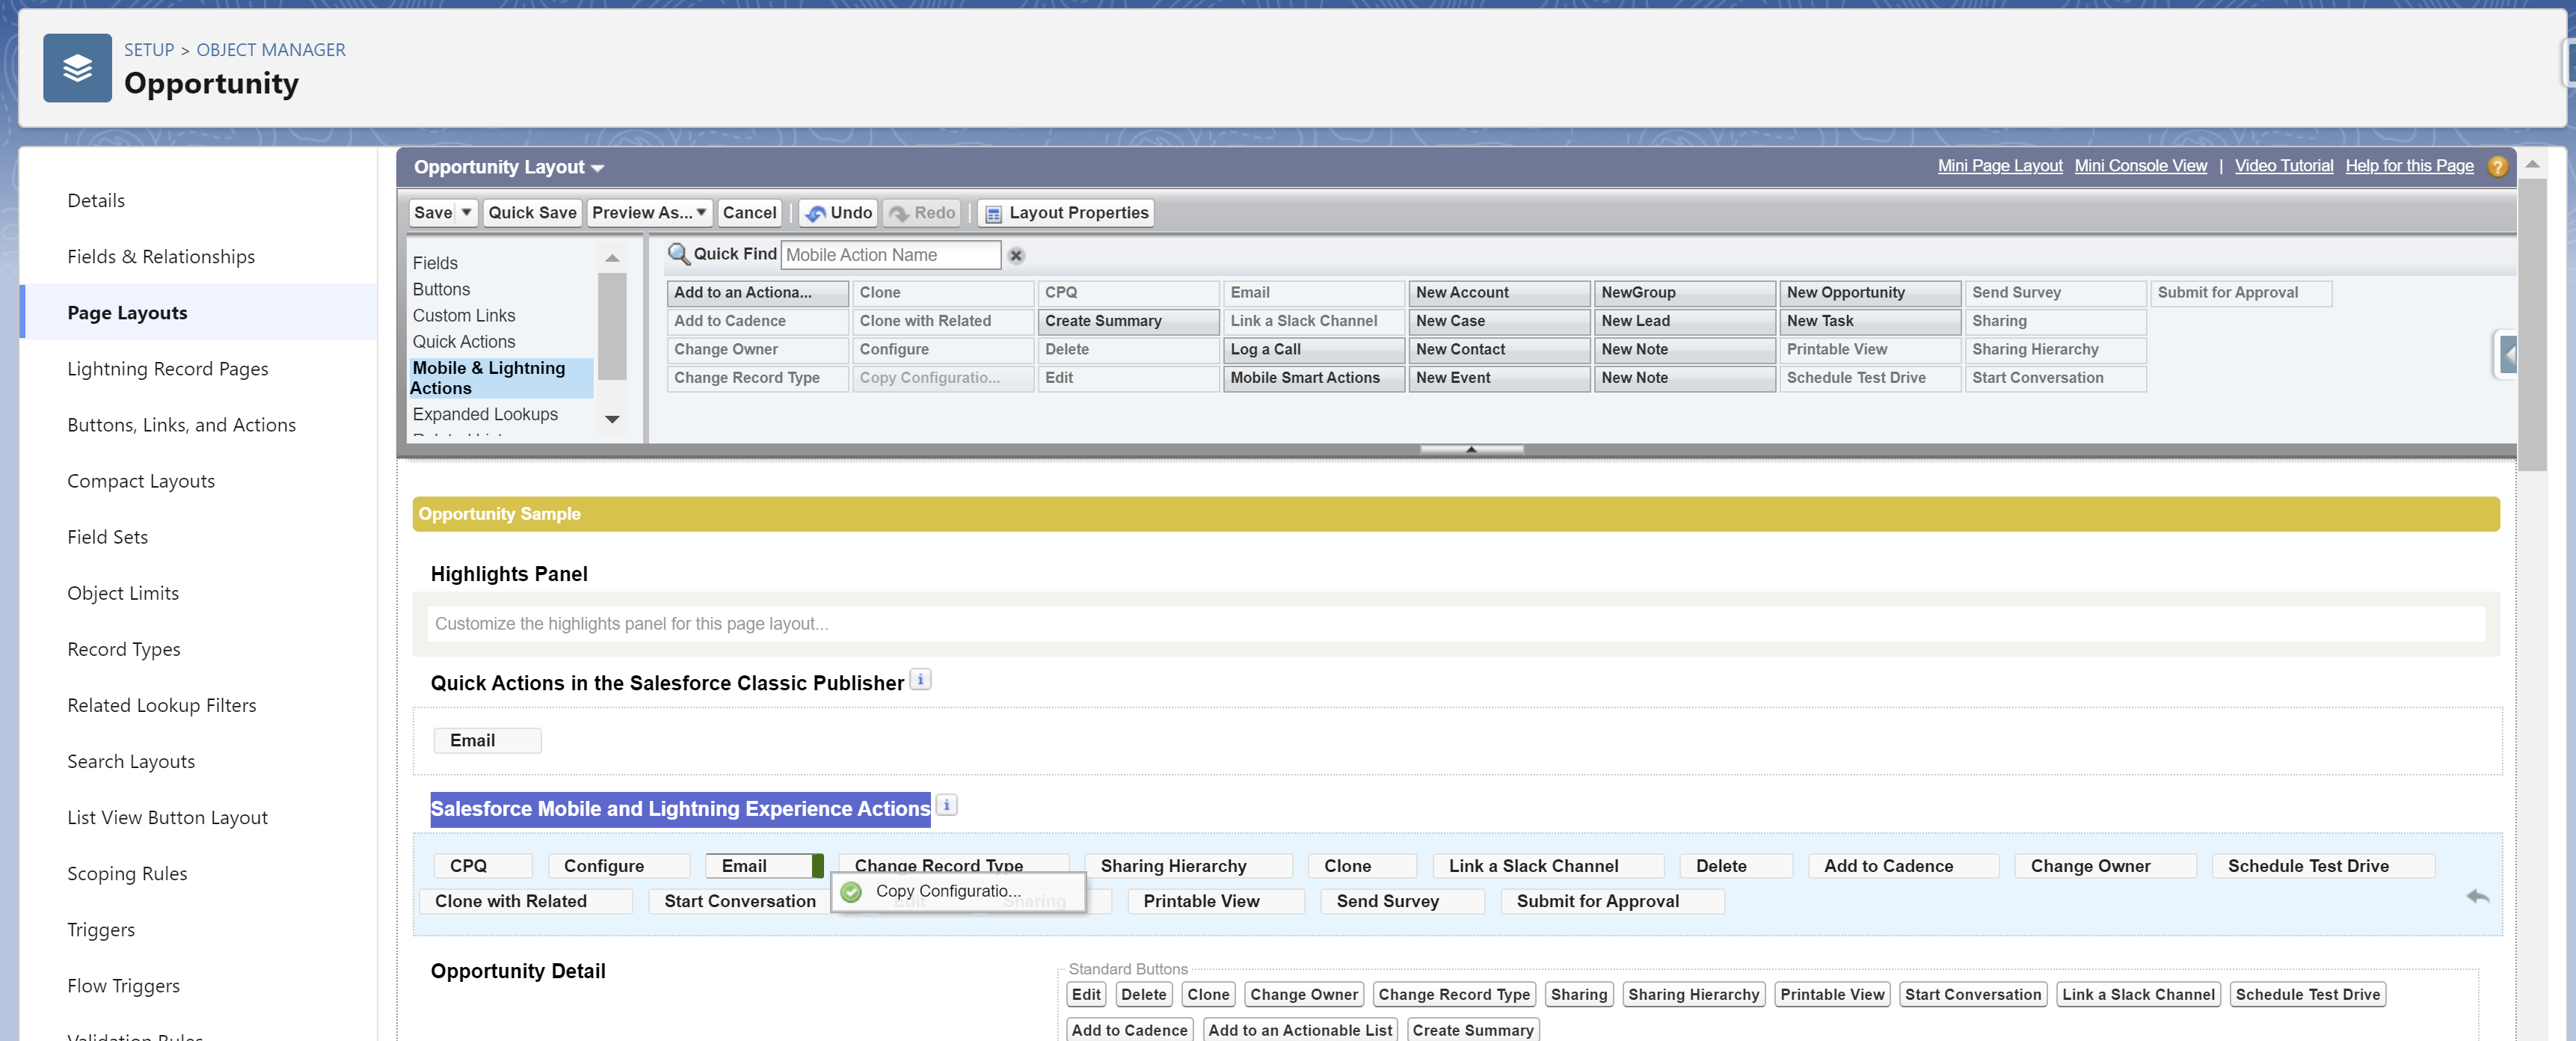
Drag and drop a newly created button from Mobile & Lightning Actions to Salesforce Mobile and Lightning Experience Actions layout section.
By following these instructions, you have successfully configured the ExperlogixSalesforceCopy Configuration Flow in your Salesforce environment.