
This guide explains the process of configuring Experlogix Cloud Connect within Microsoft Dynamics 365 F&O. The purpose of this guide is to provide step-by-step instructions for adding parameters, configuring integration APIs, and defining processing entities to streamline the BOM and Route generation process across companies.
As the configurations can involve intercompany operations, this setup ensures that businesses can manage production details, making the process flexible and scalable. The guide includes real-world examples, references to external documentation, and detailed instructions to support successful implementation.
You must complete this setup process for every Microsoft Dynamics 365 F&O company for which you wish to use the Configurator and the BOM Route Generator.
Adding the Configurator URL details to the Experlogix Parameters
-
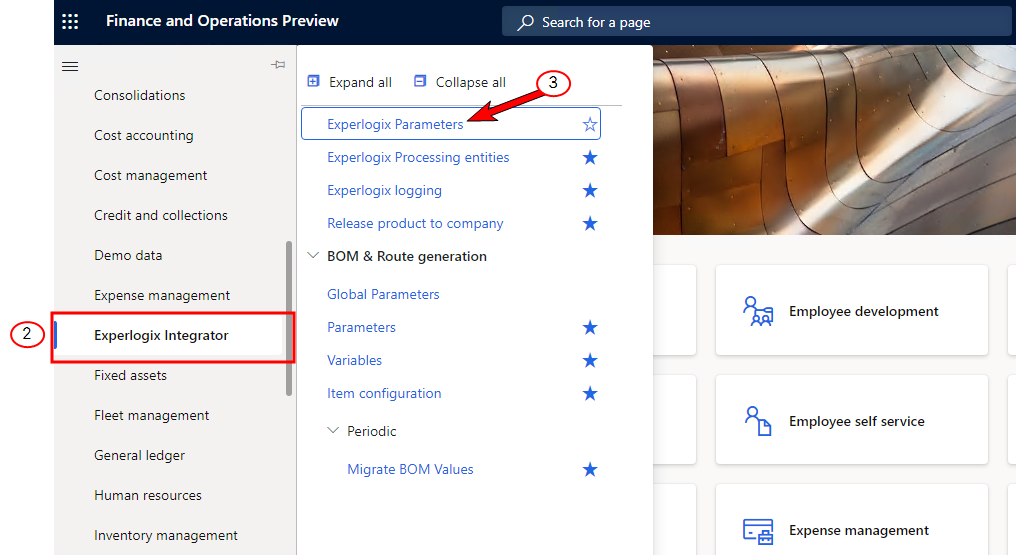
In Microsoft Dynamics 365 F&O, in the left pane, select Modules.
-
From the options displayed in the left pane, select Experlogix Integrator.
-
Select Experlogix Parameters. The Experlogix Parameters screen displays.
-
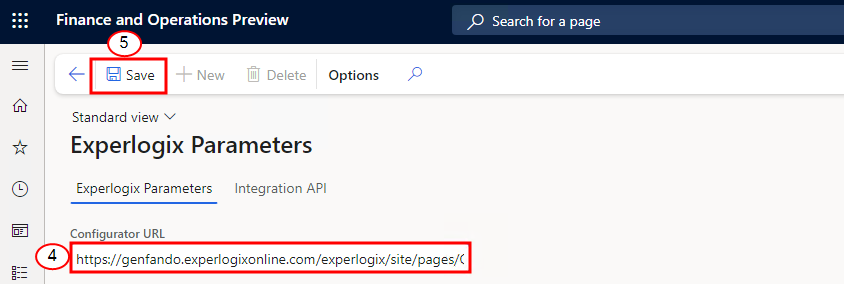
In the Configurator URL field, enter the Configurator URL.
-
Select the Save button at the upper-left corner of the screen.
Your Experlogix parameters are saved in Microsoft Dynamics 365 F&O.
Adding Integration API Details
-
Navigate to the Experlogix Parameters screen.
-
At the upper-left corner of the screen, select the Edit button.
-
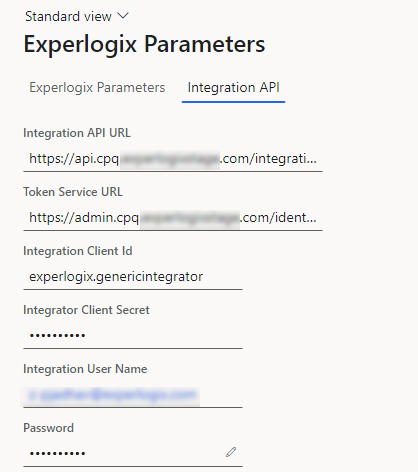
Select the Integration API tab.
-
In the Integration API URL field, enter the Unified Integration API URL.
-
For the remaining Integration API tab fields, fill in the details as described below:
|
Microsoft Dynamics 365 F&O Setting |
Web Configurator Setting |
|---|---|
|
Token Service URL |
Token Endpoint URL |
|
Integration Client Id |
OAuth Client ID |
|
Integration Client Secret |
OAuth Client Secret |
|
Integration User Name |
Admin Center User Name |
|
Password |
Admin Center Password |
Experlogix supports two authentication methods for Salesforce integration:
-
Password Type
-
Requires Integration User Name and Integration Password.
-
-
Client Credentials Type
-
Leave Integration User Name and Integration Password empty.
-
Use an organization-specific Integration Client Id from Experlogix settings.
-
-
At the upper-left corner of the screen, select the Save button.
The Integration API details are added in Microsoft Dynamics 365 F&O. Next we'll define the Processing Entities to use in Microsoft Dynamics 365 F&O, continue to Adding Processing Entities.
Adding Processing Entities
Adding the processing entities defines which entities within Microsoft Dynamics 365 F&O that the Experlogix Configurator and BOM Route Generator can interact with and process work on.
Currently Supported Entities in Cloud Connect
The following entities are available for configuration in Cloud Connect CPQ:
|
Integration |
Configure |
Outbound |
|---|---|---|
|
Microsoft Dynamics 365 CE |
|
Any table or entity |
|
Microsoft Dynamics 365 F&O |
|
Any table or entity |
|
Microsoft Dynamics 365 BC |
|
Any table or entity |
|
Salesforce |
|
Any table or entity |
-
In Microsoft Dynamics 365 F&O, in the left pane, select Modules.
-
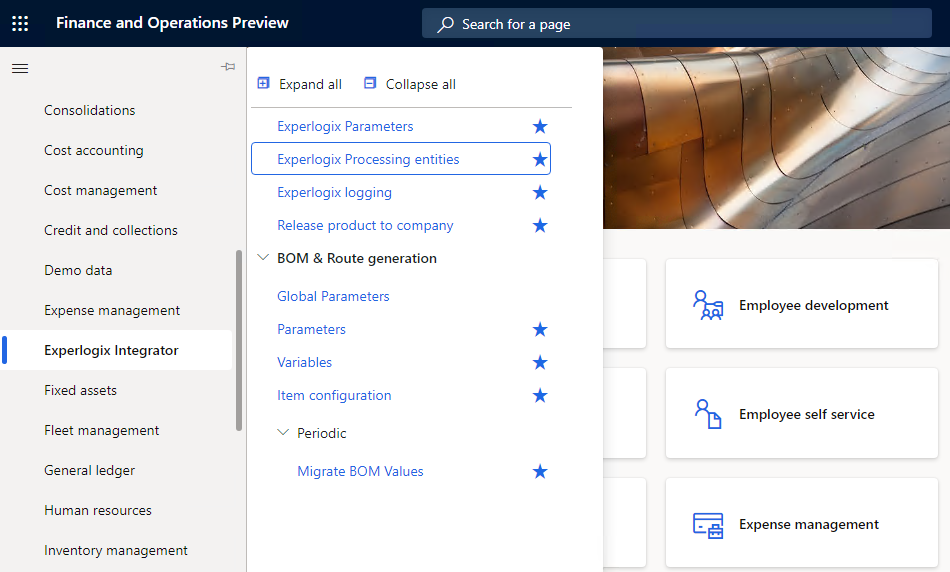
From the options displayed in the left pane, select Experlogix Integrator. The Experlogix Integrator options display.
-
Select Experlogix Processing Entities.
-
On the toolbar at the top, select Actions.
-
Select the Initialize action.
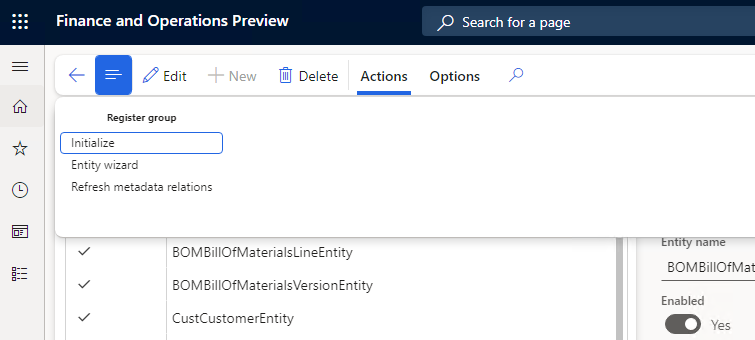
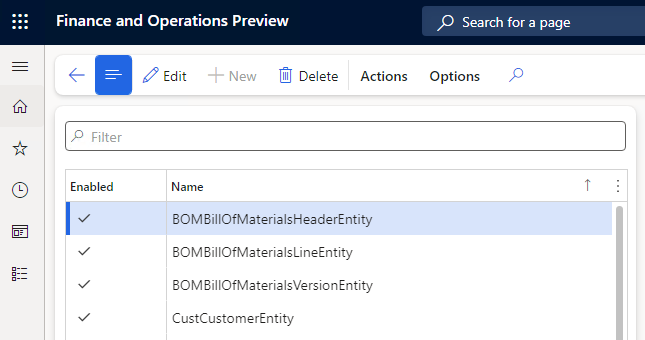
You've added the processing entities for Cloud Connect Microsoft Dynamics 365 F&O. In the list, the default set of processing entities displays.
Connection Type
After adding processing entities, it's important to understand how the Connection Type parameter for each processing entity affects how data is stored and shared across Companies. The connection type defines how the configuration data and process state are stored for a processing entity.
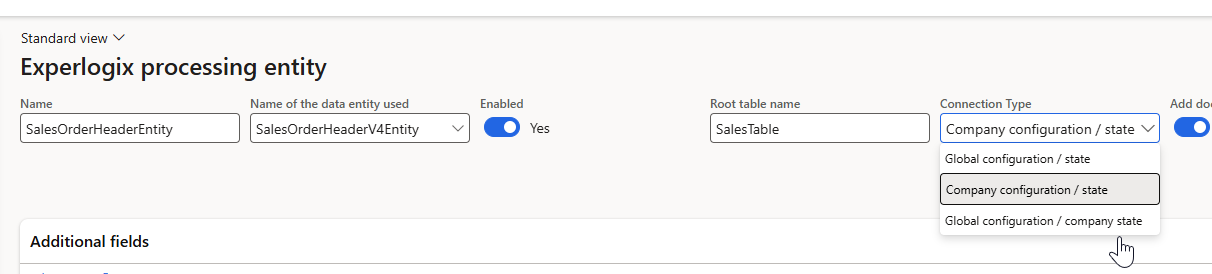
See the table below for Connection Type options:
|
Connection Type |
Configuration Scope |
Process State Scope |
Description |
|---|---|---|---|
|
Global configuration/ state |
Global |
Global |
Both the configuration and process state are global. A good example of a processing entity is DirPartyEntity, as Party is global across all companies. |
|
Company configuration/state |
Company |
Company |
Both the configuration and process state are company-specific. A good example of an a processing entity are SalesQuotationHeaderEntity, SalesOrderHeaderEntity and ProjectEntity as all three are company-specific and it is unlikely that the configuration should be shared amongst companies. |
|
Global configuration/company state |
Global |
Company |
The configuration is global, the process state is saved per company. A likely example is EcoResReleasedProductEntity. In this case, the configuration is shared amongst the company but the process-state (including the released product, BOM and route) is saved per company. |
In the majority of use cases for the Experlogix CPQ Configurator, entities should be set to Company configuration/state.
User Roles in Microsoft Dynamics 365 F&O
The following table provides the descriptions for user roles in Microsoft Dynamics 365 F&O.
Form-specific roles are only available with Cloud Connect for Microsoft Dynamics 365 F&O - CPQ - 25.04.07.1 or later.
|
User Role |
Description |
|---|---|
|
Experlogix administrator |
Provides administrator rights to change settings. |
|
Experlogix CPQ sales order header |
Enables visibility of the Configure button on the following page: Sales order detail > CPQ tab. |
|
Experlogix CPQ sales order line - distinct product |
Enables visibility of the Configure button on the following page: Sales order line > Configure distinct product. |
|
Experlogix CPQ sales order line - product variant |
Enables visibility of the Configure button on the following page: Sales order line > Configure product variant. |
|
Experlogix CPQ sales quotation |
Enables visibility of the Configure button on the following page: Sales quotation > CPQ tab. |
|
Experlogix CPQ project quotation |
Enables visibility of the Configure button on the following page: Project quotation > CPQ tab. |
|
Experlogix CPQ project |
Enables visibility of the Configure button on the following page: Project > CPQ tab. |
The Experlogix configurator role is no longer part of Cloud Connect for Microsoft Dynamics 365 F&O. Use the form‑specific roles instead.
Set up Number Sequences
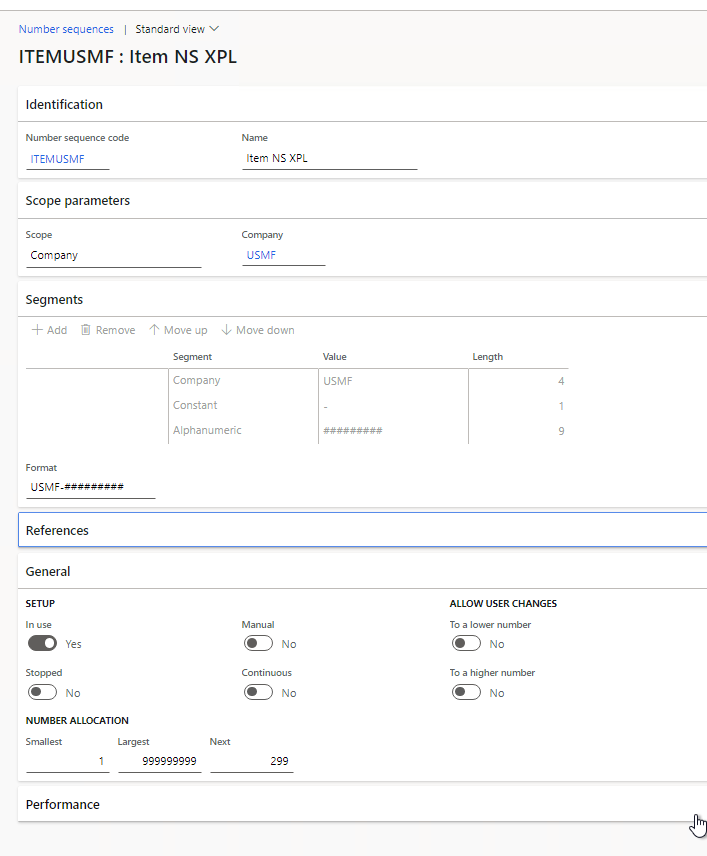
Setting up a number sequence in Microsoft Dynamics 365 F&O is critical for ensuring consistency and uniqueness across various transactional and operational processes, including sales orders, BOM management, and route generation. This section outlines the configuration of a number sequence and demonstrates how it integrates with the Process Designer and Cloud Connect.
In this guide, you'll learn how to:
-
Access and configure the number sequence in Microsoft Dynamics 365 F&O
-
Set the scope parameters for number sequences in Microsoft Dynamics 365 F&O
-
Define the different sequences of your number sequences in Microsoft Dynamics 365 F&O to ensure both uniqueness and architectural uniformity
This setup guarantees that each generated number is unique and fits within the structure required by your Microsoft Dynamics 365 F&O environment. For guidance on navigating to number sequences in Microsoft Dynamics 365 F&O, please refer to, set up number sequences on an individual basis from Microsoft. Use the parameter table below as a guide, as the values will differ depending on your unique setup.
Microsoft Dynamics 365 F&O Number Sequences Parameters Example
|
Field |
Value |
||||||||||||
|---|---|---|---|---|---|---|---|---|---|---|---|---|---|
|
Number Sequence Code |
ITEMUSMF |
||||||||||||
|
Name |
Item NS XPL |
||||||||||||
|
Scope |
Company |
||||||||||||
|
Company |
USMF |
||||||||||||
|
Segments |
|
||||||||||||
|
Format |
USMF-######### |
||||||||||||
|
In-use |
Yes |
||||||||||||
|
Stopped |
No |
||||||||||||
|
Manual |
No |
||||||||||||
|
Continuous |
No |
||||||||||||
|
To a lower number |
No |
||||||||||||
|
To a higher number |
No |
||||||||||||
|
Number Allocation |
|
BOM Route Generator
The traditional Experlogix database setup includes Series, databases, Categories, Options, and Properties. While this setup allows complete control over the Configurator and the information created in Dynamics 365, it requires changes to be applied and moved across development stages(Test, Stage, Production) which can be cumbersome for larger organizations. The new BOM Route Generator for Cloud Connect Microsoft Dynamics 365 F&O addresses this by:
-
Defining variables within Microsoft Dynamics 365 F&O.
-
Using the Experlogix database and Cloud Connect to assign variables and values to configurations.
Linking these variables to active BOM/Route lines in Microsoft Dynamics 365 F&O, and creates an ‘over-complete’ or ‘super’ BOM/Route that filters options based on the set variables and values. These changes streamline the process by reducing the need for frequent Configurator publications, facilitating better collaboration.
BOM & Route Generation parameters
To ensure the proper functionality of the Experlogix BOM and Route Generator, it is crucial to complete the parameter setup for each company where the generator will be used. Since BOMs and Routes are stored by company in Microsoft Dynamics 365 F&O, you must define a BOM/Route number sequence in the Parameters form for each entity.
Follow these steps to update the parameters for your organization and save the configuration for the BOM/Route Generator.
You must complete this setup process for every Microsoft Dynamics 365 F&O company for which you wish to use the Configurator and the BOM Route Generator.
-
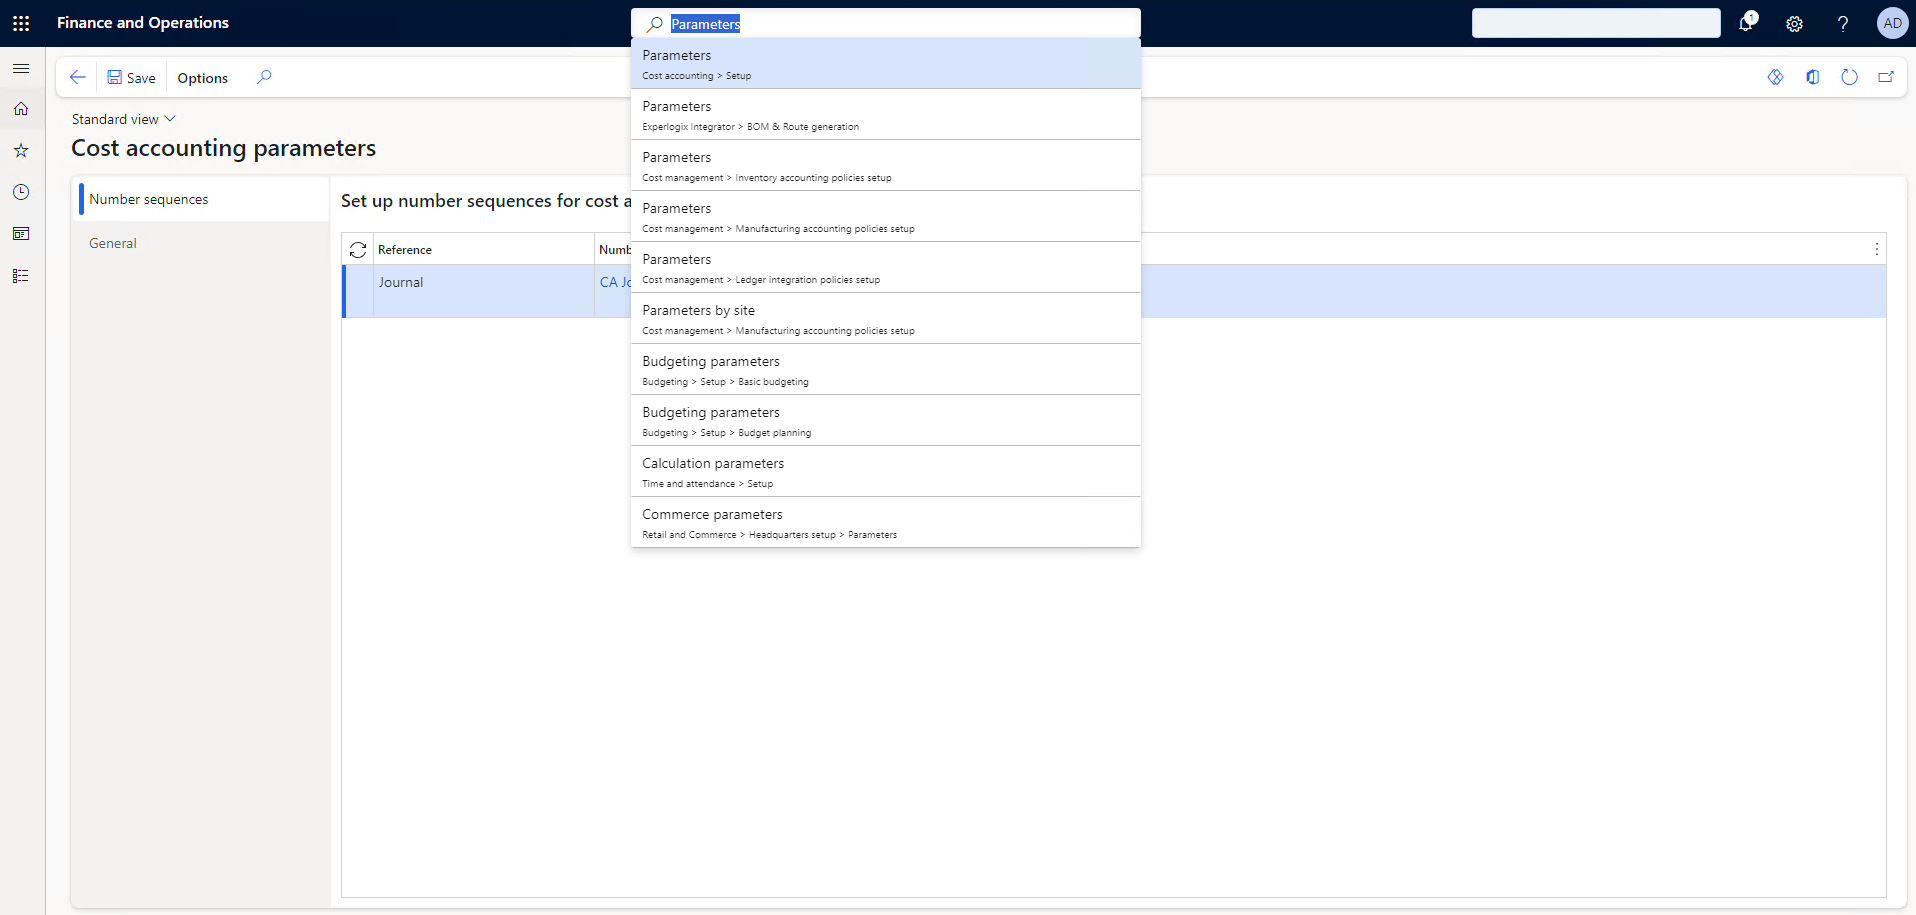
In Microsoft Dynamics 365 F&O, in the search box, search for Parameters and select > Experlogix Integrator > Parameters.
-
Update the Parameters for your organization.
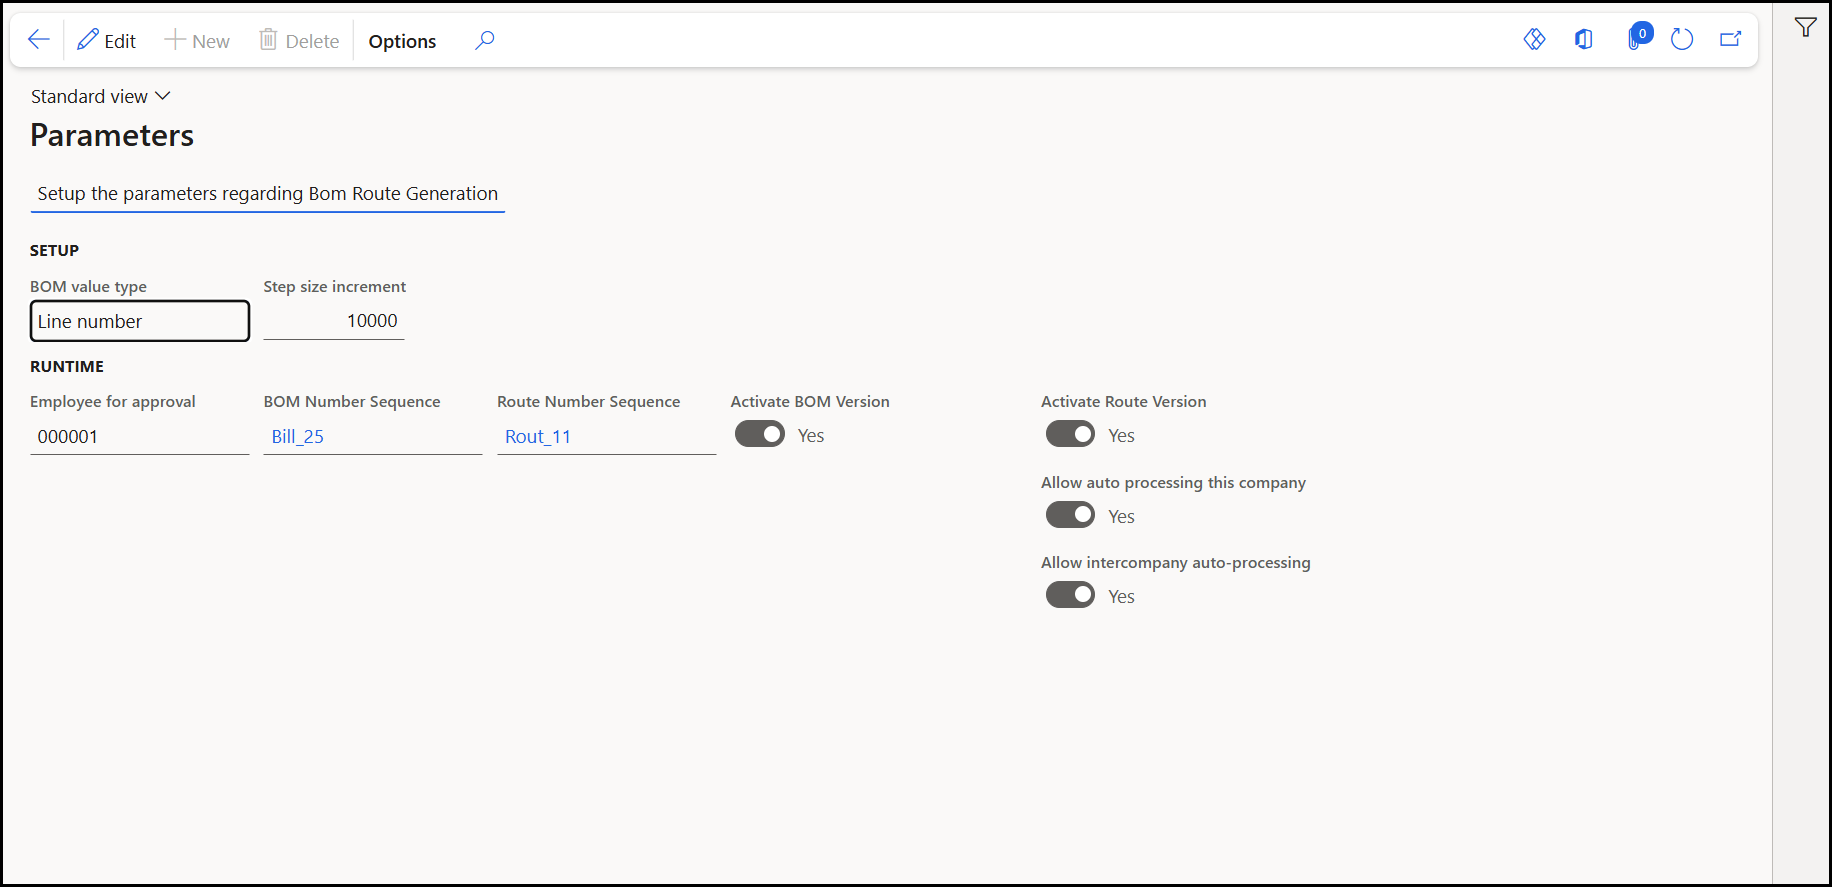
|
Sections |
Parameter |
Definition |
|---|---|---|
|
SETUP |
BOM value type |
Specifies the type by which the link between the BOM line and the BOM values will be defined. Options include:
BOM value type is the key which links the BOM lines from your configuration to the Microsoft Dynamics 365 F&O BRG BOM Values. When changing BOM value types, you must migrate all your existing BOMs to the new type. Search for and select the Migrate BOM Values action (Experlogix Integrator > BOM & Route Generation > Periodic). If the type is unchanged and no BOM migration is needed, you will receive the following notification in Microsoft Dynamics 365 F&O's Action Center: "Bom value has not change: migration is not needed." Otherwise, the Action Center notification informs you when the migration has been completed successfully. |
|
Step size increment |
Specifies the value by which the new lines on the BOM and/or Route value form will increment. |
|
|
RUNTIME |
Employee for approval |
Specifies the user that serves as an approver for BOMs and routes. |
|
BOM Number Sequence |
Specifies the number sequence used when the BOM Route Generator creates new BOMs. |
|
|
Route Number Sequence |
Specifies the number sequence used when the BOM Route Generator creates new routes. |
|
|
Activate BOM Version |
Allows the administrators to control whether the BOM Route Generator automatically activates newly created BOM Versions during generation. The default value is No. |
|
|
Activate Route Version |
Allows the administrators to control whether the BOM Route Generator automatically activates newly created Route Versions during generation. The default value is No. |
|
|
Allow auto processing this company |
If Yes, on a successful save and close of the Configurator, the BOM Route Generator triggers automatically. |
|
|
Allow intercompany auto-processing |
If Yes, triggers the BOM Route Generator when an intercompany sales order is created in this company. For intercompany auto-processing to work, the Allow automated processing parameter must be set to Yes in the Global BOM Route Generator Parameters. |
For a detailed list and explanation of all Experlogix parameters present in your Microsoft Dynamics 365 F&O environment, see Experlogix Parameters.
3.Select the Save button.
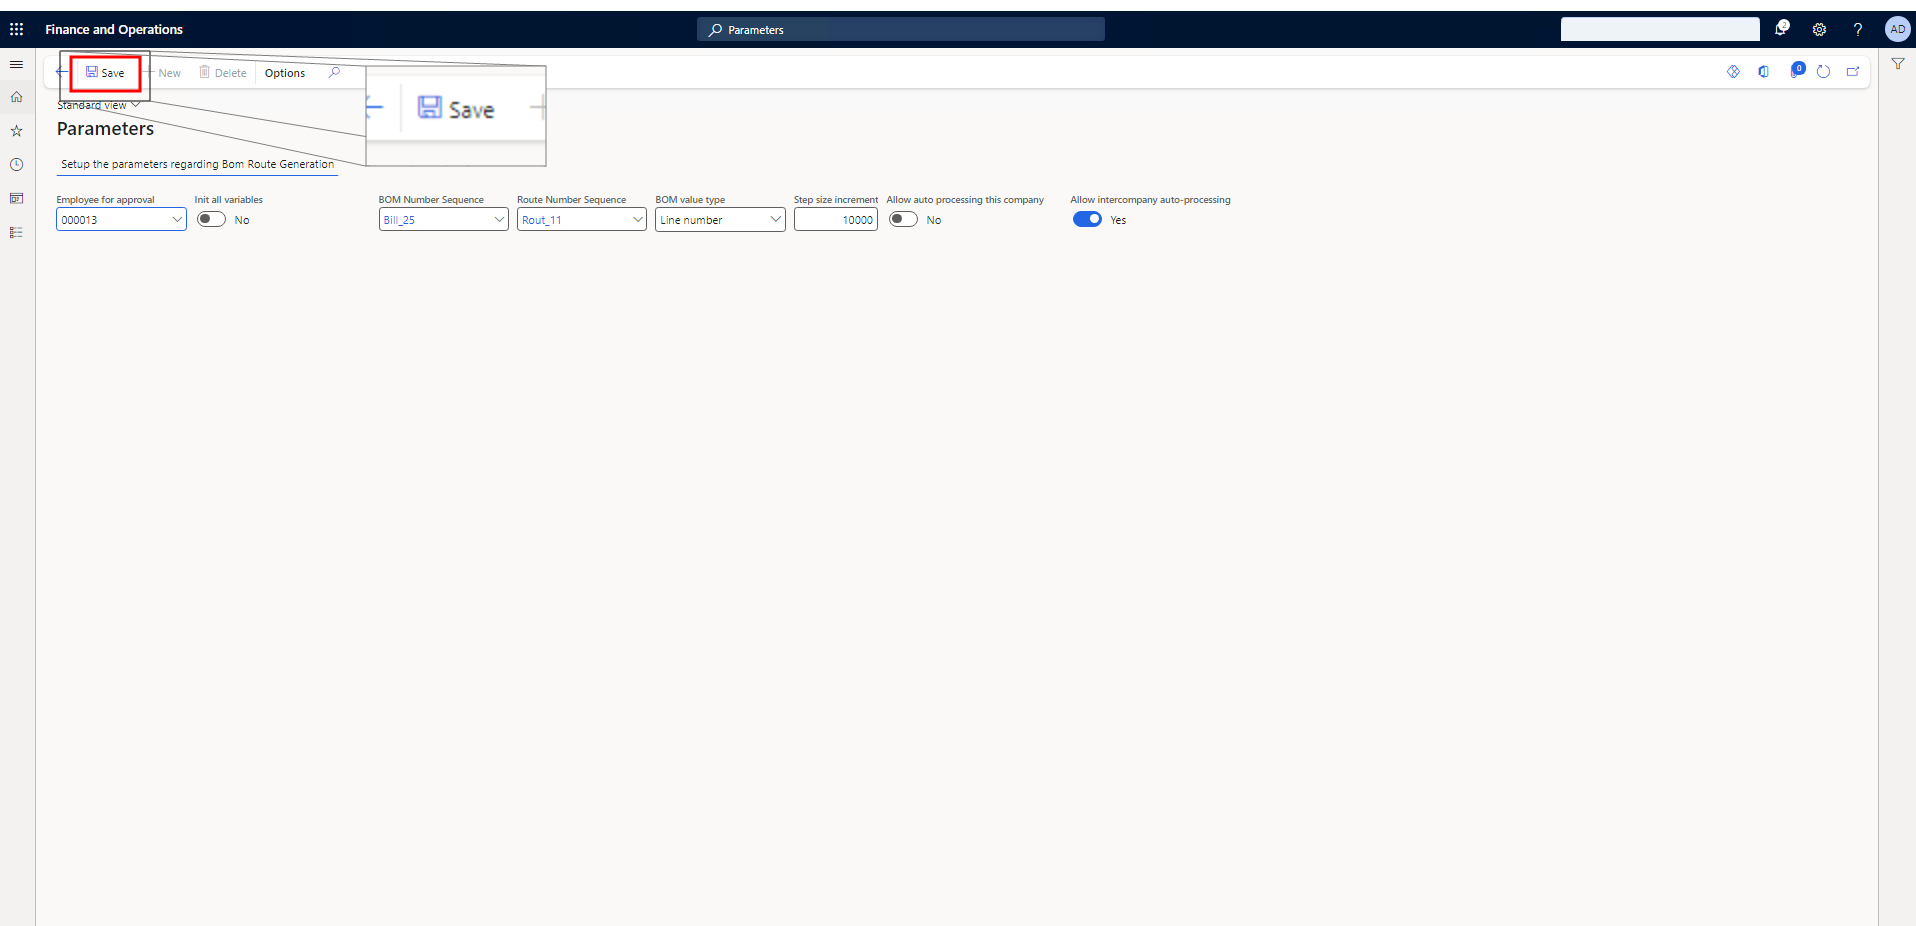
You've successfully setup the parameters for the BOM Route in this company. Next we'll set up the processing entities for this company for interacting with the BOM and Route Generator, continue to Processing entity setup.
Data Migration
As part of the BOM Route generator , Experlogix supplies the following data entities to support easy import and export of data:
|
Technical Name |
Functional Description |
|---|---|
|
XplBrgConfigValueEntity |
Experlogix config values |
|
XplBrgBomTableValuesEntity |
Experlogix bom table values |
|
XplBrgBomValueEntity |
Experlogix bom table values |
|
XplBrgRouteValueEntity |
Experlogix route table values |
|
XplBrgItemConfigEntity |
Experlogix item config values |
|
XplBrgVariablesEntity |
Experlogix variables entity |
Processing entity setup
This section provides a step-by-step guide for setting up processing entities within the Experlogix Integrator. You will be guided through the selection of data entities and the configuration of the Connector handler.
-
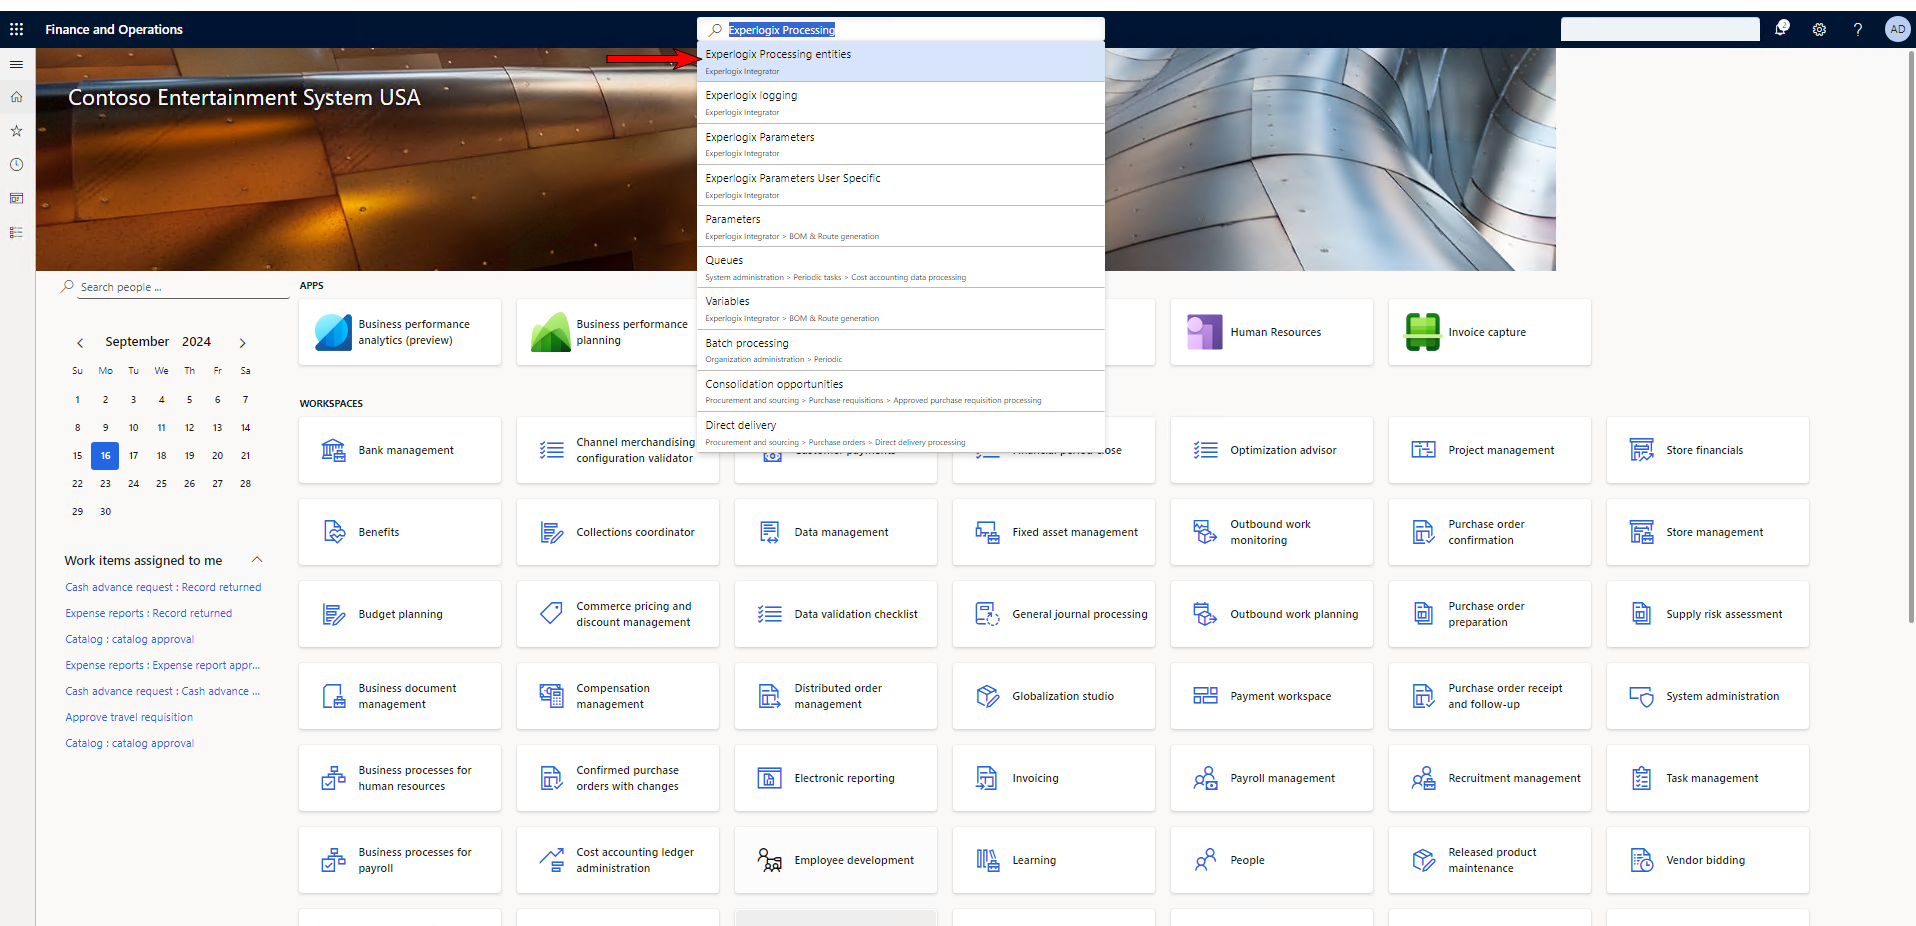
In Microsoft Dynamics 365 F&O, in the search box, search for Experlogix Processing and select Experlogix Integrator > Experlogix Processing Entities.
-
Select Actions.
-
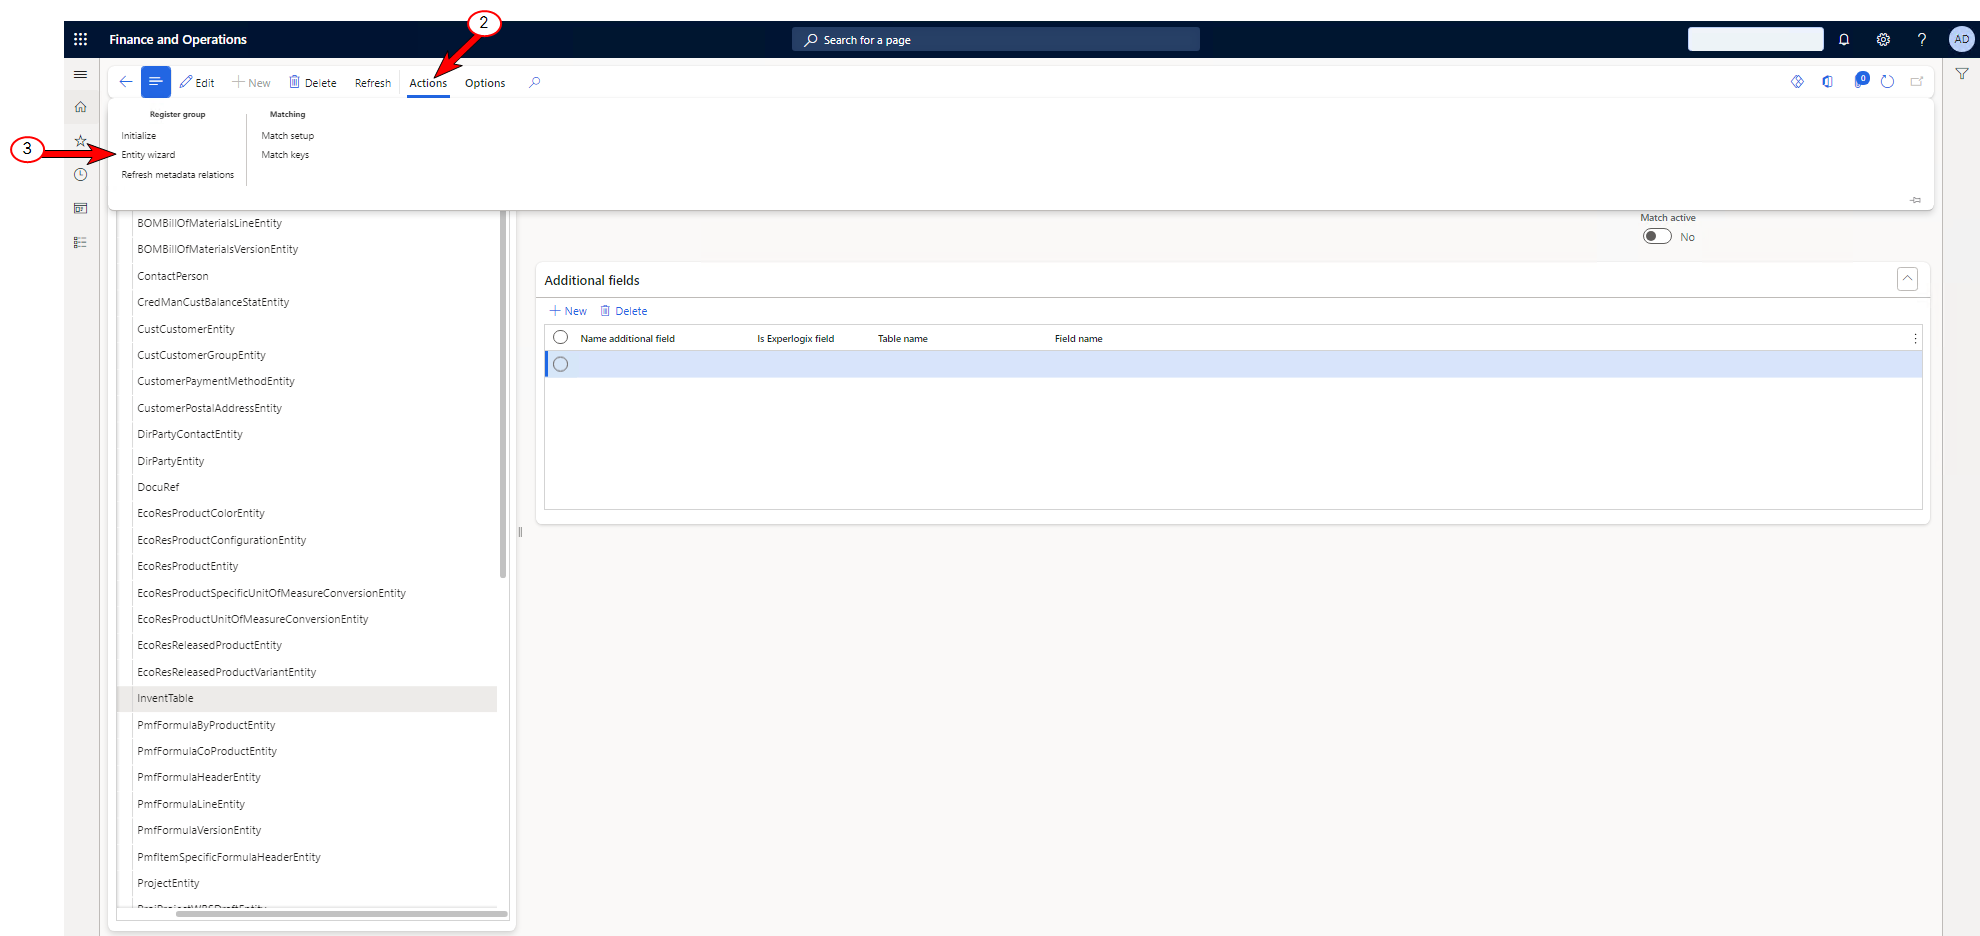
Select Entity wizard.
-
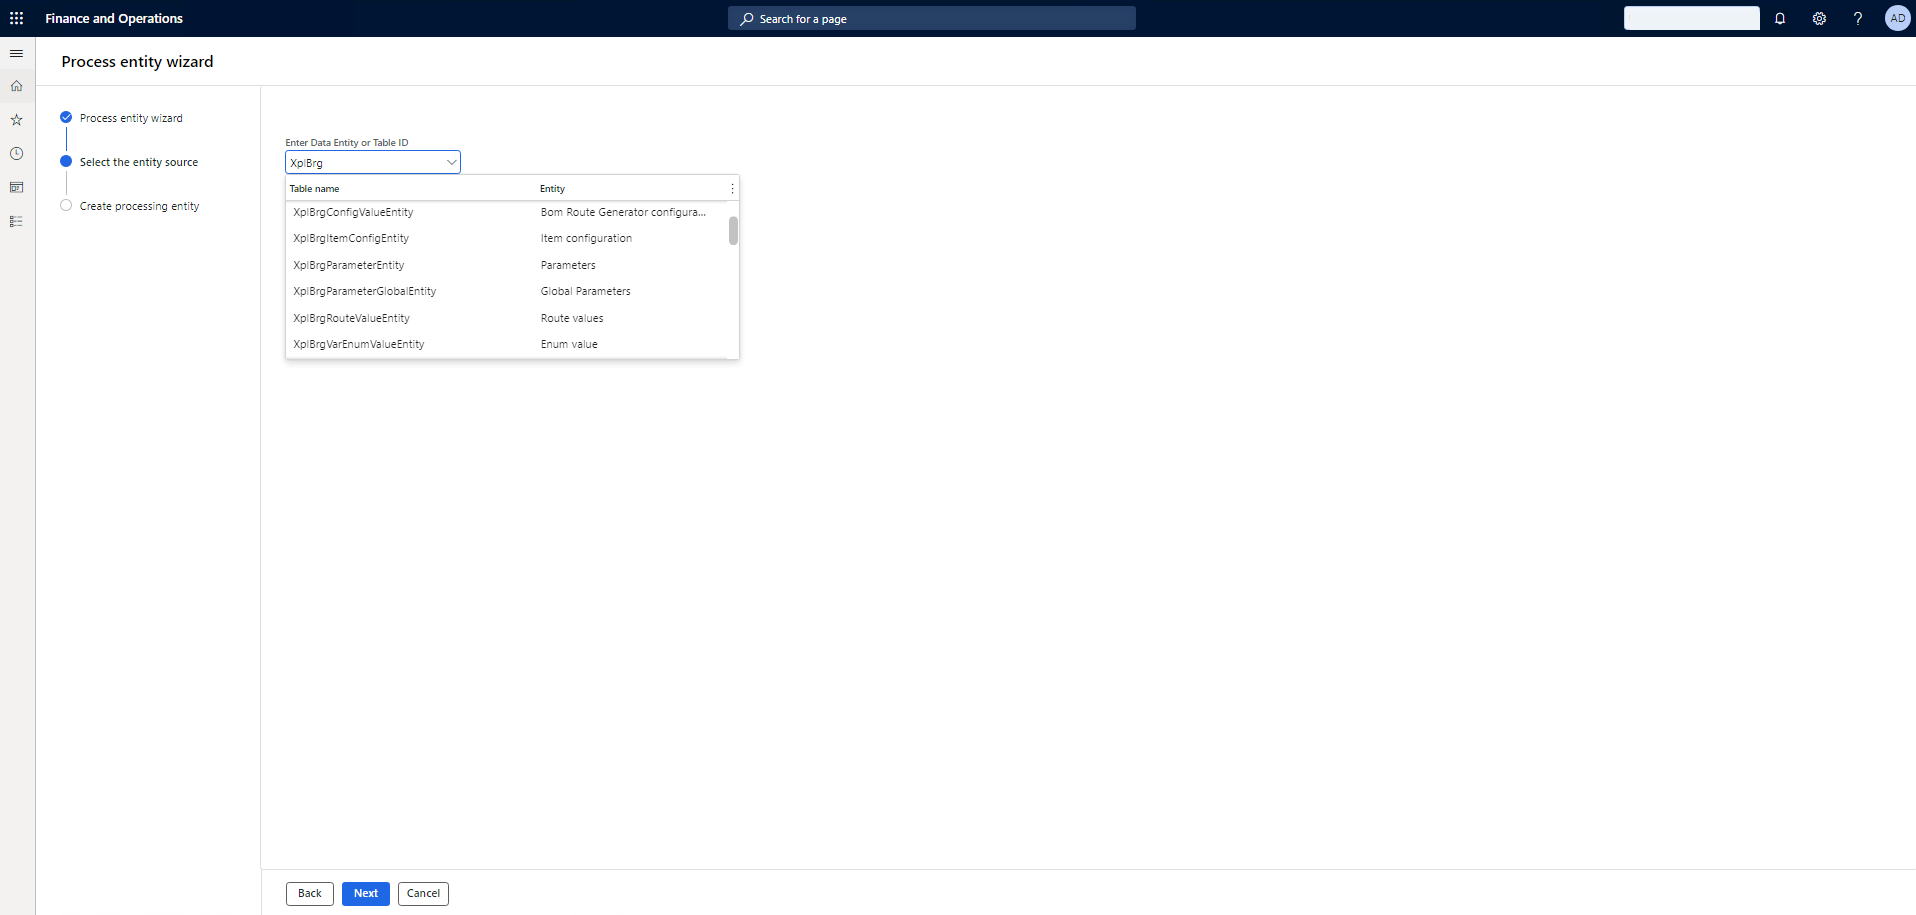
In the Enter Data entity or Table ID field, search and select XplBrgItemConfigEntity.
-
Select Next.
-
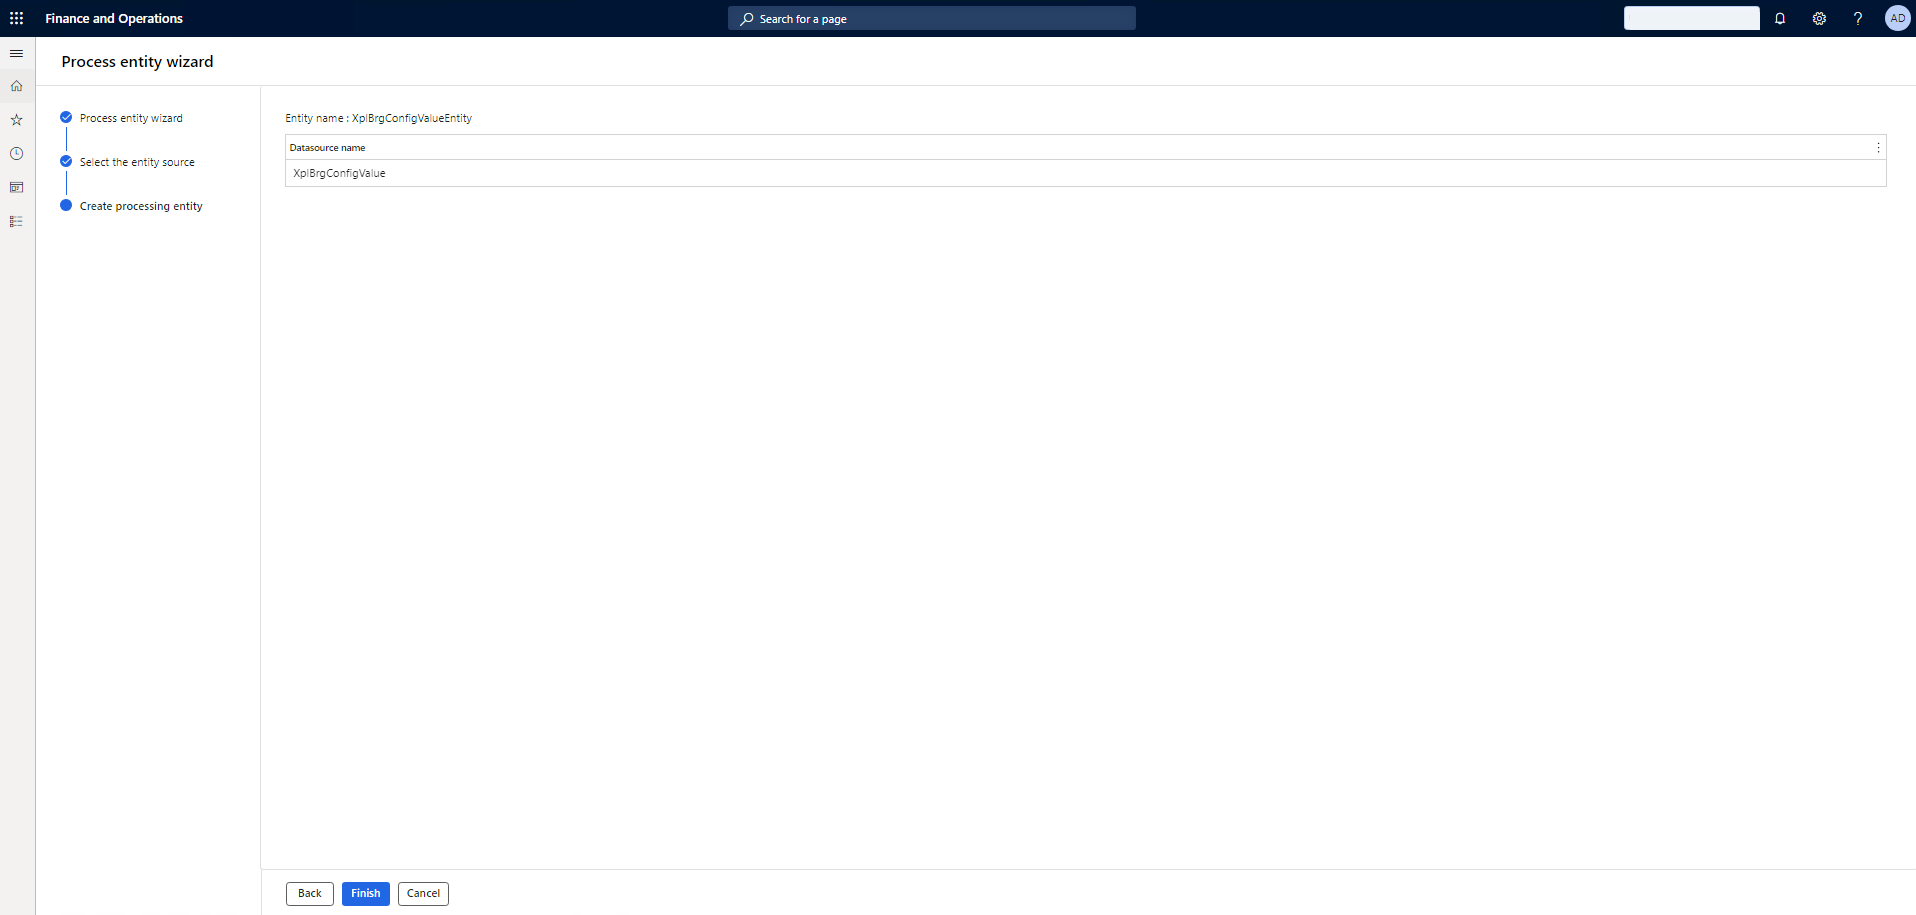
Select Finish.
-
Repeat steps 2 through Step 7 for XplBrgItemConfigEntity.
-
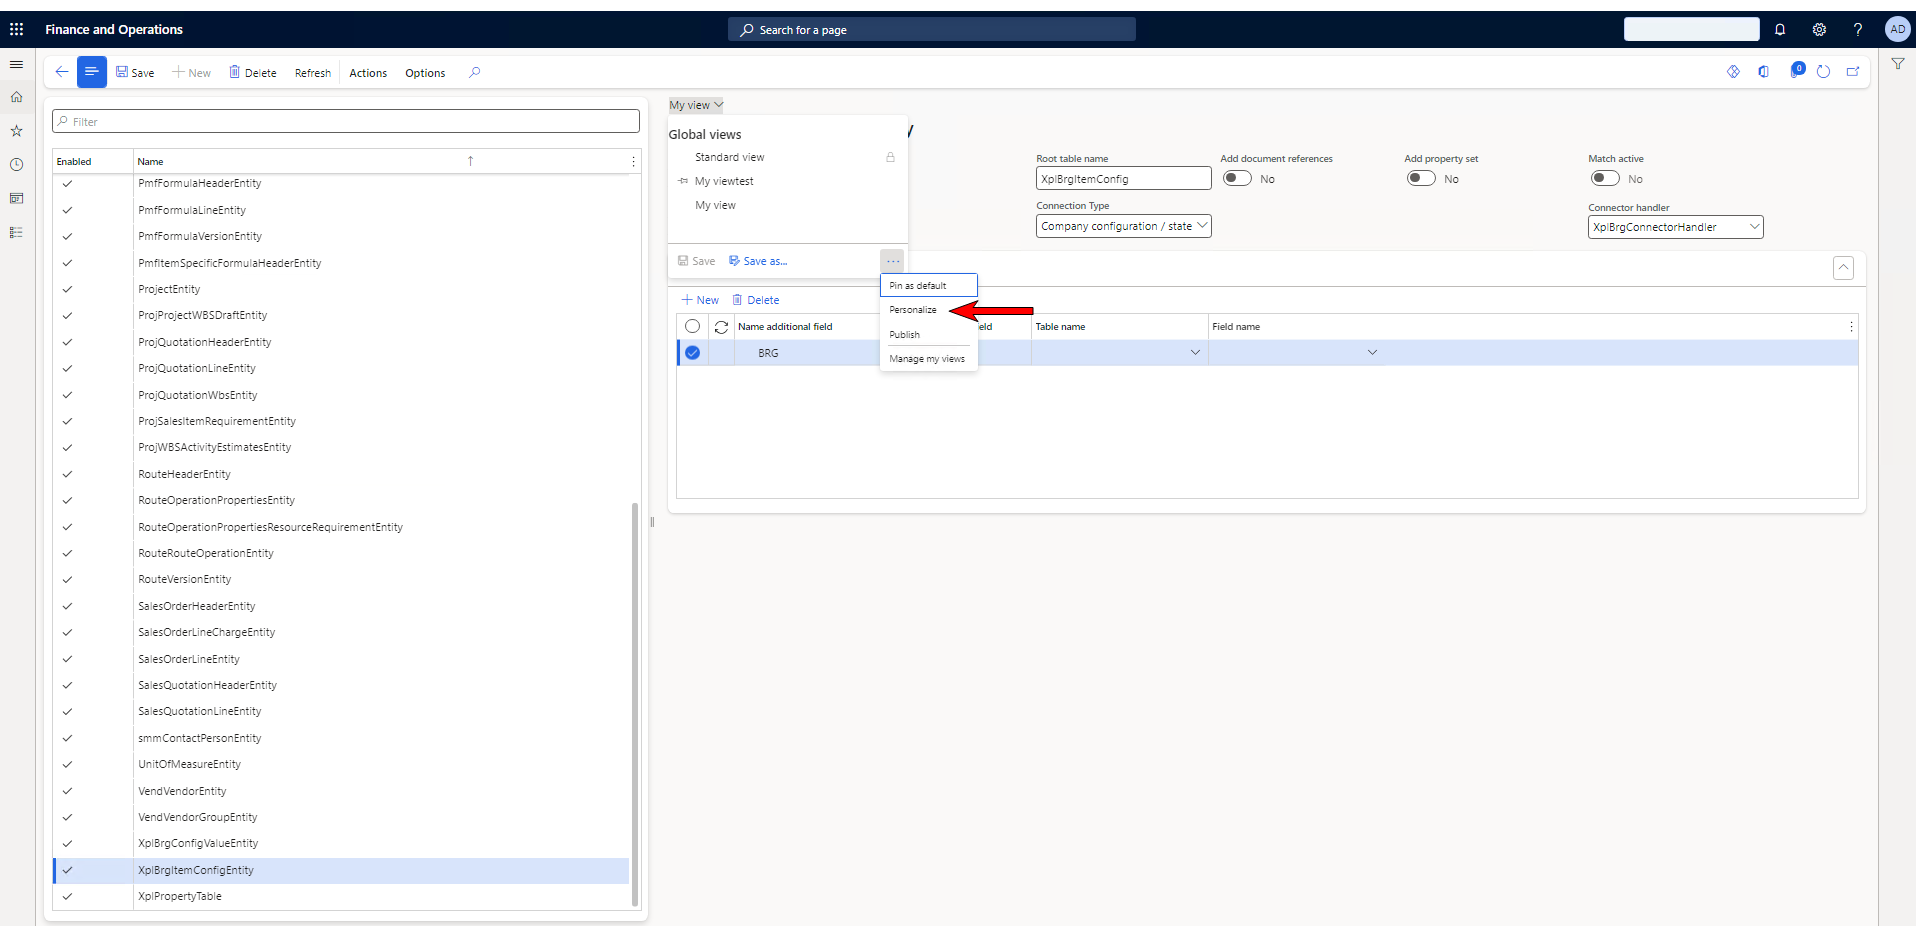
In the List view, select Experlogix processing entity XplBrgItemConfigEntity.
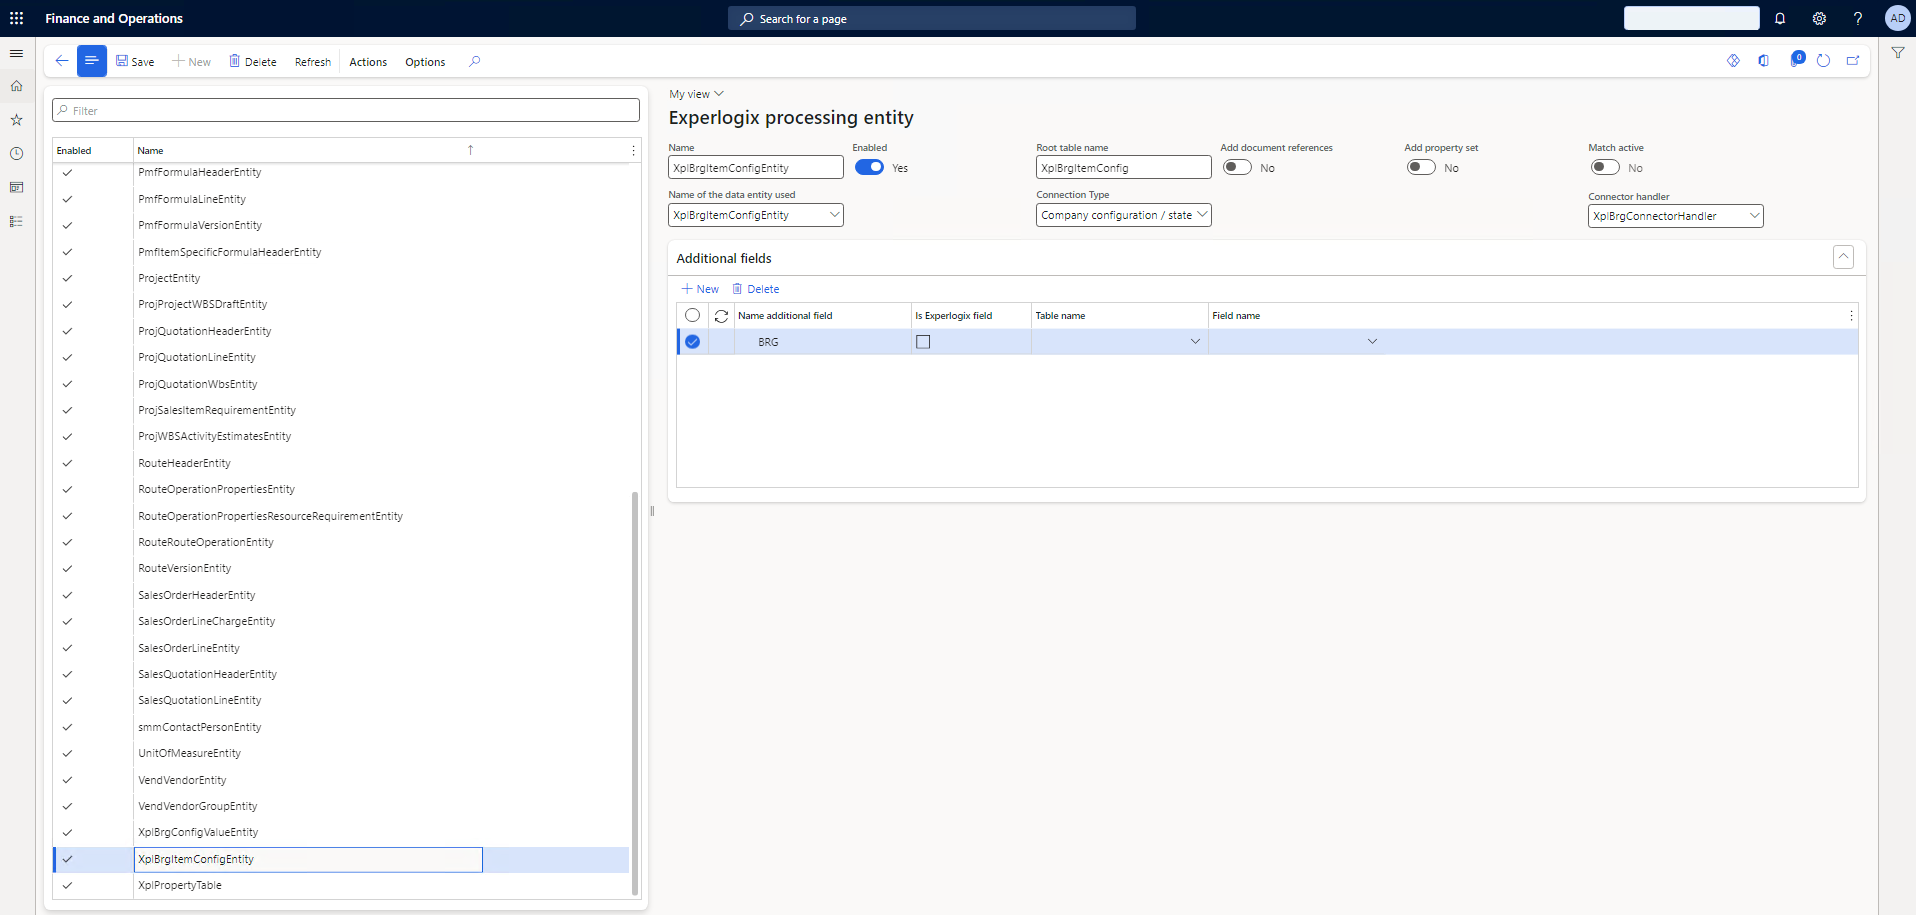
If you do not see the Connector handler field, you must personalize your view to display it on the form. For more information, see the Personalization toolbar.
-
Set the Connector handler to XplBrgConnectorHandler.
You've successfully set up the processing entities for the BOM and Route in this company. Next, we’ll focus on Experlogix Variables, which are crucial for streamlining the BOM and Route generation processes across companies in an intercompany set up. Continue to the Experlogix Variables section to learn how to setup Experlogix global variables for flexible operations.
Experlogix Variables
Experlogix variables streamline the BOM and Route generation processes by providing a global list of variables you can assign to configurations across companies. You manage these variables in the Experlogix Integrator module under BOM & Route Generation > Variables. Since they are stored globally, they are not tied to a specific company, making them more flexible and efficient for intercompany operations.
Due to the diverse requirements across industries, we recommend reviewing the specific examples below that illustrate how to create and manage variables in the BOM and Route Generation process. This enhances flexibility, enabling you to customize the system's capabilities to meet your specific needs, instead of applying a universal approach to all implementations.
Accessing the Microsoft Dynamics 365 F&O Global Experlogix Variables
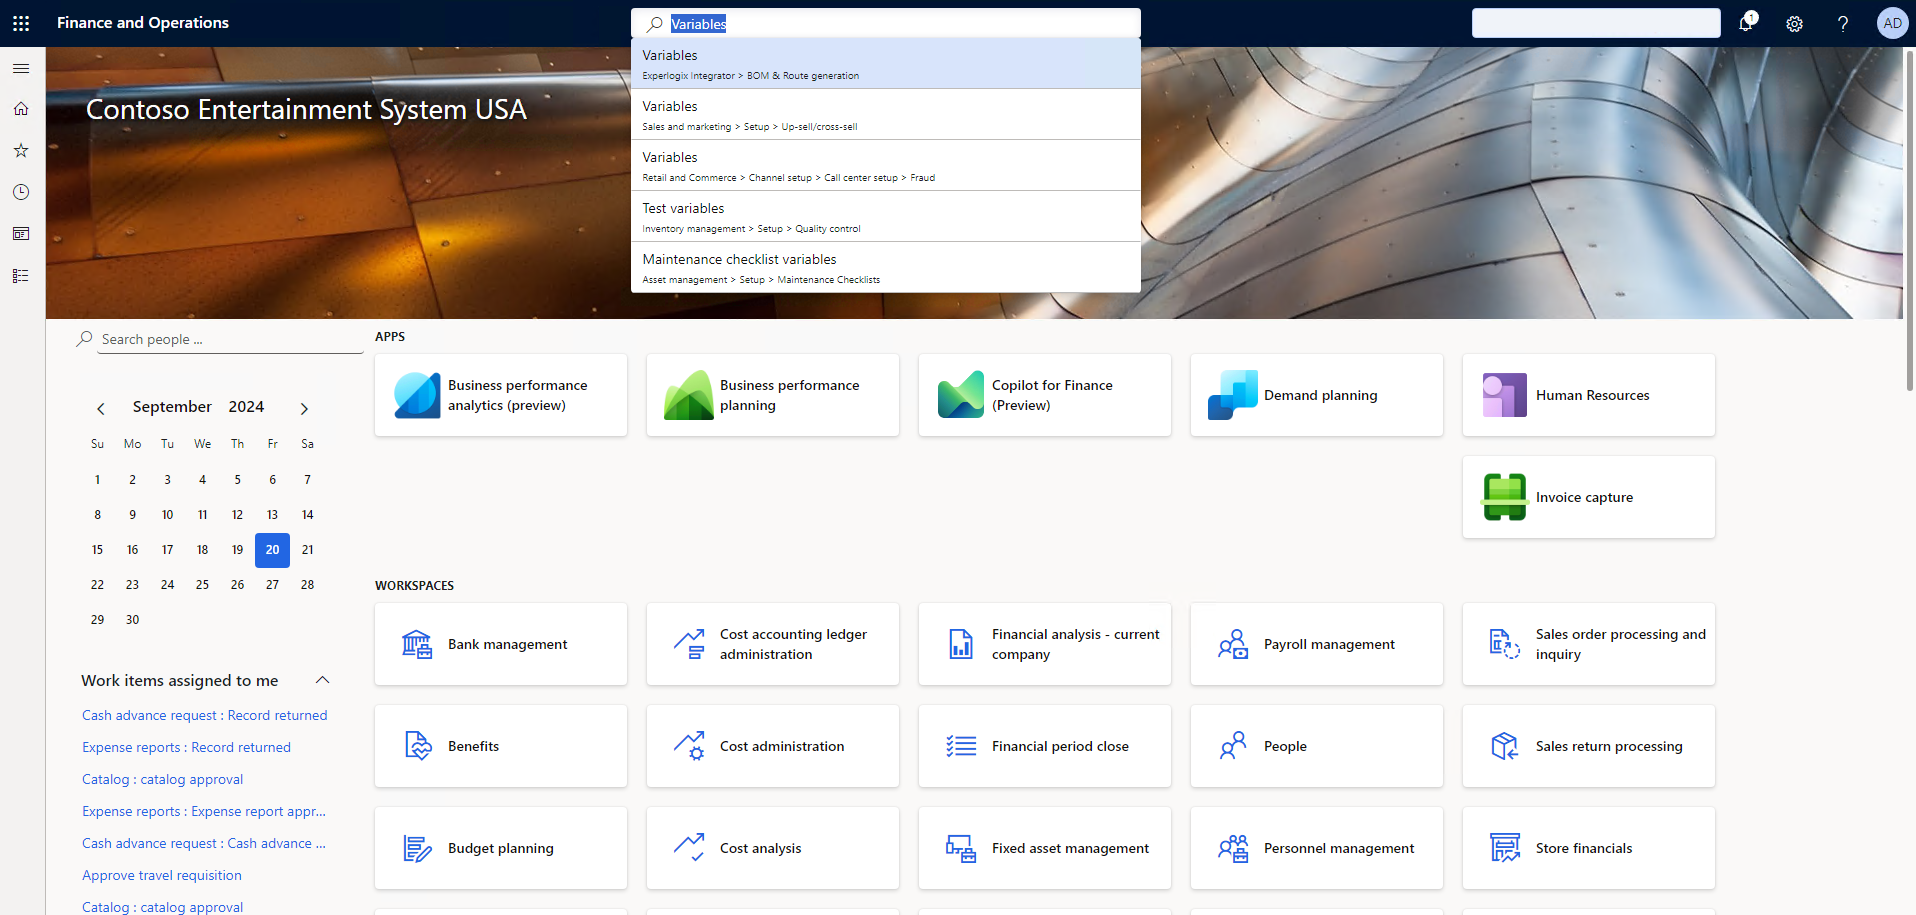
In Microsoft Dynamics 365 F&O, in the search box, search for Variables and select > Experlogix Integrator > Variables.
You can create and manage Experlogix variables using the actions in the form ribbon.
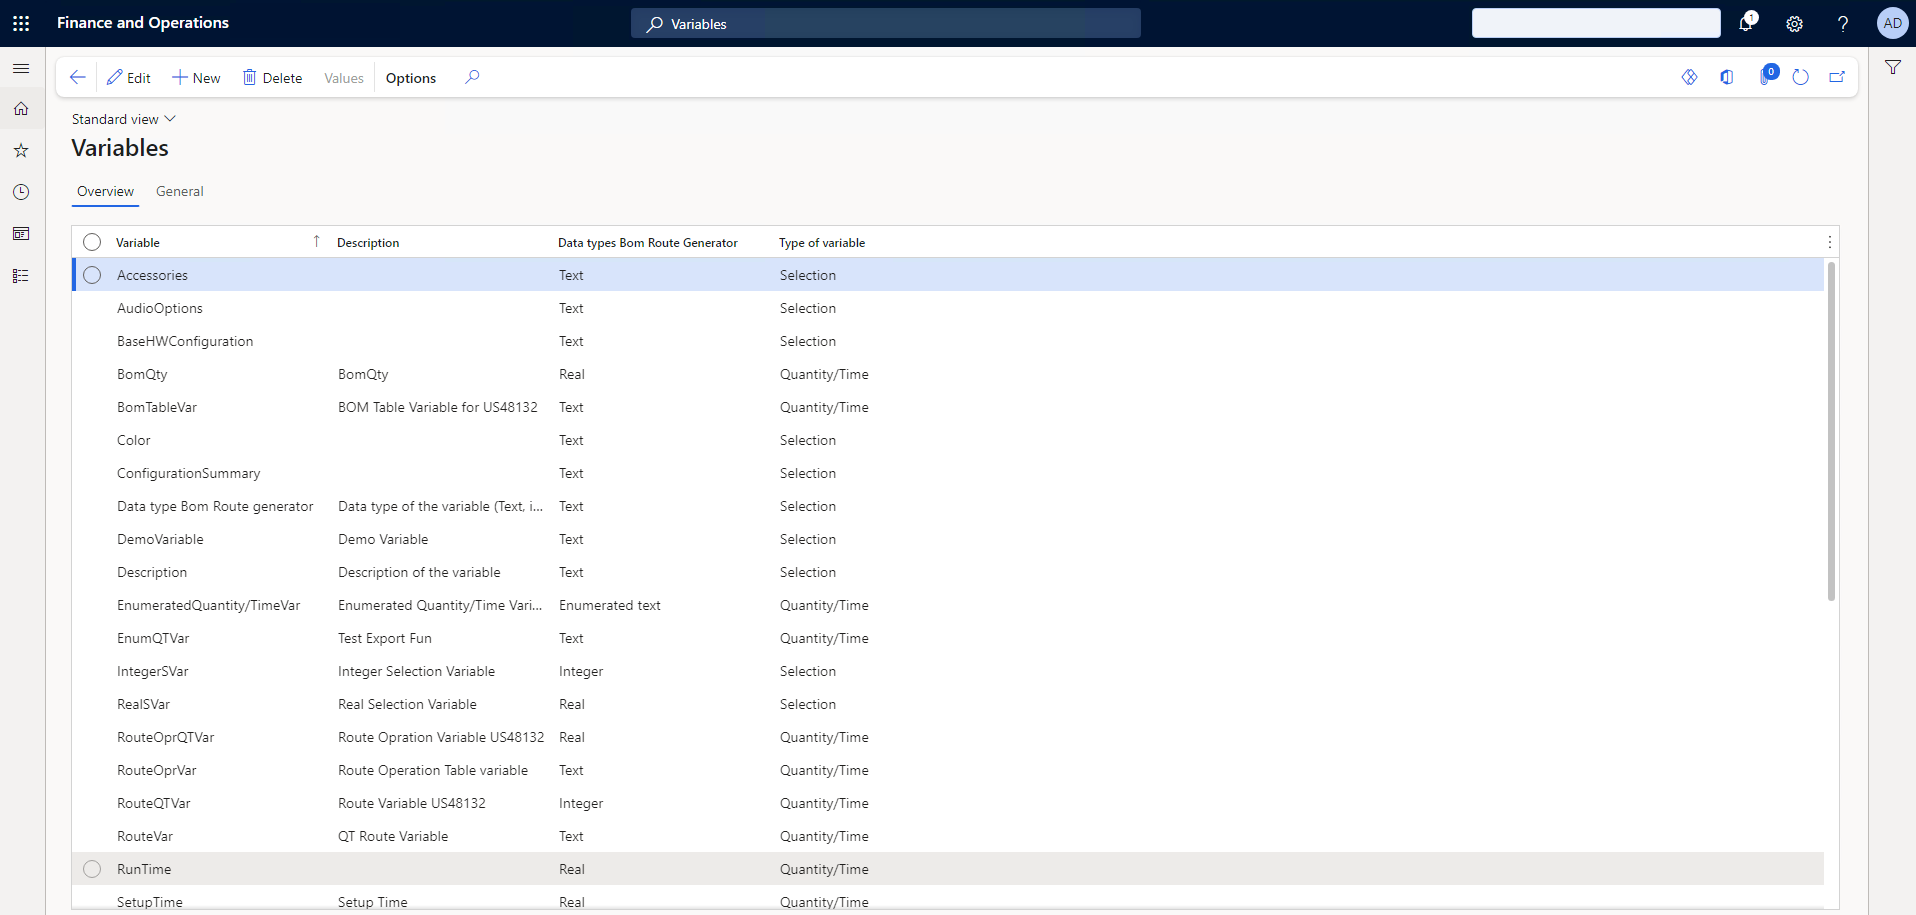
Microsoft Dynamics 365 F&O Experlogix Integrator BOM & Route Generation Variables Parameters
|
Field |
Description |
||||||
|---|---|---|---|---|---|---|---|
|
Variable |
Display the ID of the variable. |
||||||
|
Description |
(Optional)Provides a user-friendly description of the variable. |
||||||
|
Data type BOM Route Generator |
Sets the data type of the variable with the following options: Text, Integer, Real, Enumerated text, and Boolean |
||||||
|
Type of variable |
Sets the behavior of the variable with the following options.
|
||||||
|
Values |
If the Data type Bom Route Generator parameters are enumerated text, the Values button in the ribbon can be accessed. The Values table opens as a new table. 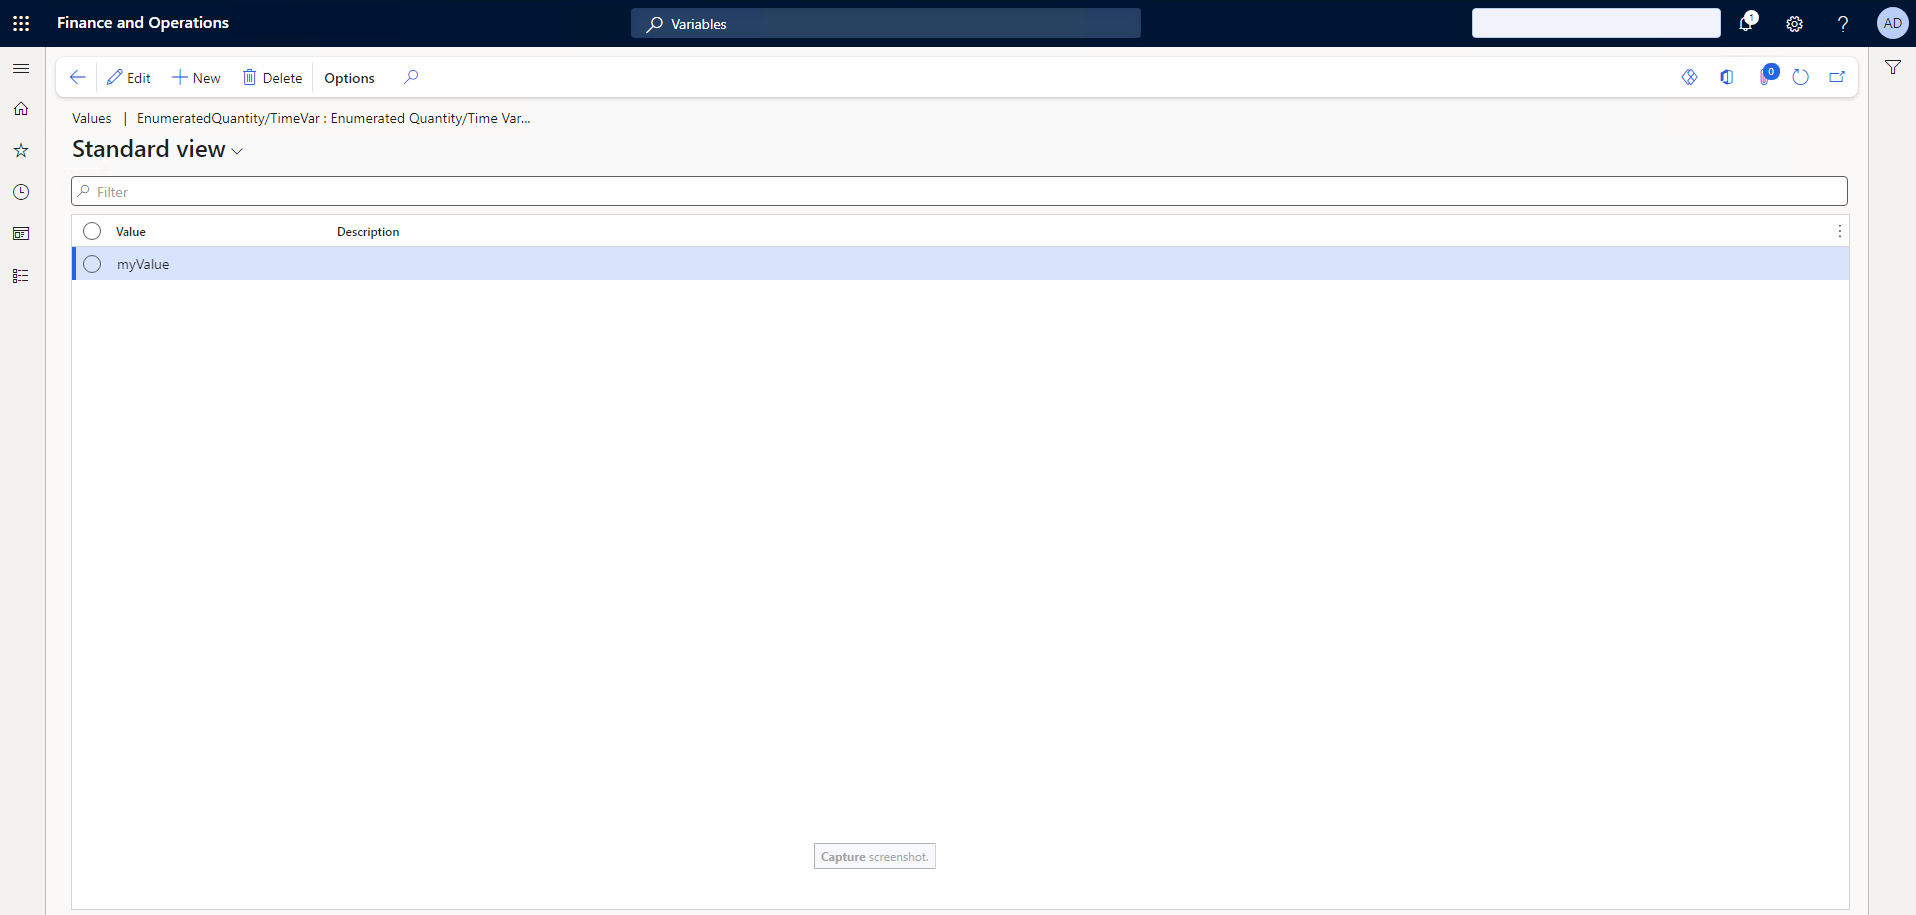
|
Variables General Tab
The Variables General tab displays additional information based on the selected variable in the Overview tab. Once you select a variable, the General tab auto-populates with relevant data, offering an at-a-glance summary of key variable attributes.
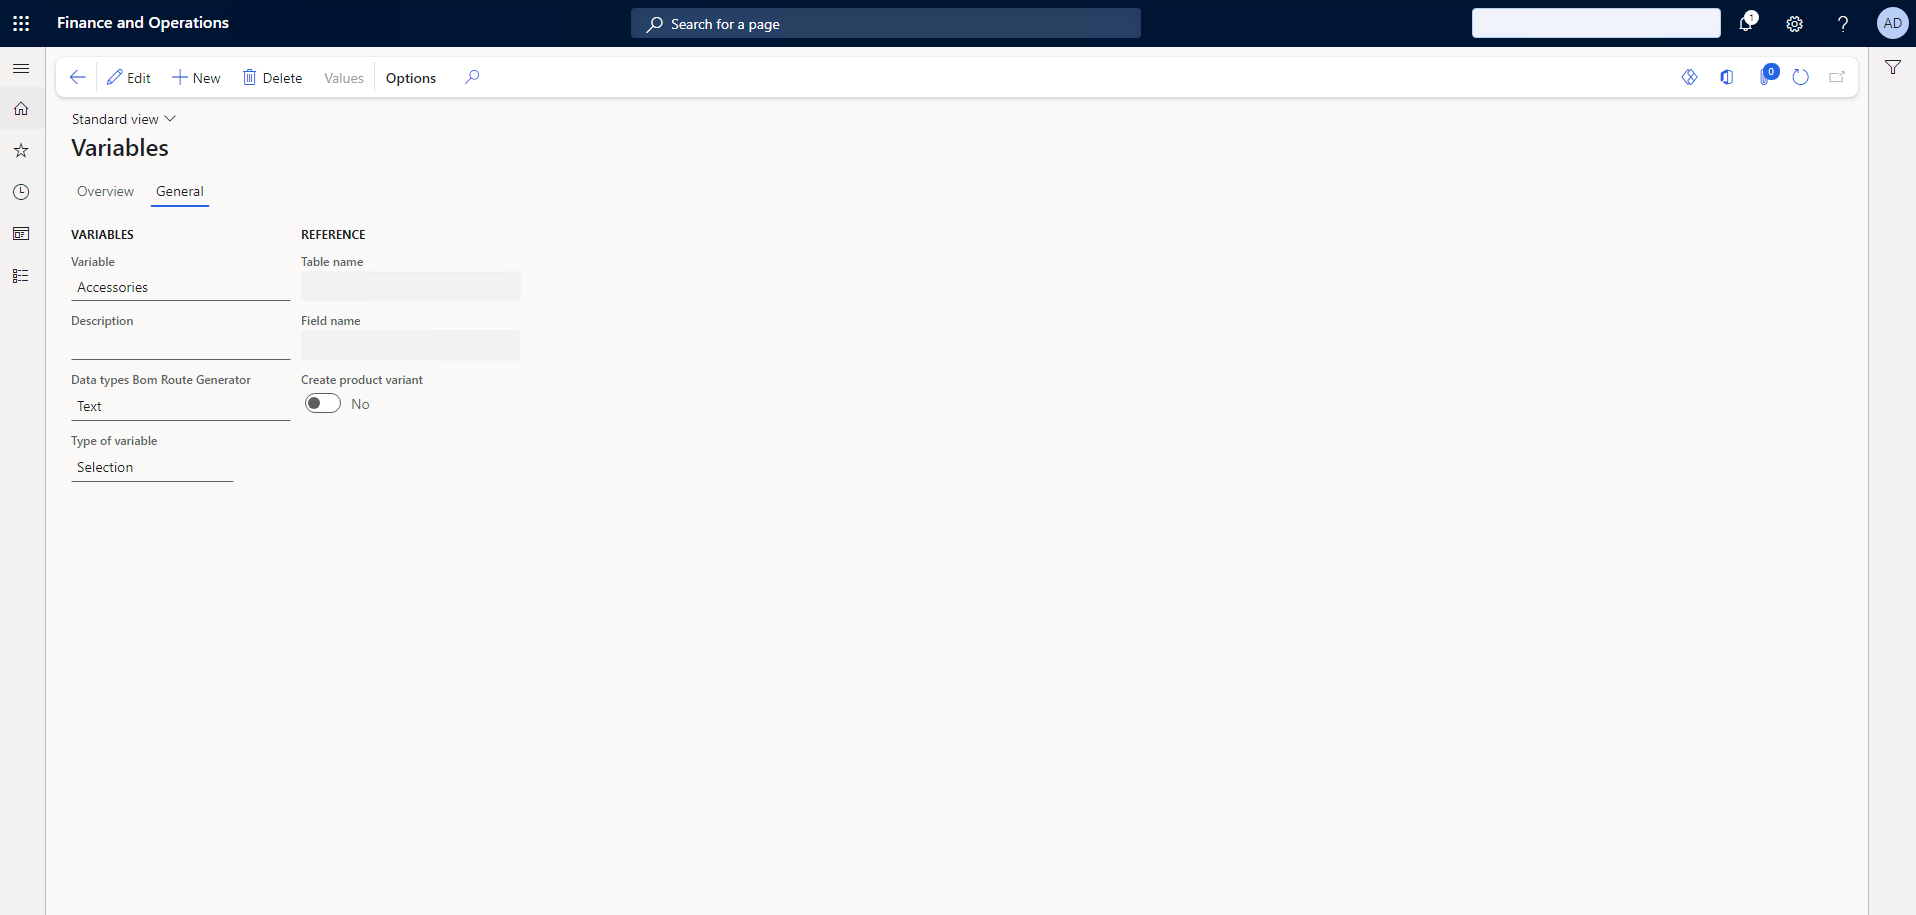
Microsoft Dynamics 365 F&O Experlogix Integrator BOM & Route Generation Variables General Tab Parameters
|
Field |
Description |
|---|---|
|
Variable |
Display the ID of the variable. |
|
Description |
(Optional)Provides a user-friendly description of the variable. |
|
Data type Bom Route Generator |
Sets the data type of the variable with the following options: Text, Integer, Real, Enumerated text, and Boolean |
|
Type of variable |
Sets the behavior of the variable with the following options.
|
|
Table name |
Sets the Table name for the variable with the following options: BOM, BOMTable, Route, RouteOpr(Route Operations), and InventDim(Inventory Dimension). The Table name parameter is only applicable if the Type of variable is Quantity/Time. |
|
Field name |
The Field name parameter is only applicable if the Type of variable is Quantity/Time. The selection for Field name is based on the selected Table Name. Field name states what field will get a new value from the variables and values. |
|
Create product variant |
When set to Yes while running the BOM Route Generator, a new product variant (for a product master) will be created if it does not exist. If a product variant exists, the process will be an existing one. The Create product variant is only used and can be enabled if:
|
Setting up the Process Designer for BOM and Route
When using the above setup, you must create a Number Series for the BOM Route Generator in Microsoft Dynamics 365 F&O. There are several methods to achieve this, but each configuration must have a unique identifier for each Microsoft Dynamics 365 F&O company. Creating the unique Number Series is crucial to enable item configuration in an intercompany setup.
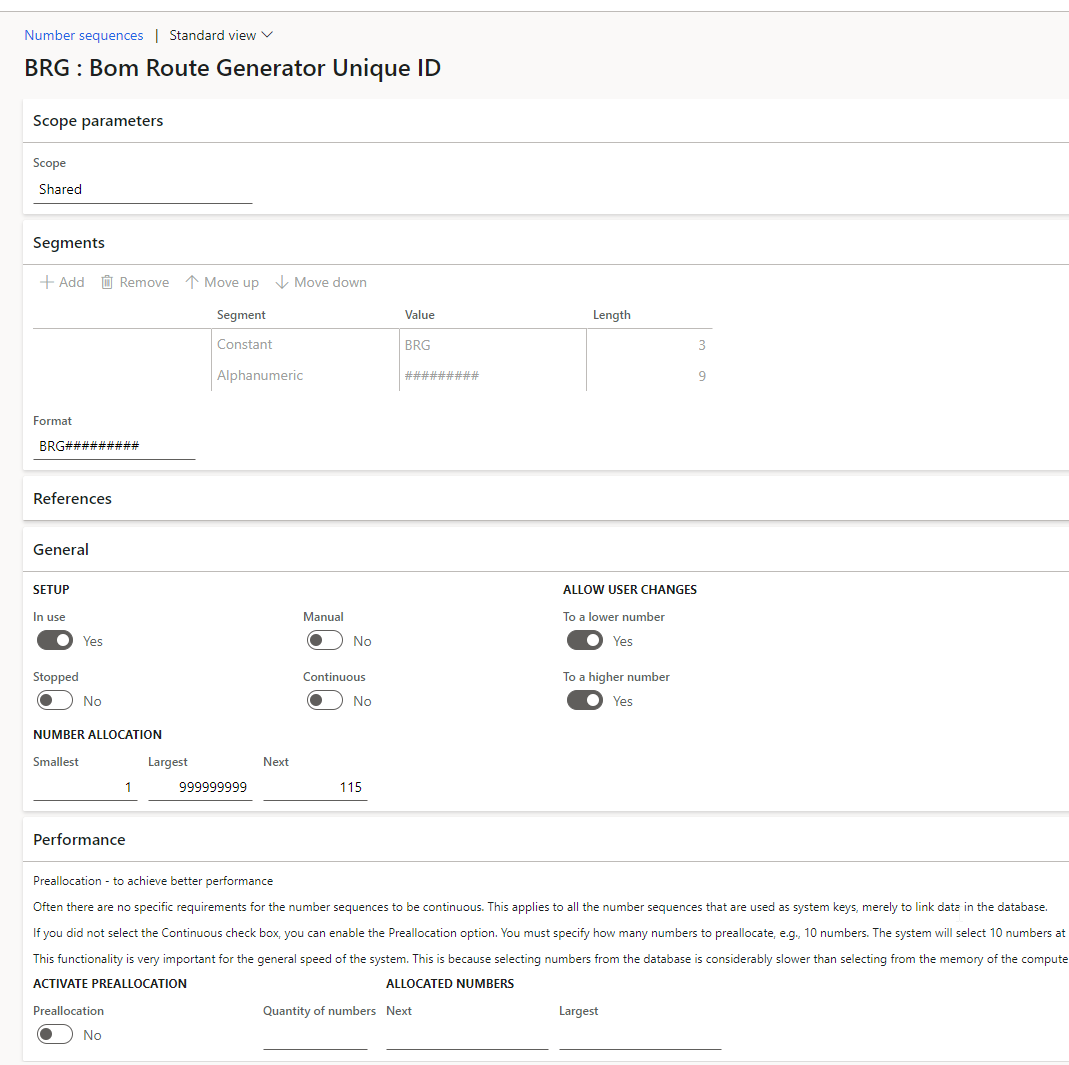
-
Create the default processing maps for Microsoft Dynamics 365 F&O in Process Designer, see Process Designer Examples.
-
In Process Maps in Process Designer, add the following entities for BOM and Route, see the Process Map Details Tab for more information on setting up Process Maps.
-
XplBrgItemConfigEntity Header Details
|
Field |
Value |
|---|---|
|
Name |
Item config |
|
Process integration |
Name of Microsoft Dynamics 365 F&O Process integration |
|
Entity |
|
|
Template |
|
|
Option Link Property |
|
-
XplBrgItemConfigEntity Lines - mapping
|
Name |
Field |
Data type |
Mapping type |
Value |
Option Attribute |
Source |
Destination |
|---|---|---|---|---|---|---|---|
|
ConfigId |
Configuration ID |
String |
Property |
Any text property present on Option |
|
|
ConfigMas |
|
Description |
Description |
String |
Property |
Description |
|
|
|
|
ItemConfigId |
Item config id |
String |
NumberSeries* Prerequisites When using the above setup, you must create a Number Series for the BOM Route Generator in Microsoft Dynamics 365 F&O. There are several methods to achieve this, but each configuration must have a unique identifier for each Microsoft Dynamics 365 F&O company. Creating the unique Number Series is crucial to enable item configuration in an intercompany setup.
|
BRG |
|
|
|
-
XplBrgConfigValueEntity Header Details
|
Field |
Value |
|---|---|
|
Name |
Config value. |
|
Process integration |
Name of Microsoft Dynamics 365 F&O Process integration. |
|
Entity |
XplBrgConfigValueEntity |
|
Template |
|
|
Option link property |
|
-
XplBrgConfigValueEntity Lines - mapping
|
Field |
Description |
|---|---|
|
Employee for approval |
The dropdown menu allows you to select the user who completes the approvals. |
|
BOM Number Sequence |
Number series to use when creating BOMs; see Number Sequences in Set up Cloud Connect for Microsoft Dynamics 365 F&O. |
|
Route Number Sequence |
Number series to use when creating routes; see Number Sequences in Set up Cloud Connect for Microsoft Dynamics 365 F&O. |
|
BOM Value type |
This dropdown allows you to select the type of value associated with each item in the Bill of Materials (BOM). The options include:
|
|
Step size increment |
This setting determines the numerical increment for new records on the Experlogix BOM/Route values form. Example Step Size: If you set the step size increment to 5, the first record will be 5, the second 10, and the third 15. |
-
Test your setup to see if the setup has been done correctly. If set up is done correctly when you save and close on one of the supported entities, the BOM and Route will generate automatically.
Example Process structure for BOM and Route
This process structure is derived from our Anne's Aquariums sample database.
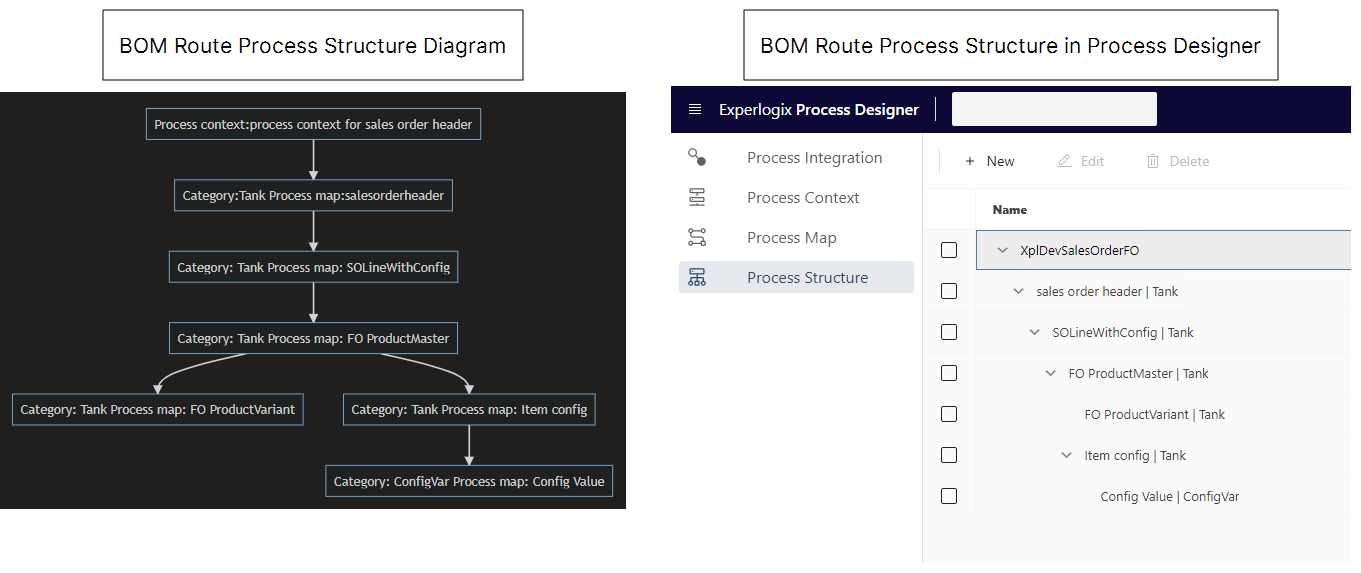
The ConfigVar Category is used to write the 1:N variable to the item config table in Experlogix and provides the following data in our example: Data Example File.
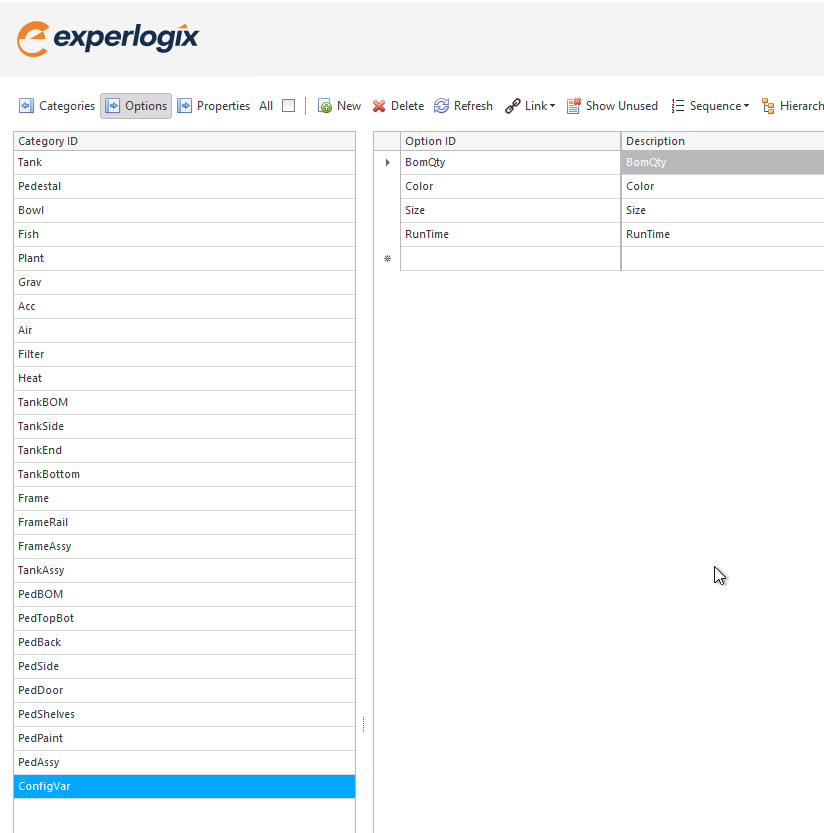
Link Experlogix variables to a BOM
In Microsoft Dynamics 365 F&O, Experlogix integrates with the Bill of Materials (BOM). Linking Experlogix variables to a BOM enables users to dynamically adjust production details based on defined variables such as quantity, time, or product attributes (e.g., Color).
Alex Turner, the Senior CPQ Solutions Architect at Anne's Aquariums, is responsible for configuring BOMs for custom manufacturing orders. For a new product, she must ensure that the BOM dynamically adjusts based on customer-specified attributes. Specifically, she needs the system to create a copy of the BOM Line if one of the items is blue and she wants to replace BOM Quantity with a value from the Experlogix configuration when this occurs.
-
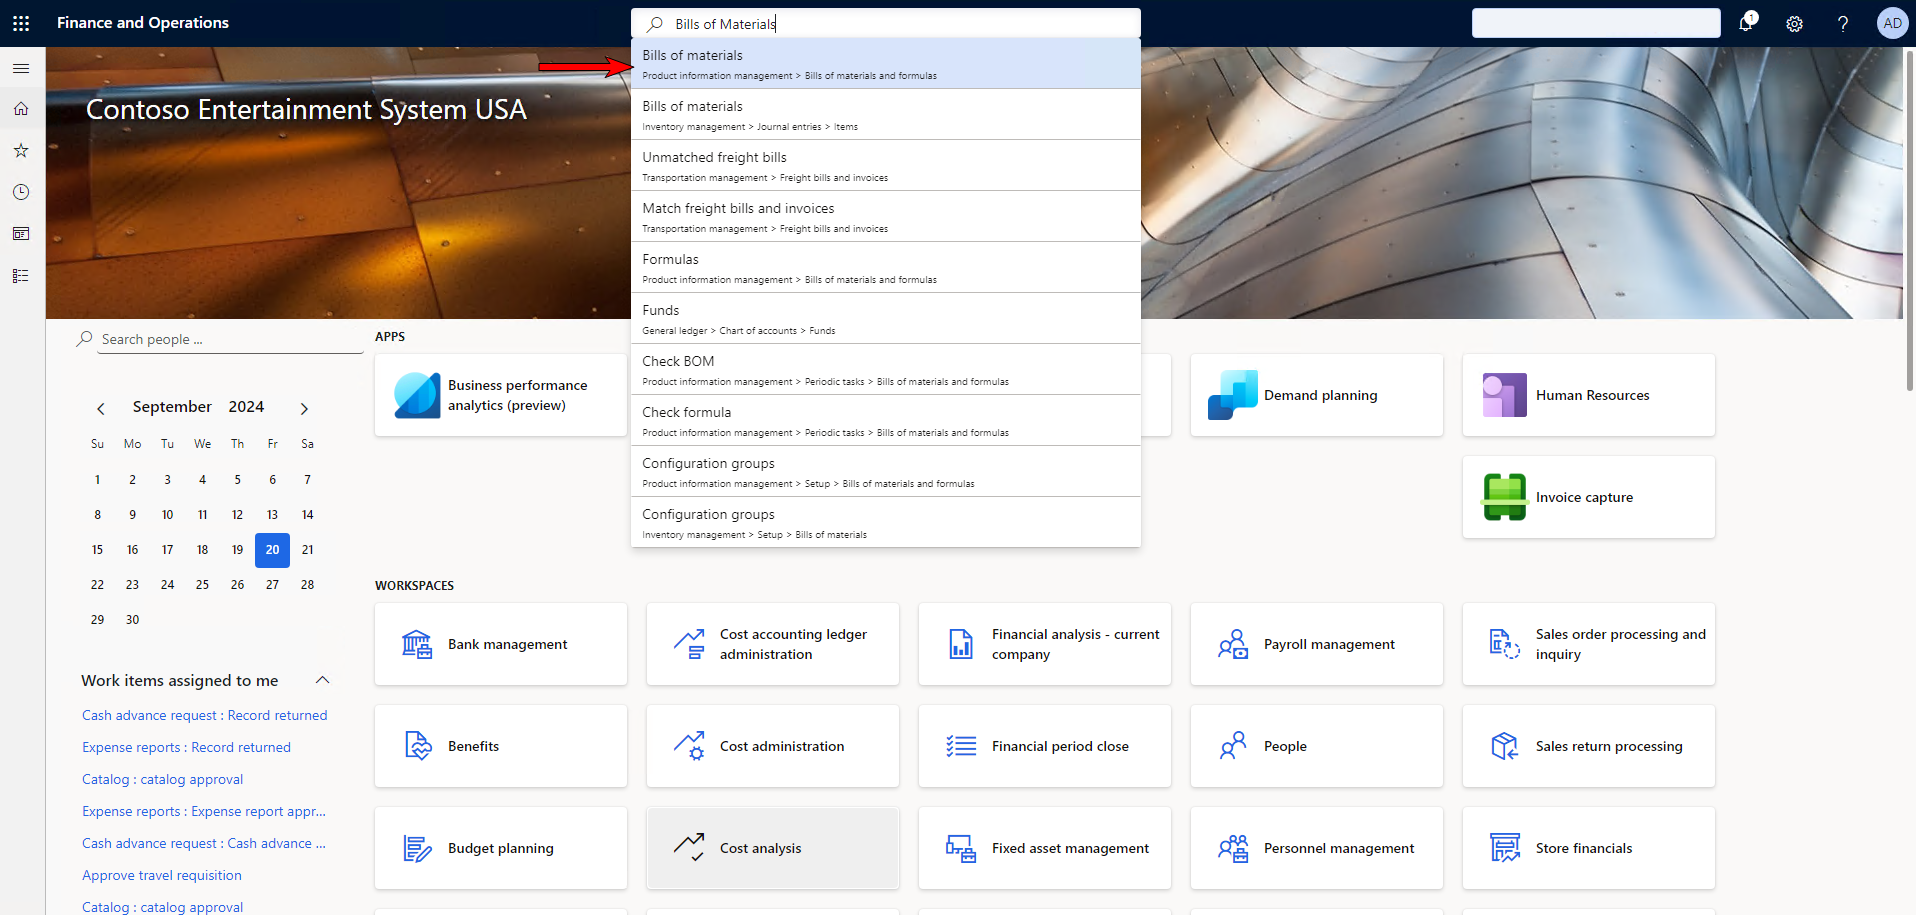
In Microsoft Dynamics 365 F&O, in the search box, search for Bills of Materials and select Product information management >Bills of materials and formulas.
-
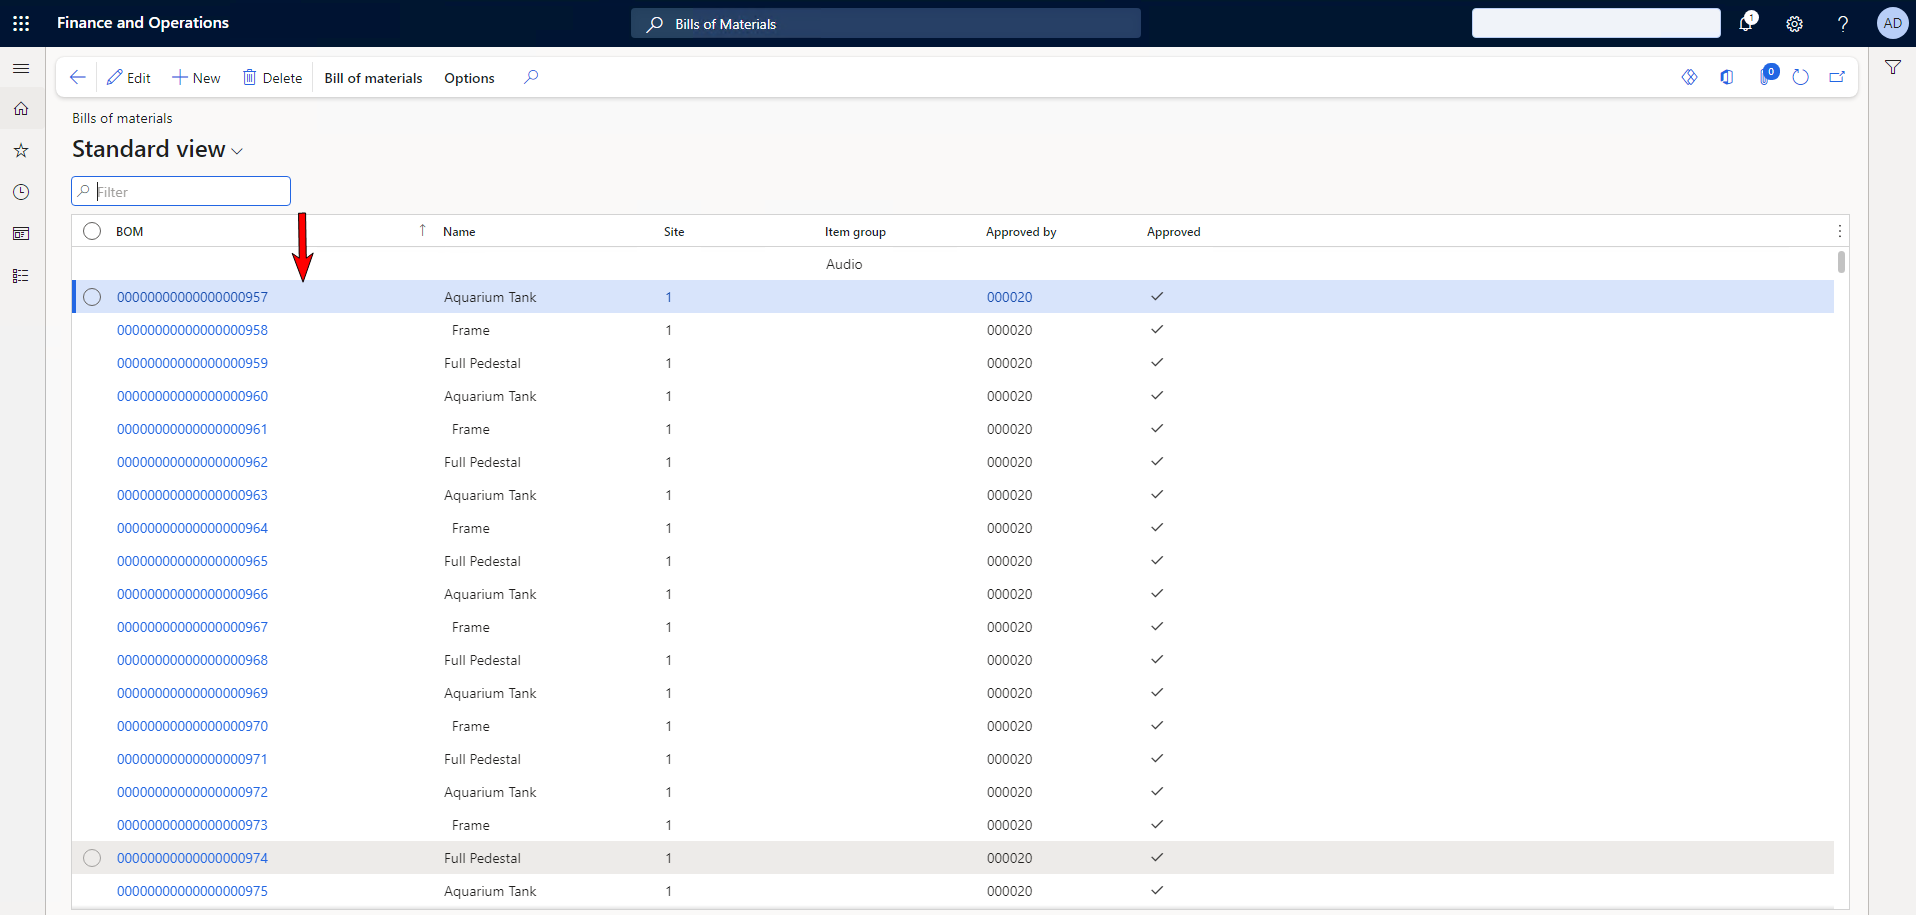
Select a BOM from the list.
-
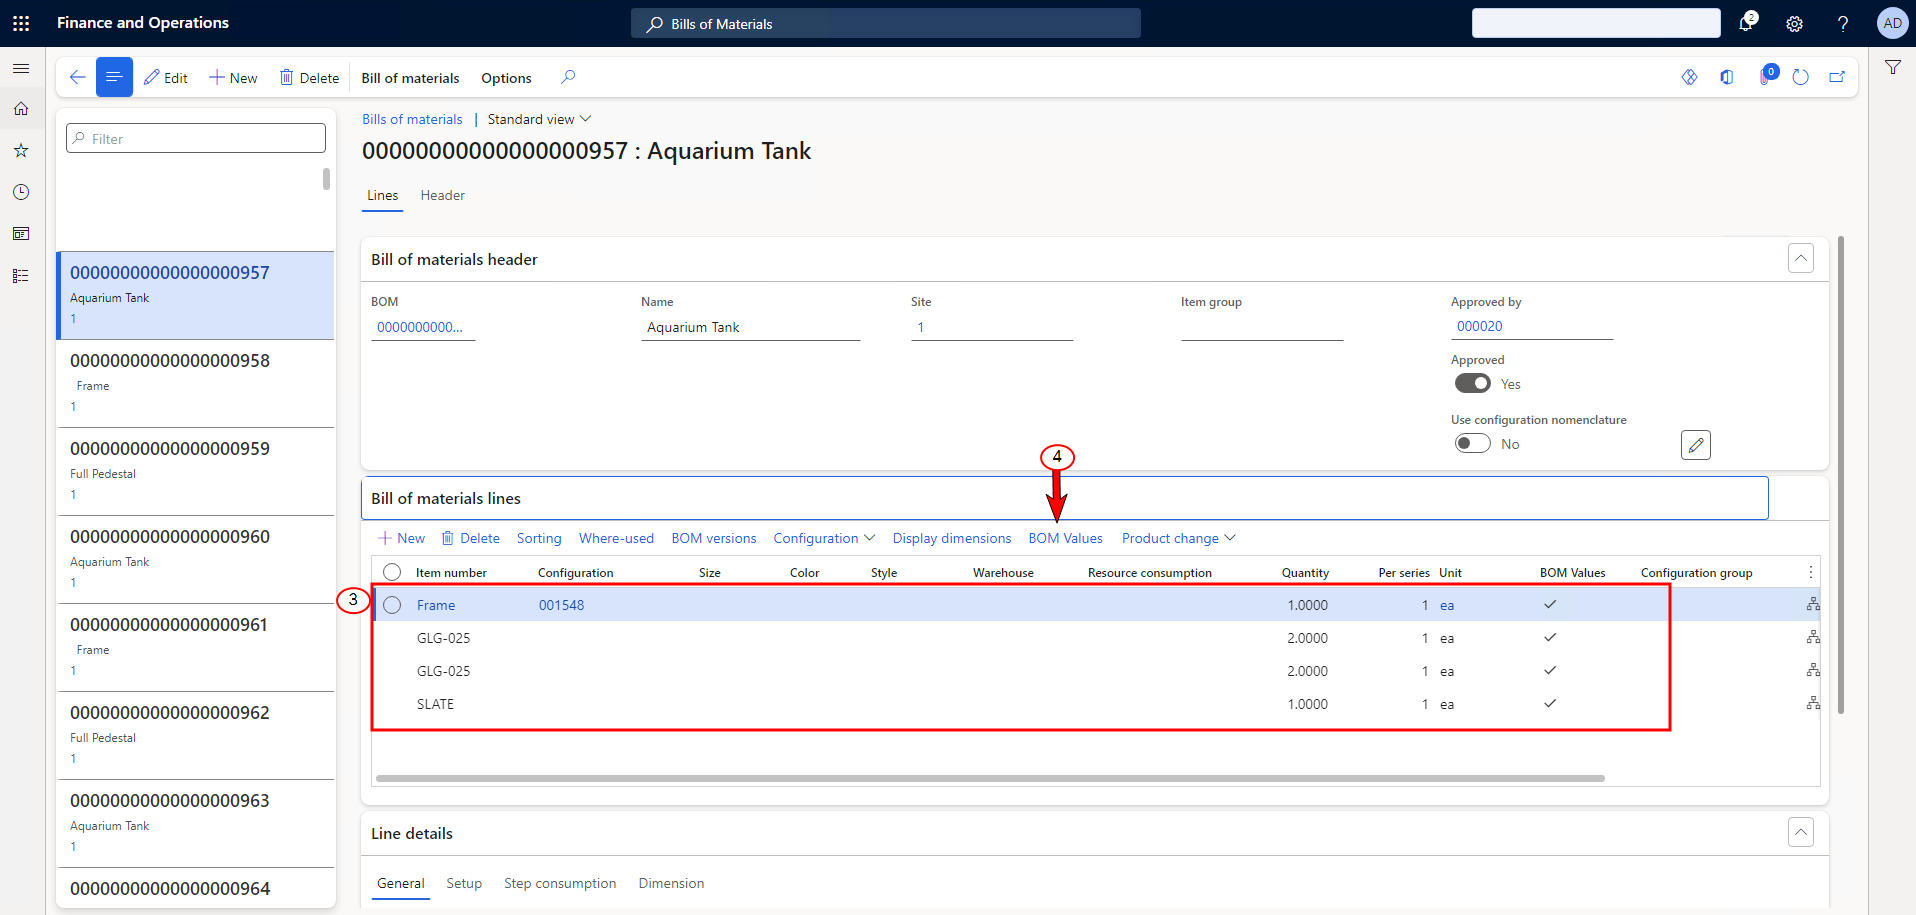
Select a BOM line
-
Select the BOM Values button.
BOM Values Button
The BOM Values button, part of the Experlogix BOM Route Generator in Microsoft Dynamics 365 F&O, is located within the Bill of Materials (BOM) form and allows users to apply dynamic, variable-driven configurations to specific BOM lines. It directly integrates variables such as product attributes (e.g., color, quantity, time) into the BOM, enabling adjustments to components based on real-time data. To access it, navigate to Modules > Product Information Management > Bills of Materials and Formulas > Bills of Materials, select a BOM and BOM line, and the BOM Values button will appear on the BOM line form. This form also supports advanced logic, including the use of operators like "And," "Or," and "Not."
-
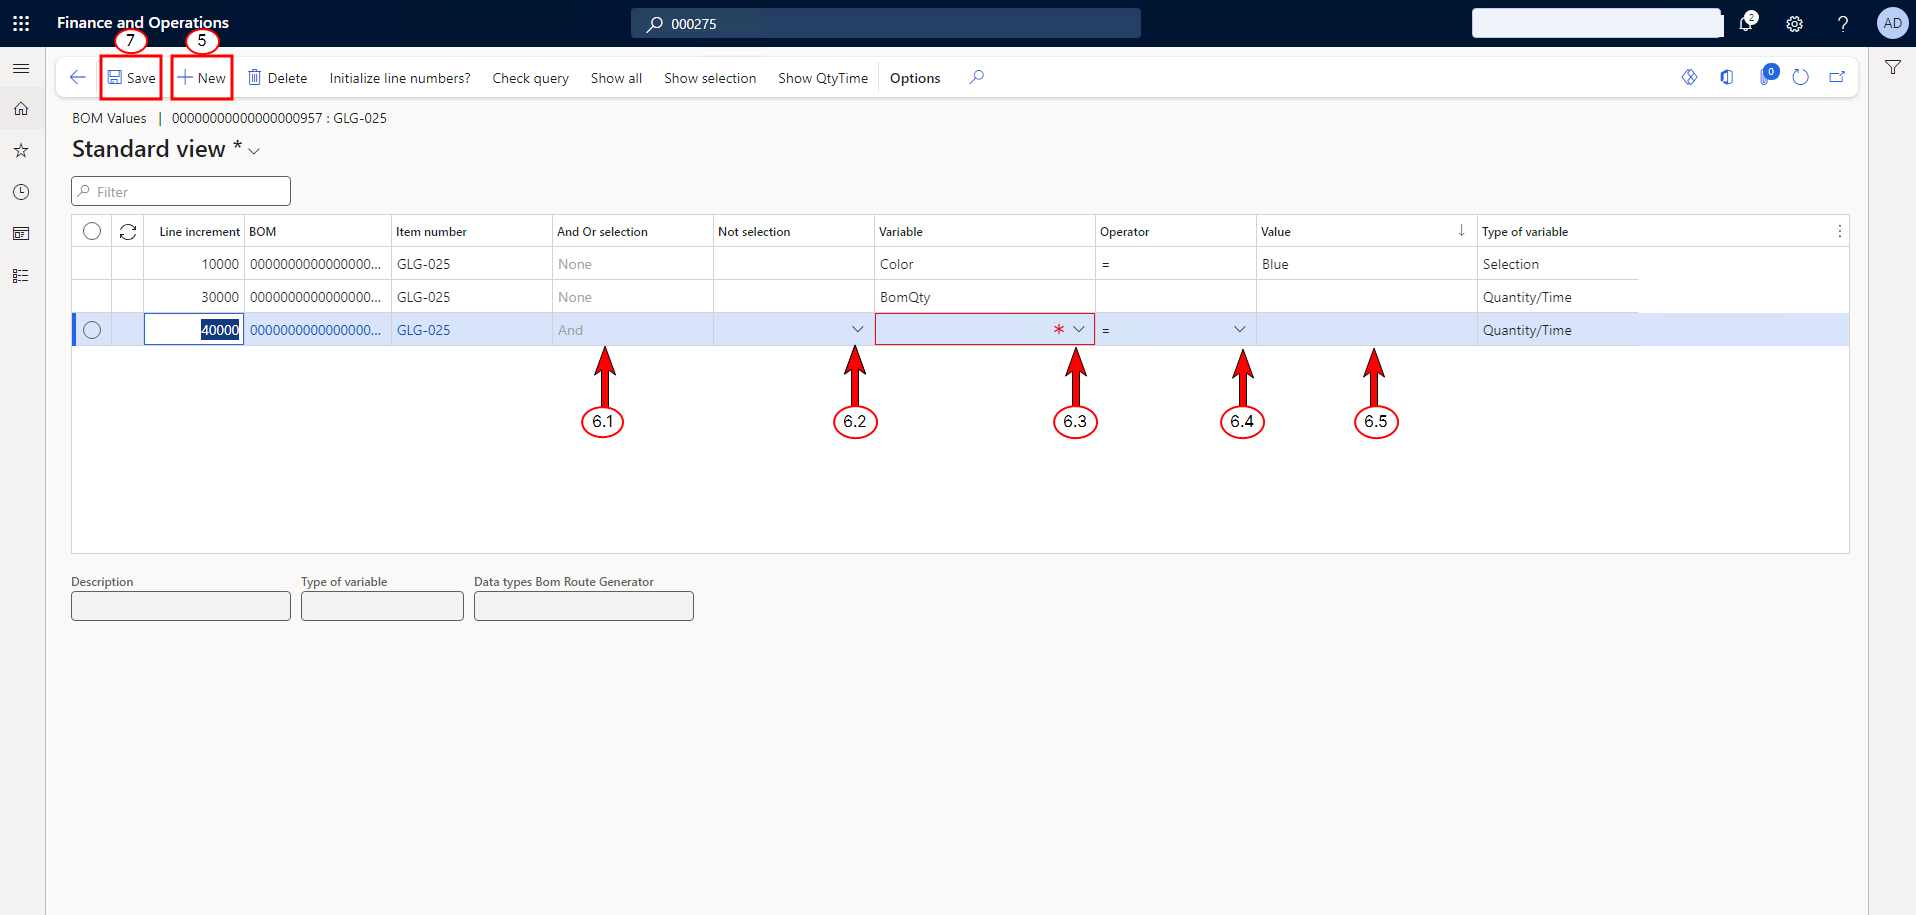
Select the +New button.
-
Create a BOM Line copy rule.
-
In the And Or selection dropdown, define whether to use advanced logic.
-
(Optional) Set your Not selection value if you want to invert the statement's logic so that the value does not equal the value.
-
In the Variable dropdown, select the variables for the condition. The Type of Variable is automatically populated based on your selected variable.
-
In the Operator dropdown, select the Operator for the rule.
-
In the Value dropdown, select the value for the variable when evaluating the rule.
-
BOM Values Form Advanced Logic Overview
The BOM Values form allows for using advanced logic through the "And/Or" selection and Not selection dropdowns, along with various operators. Here’s how each option works:
None: This operator inverts the condition of a single line. If you need to apply the inversion across multiple lines, you must apply the "Not" operator to each line individually.
And: The "And" operator takes precedence over "Or" when generating a logical statement. This means that "And" will group conditions more tightly, requiring both conditions to be true, before evaluating any "Or" conditions.
Or: The "Or" operator is evaluated after any "And" operators, meaning that if any condition connected by the "Or" is true, the entire statement is evaluated as true, but only after all "And" conditions have been evaluated.
Not Color = Red would run when the variable Color is not equal to Red.
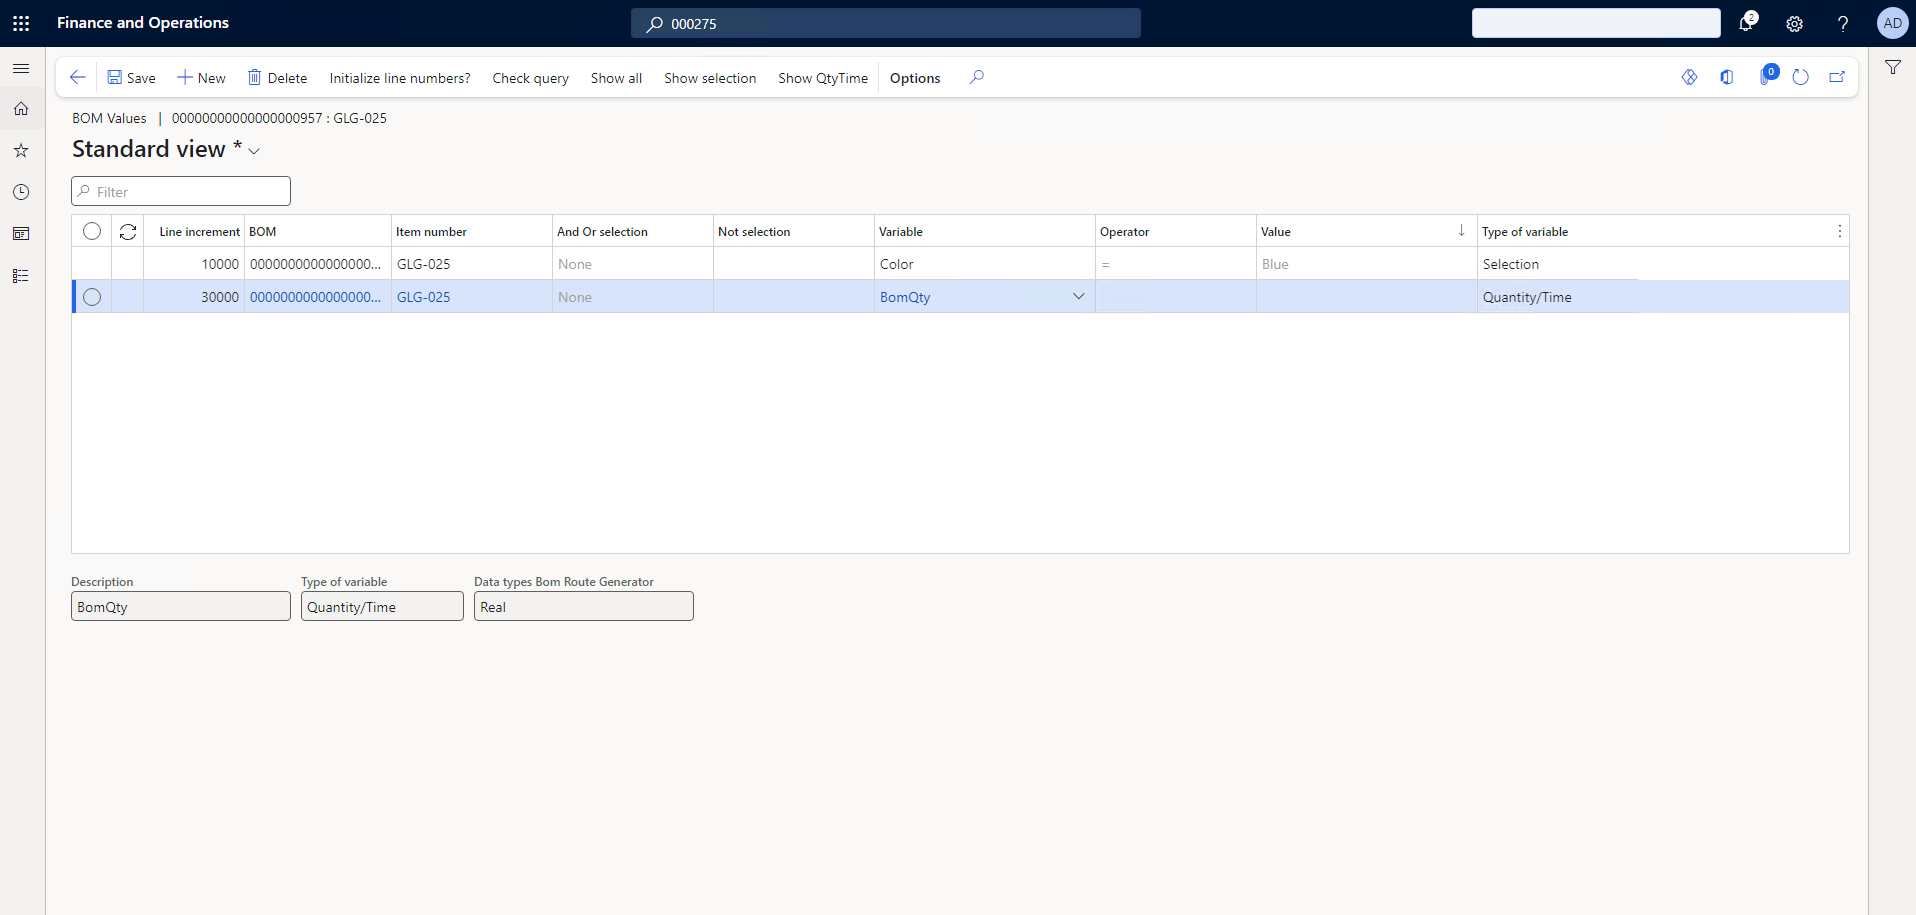
Example BOM Condition on Variable Color
In this process, if the client selects "Blue" as the item color, the system will create a copy of the BOM line. Additionally, the BomQty field, which has a Type of variable value of Quantity/Time, will be dynamically replaced with the value provided by the Experlogix configuration during this action.
-
Select Save.
Once you've set up the condition in the BOM Values form, be sure to approve and activate the BOM. Experlogix relies on the Microsoft Dynamics 365 F&O active BOM concept to locate the Overcomplete/Super BOM. For more detailed guidance on activating BOMs in Microsoft Dynamics 365 F&O, refer to the official Microsoft documentation.
Link Experlogix variables to a Route
In Microsoft Dynamics 365 F&O, Experlogix integrates with the Route functionality to enable dynamic adjustments to production processes based on defined variables. This allows businesses to streamline operations by configuring routes based on specific attributes, similar to the process for BOMs.
-
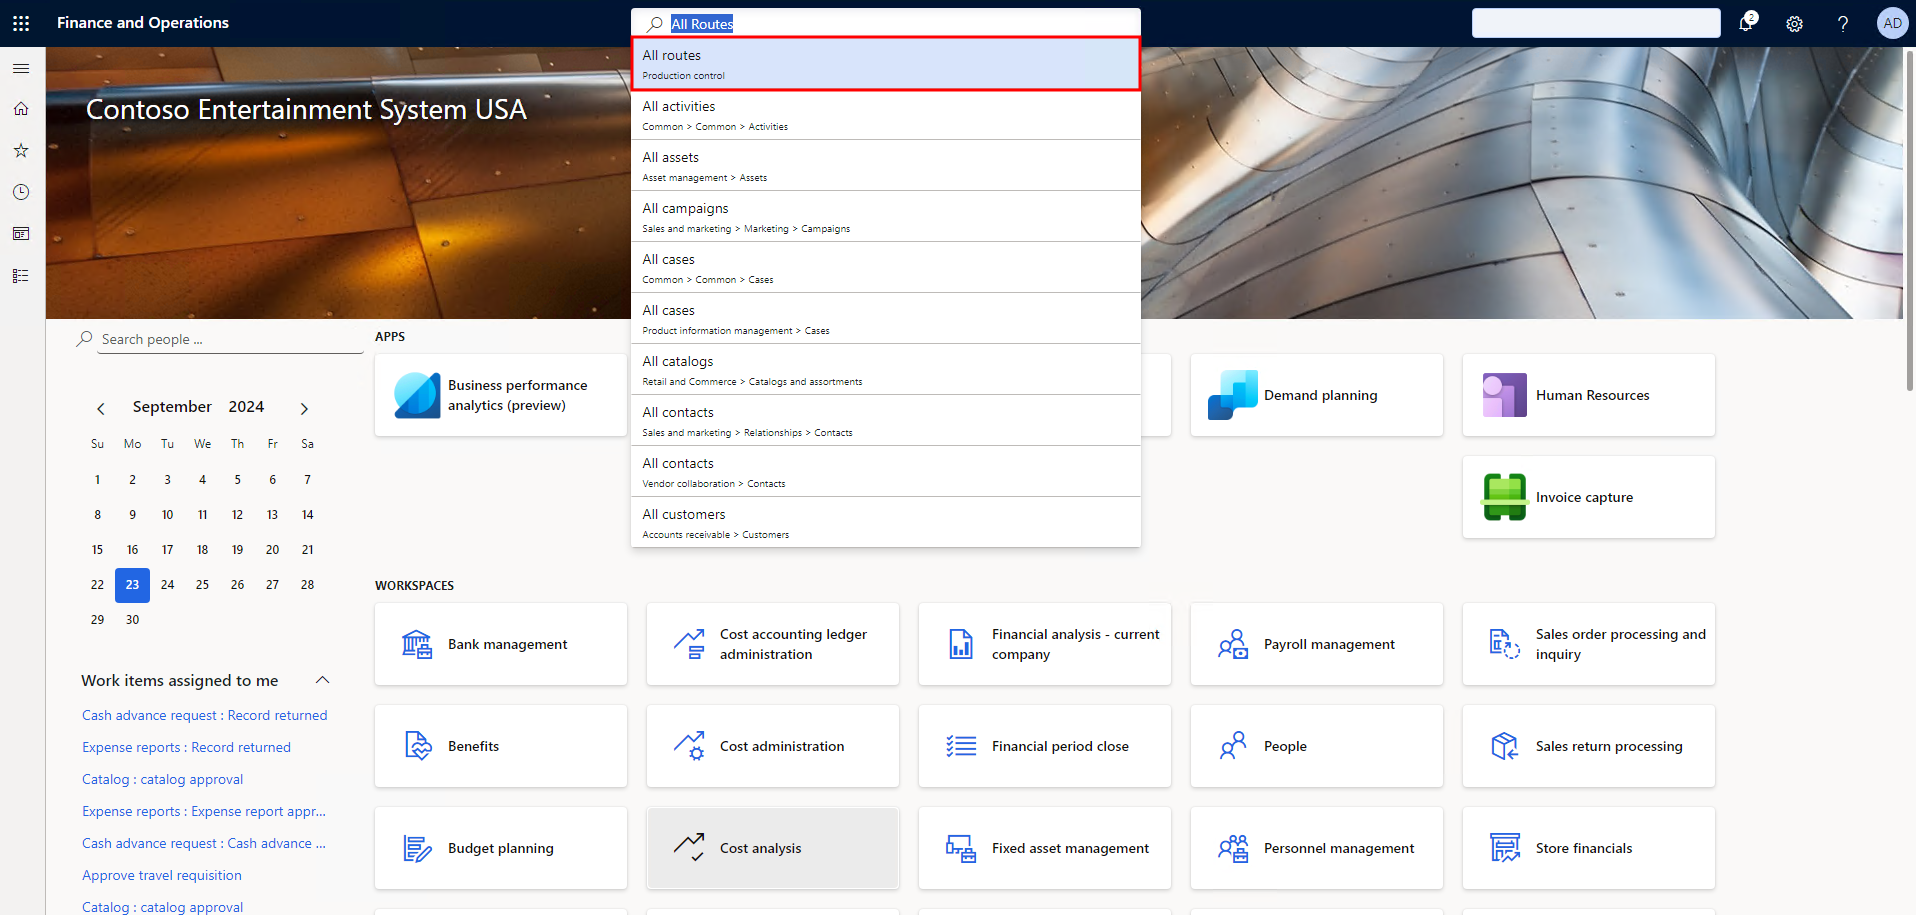
In Microsoft Dynamics 365 F&O, in the search box, search for All routes and select Product information management> Bills of materials and formulas.
-
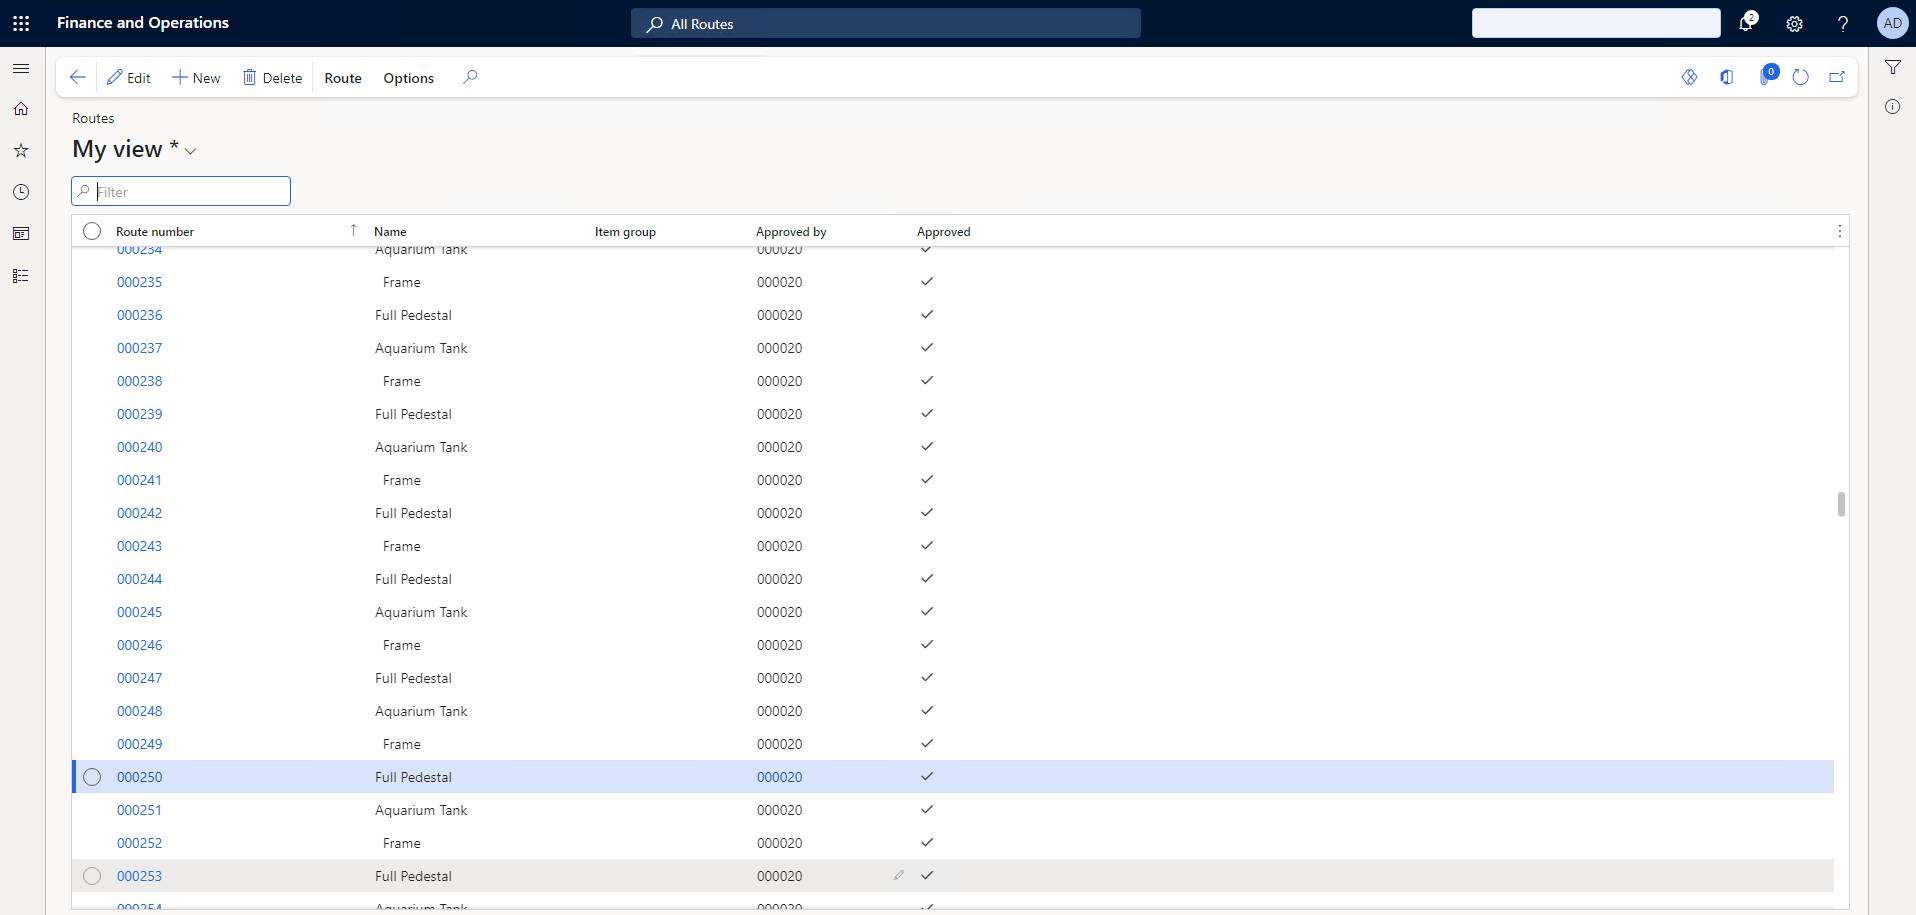
Select a route.
-
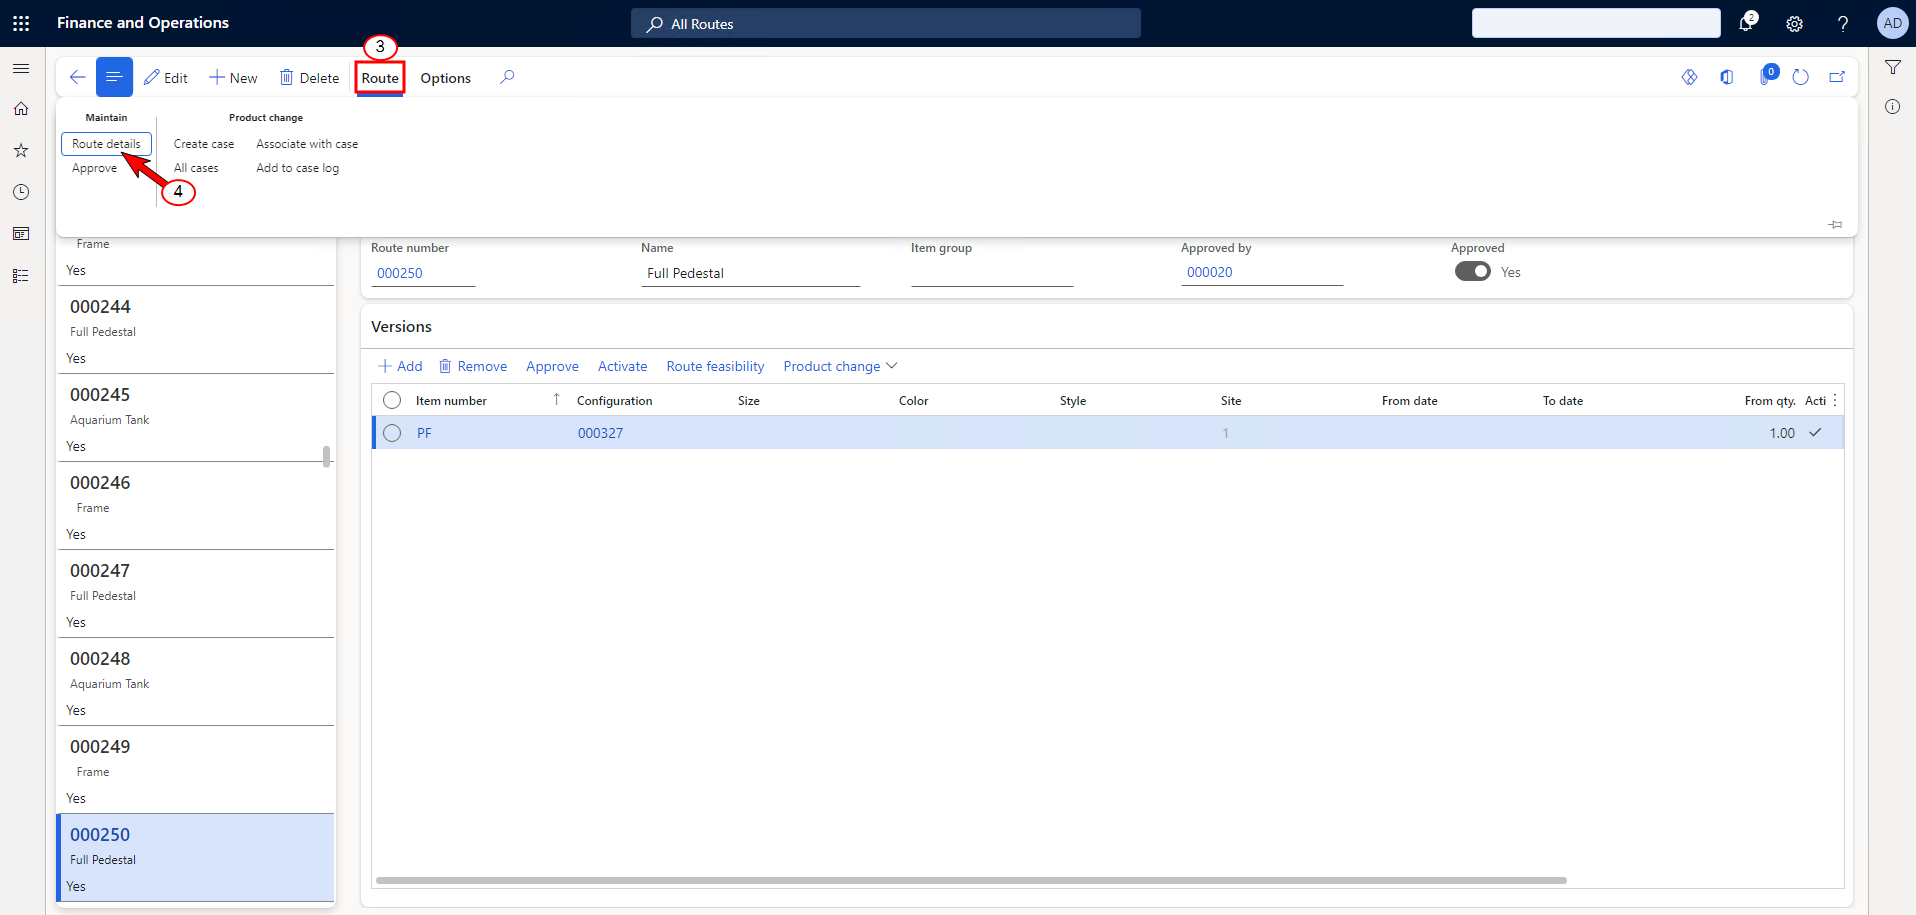
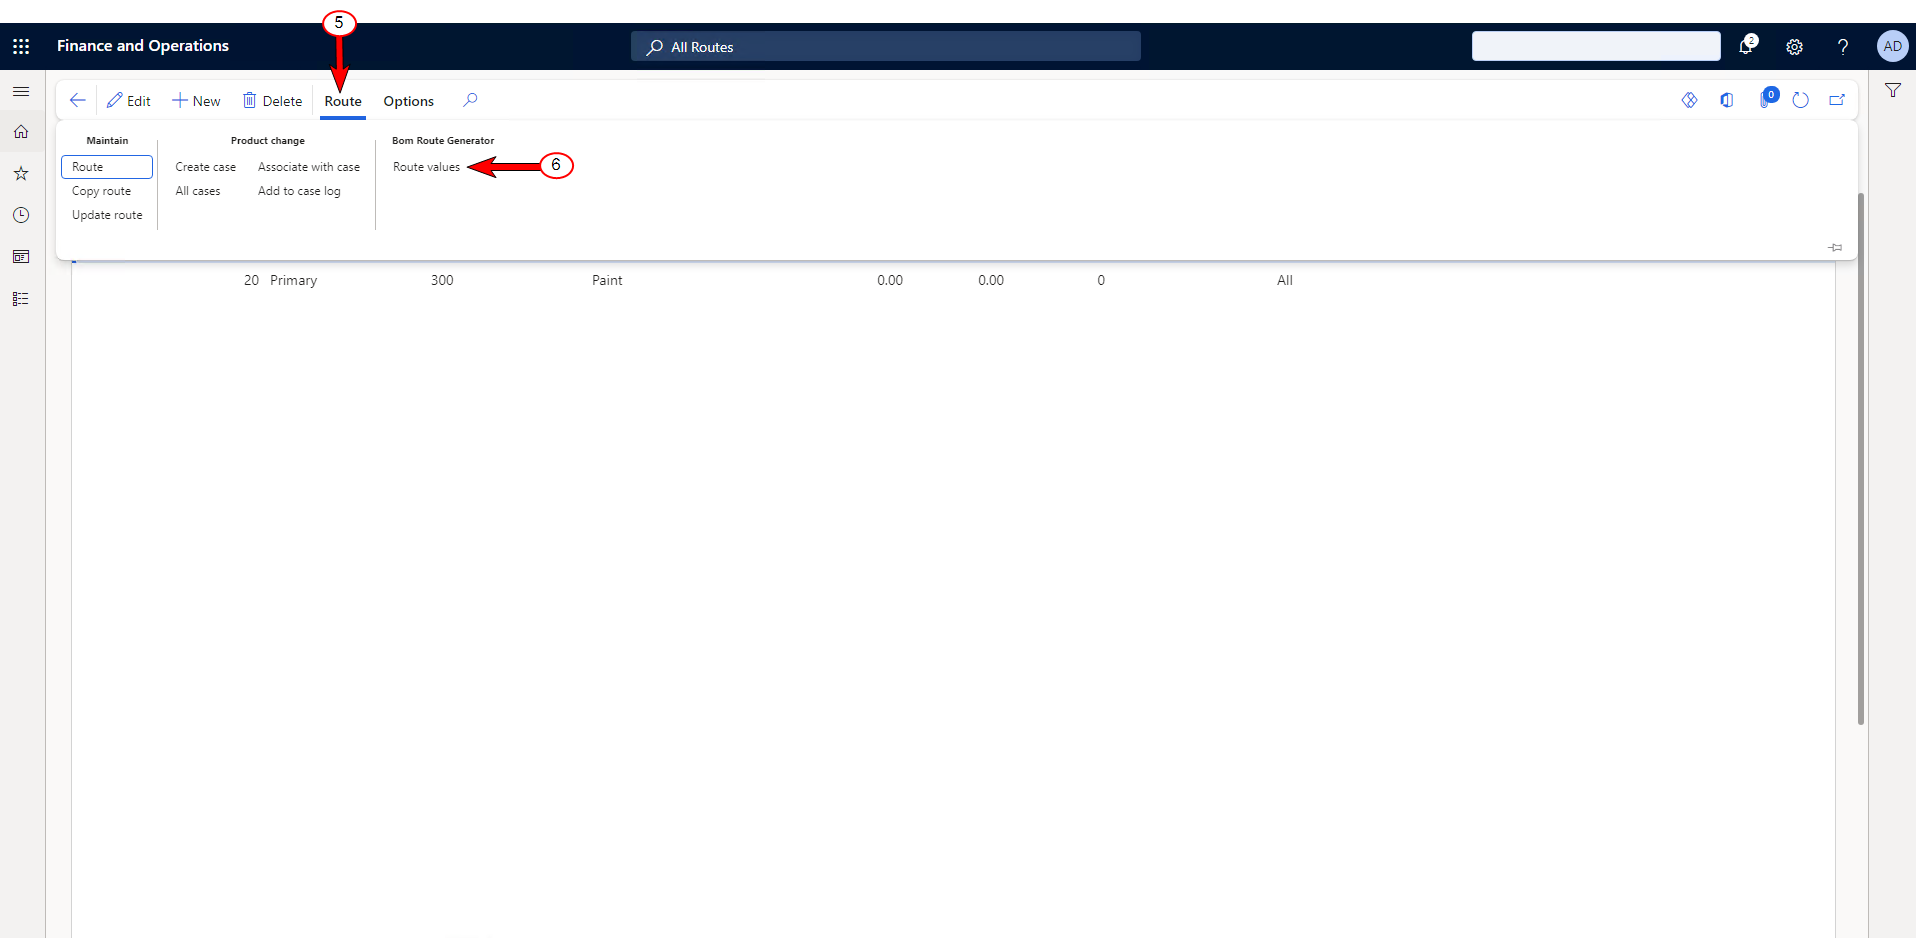
Select Route.
-
Select Route Details.
-
From the Route Details page, select Route.
-
Select the Route Values button.
Route Values button
The e-Con Route Values button, similar to the BOM Values button, allows users to directly integrate variables such as Size or Process Time into the route. Clients can leverage flexible, real-time adjustments to operations based on Experlogix configurations. You can access the button from the Route Details screen in Microsoft Dynamics 365 F&O.
-
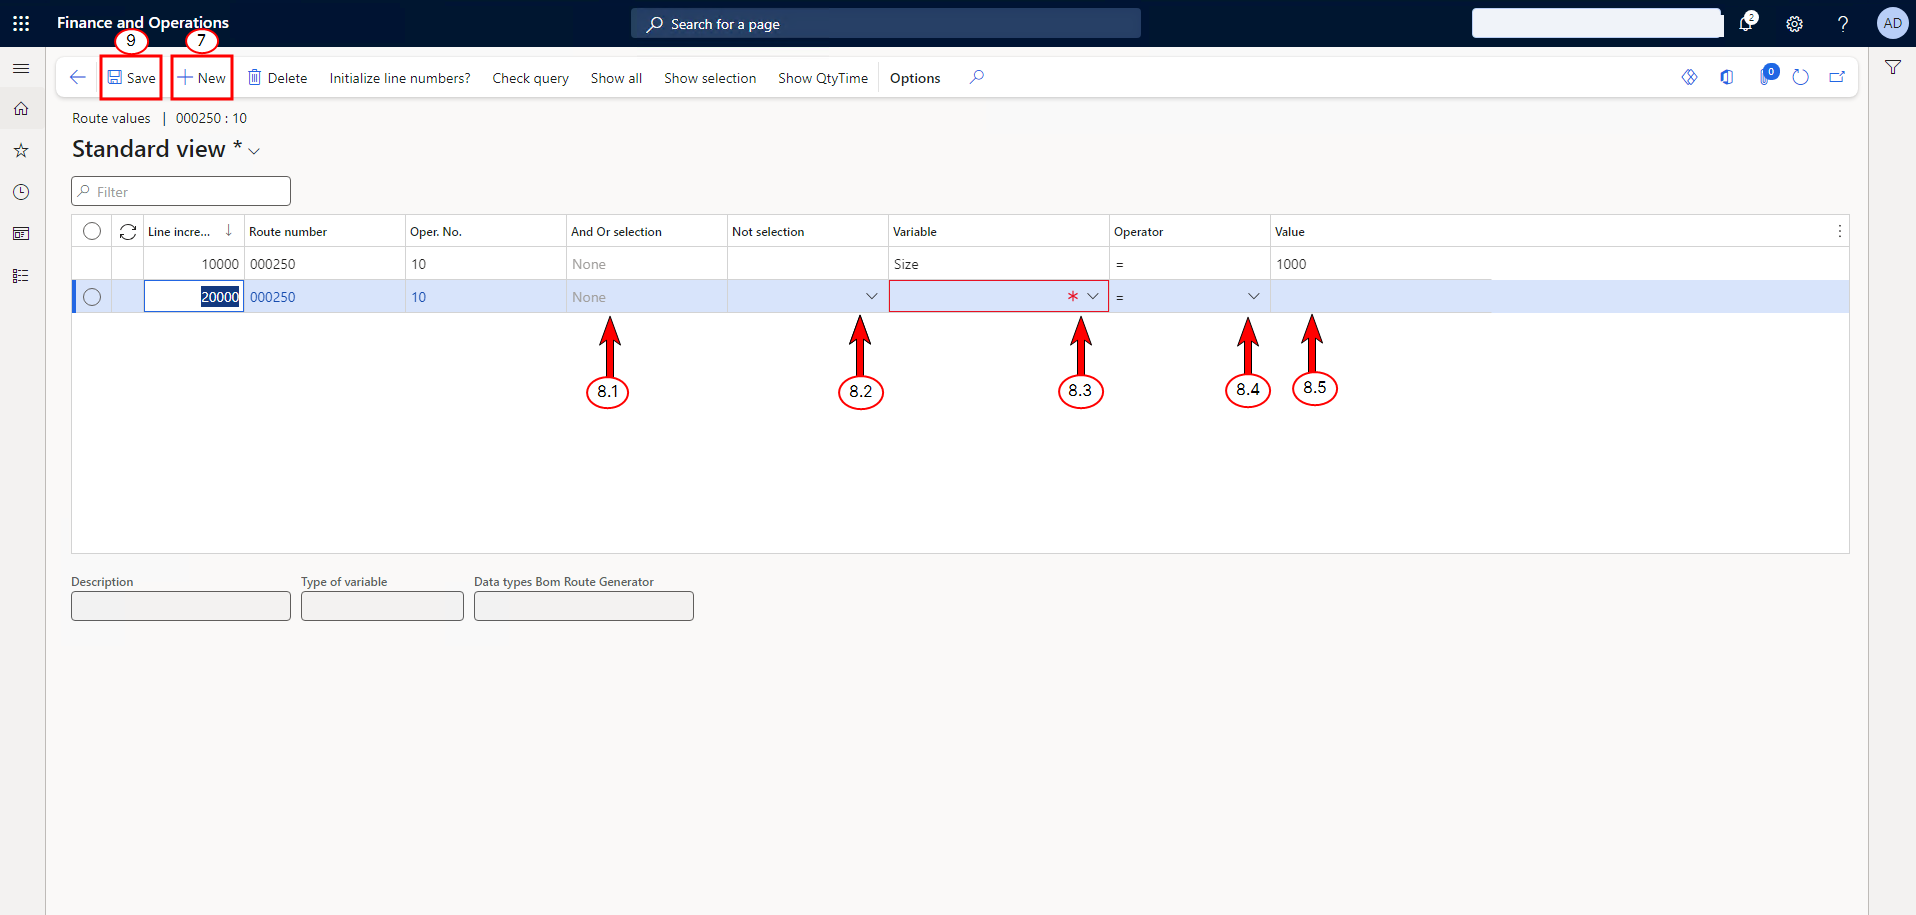
Select the +New button.
-
Set up a Route Operation Copy Rule:
-
In the And/Or selection dropdown, define whether to use advanced logic.
-
Set your Not selection value, if needed, to invert the condition.
-
In the Variable dropdown, select the variable for the condition.
-
In the Operator dropdown, choose the operator to apply.
-
In the Value dropdown, select the value for the variable when evaluating the rule.
-
BOM Values Form Advanced Logic Overview
The BOM Values form allows for using advanced logic through the "And/Or" selection and Not selection dropdowns, along with various operators. Here’s how each option works:
None: This operator inverts the condition of a single line. If you need to apply the inversion across multiple lines, you must apply the "Not" operator to each line individually.
And: The "And" operator takes precedence over "Or" when generating a logical statement. This means that "And" will group conditions more tightly, requiring both conditions to be true, before evaluating any "Or" conditions.
Or: The "Or" operator is evaluated after any "And" operators, meaning that if any condition connected by the "Or" is true, the entire statement is evaluated as true, but only after all "And" conditions have been evaluated.
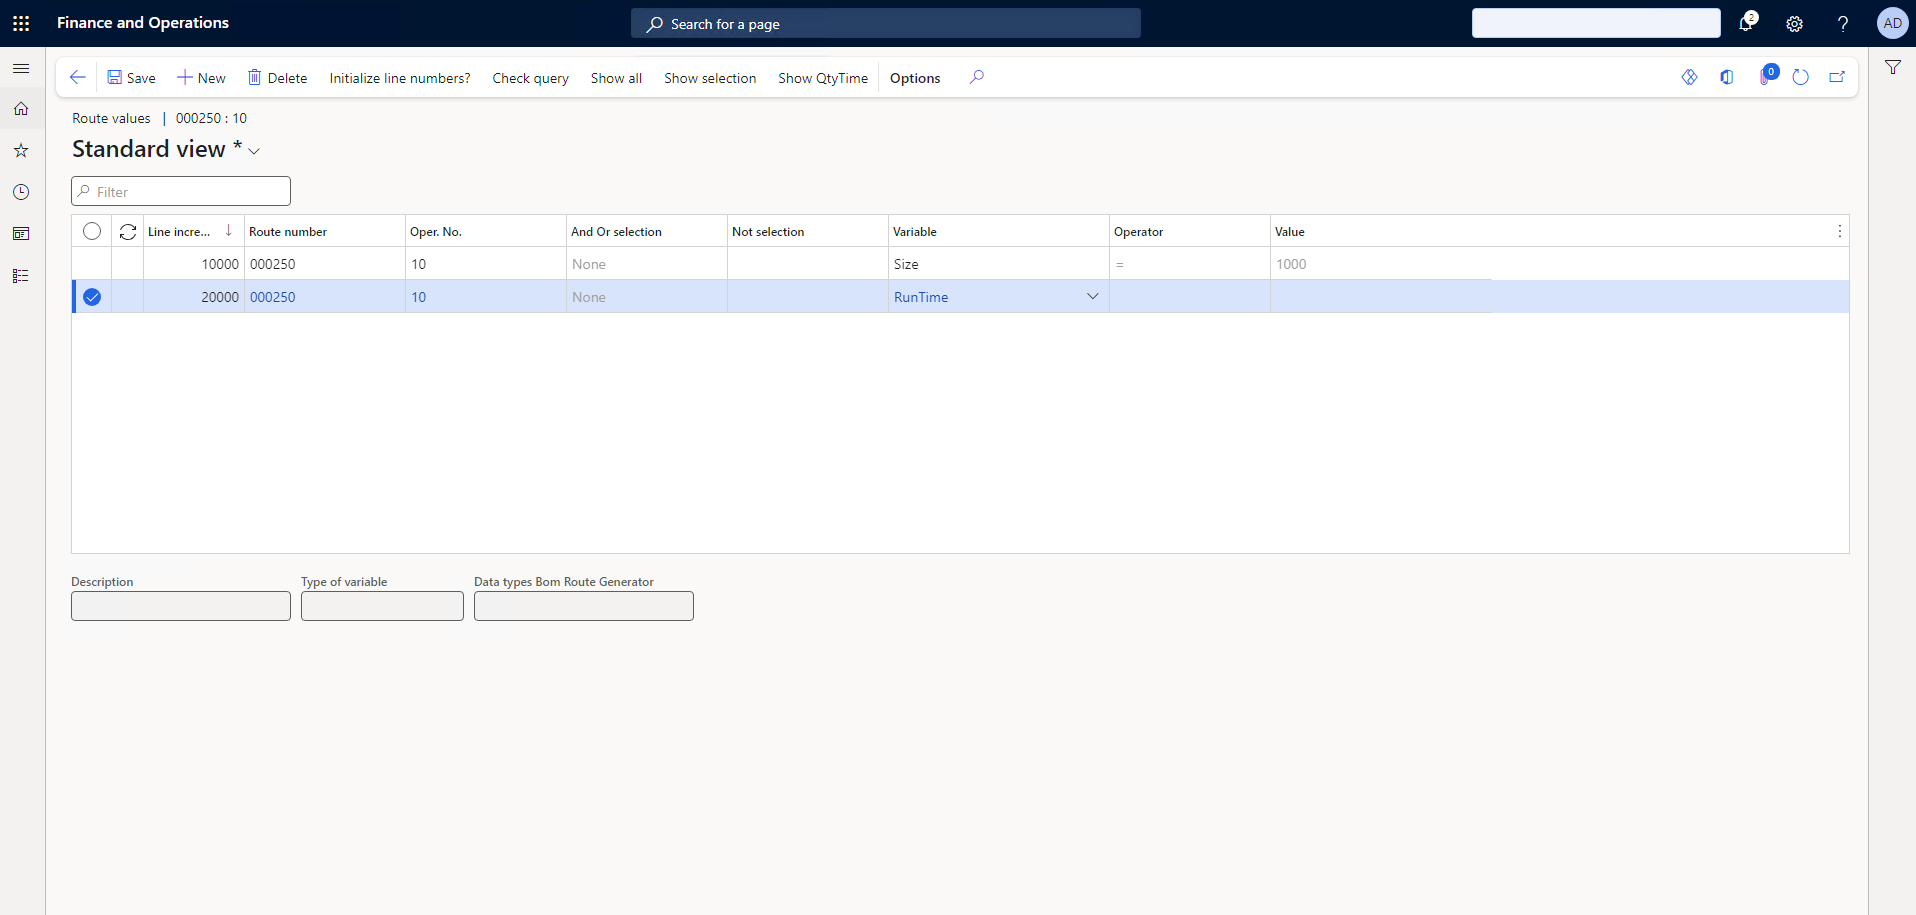
Example Route Condition on Variable Size:
In this example, if the client selects 1000 as the value for the Size variable, the system will create a copy of the route operation. Additionally, the RunTime field, which has a Type of variable value of Quantity/Time, will be dynamically replaced with the value provided by the Experlogix configuration during this action.
-
Select Save.
Once you have set up the condition in the Route Values form, you must approve and activate the route to finalize the configuration. Like the BOM process, Experlogix relies on the active route concept in Microsoft Dynamics 365 F&O. For more details on activating routes, please refer to the official Microsoft documentation.