
Cloud Connect leverages Microsoft Dynamics 365 F&O's matching feature by checking for matching data, such as BOMs, routes, and items, when saving a configuration. If matching data is present in Microsoft Dynamics 365 F&O, the data is reused rather than duplicated. This behavior leads to improved save performance and a smaller master data set to manage in Microsoft Dynamics 365 F&O. Users must Set Matching to Active and Initialize Default Matching Set on a processing entity to enable matching. A default set of matching fields exist for the entities listed below:
-
BOMBillOfMaterialsVersionEntity
-
BOMBillOfMaterialsLineEntity
-
EcoResReleasedProductEntity
-
EcoResReleasedProductVariantEntity
-
RouteVersionEntity
-
RouteRouteOperationEntity
-
RouteOperationPropertiesEntity
Match Keys
A match key in Microsoft Dynamics 365 F&O represents each unique variant of an entity record or structure and is used to match existing entity data and reuse it while creating a new record. On a given entity, each unique set of match field values represents a match key. When matching is enabled and a new record is saved to Microsoft Dynamics 365 F&O, if the match fields in the incoming record match an existing record in the system, the system reuses the existing record rather than creating a new one. This minimizes the size of the master data set in Microsoft Dynamics 365 F&O. There are three types of matching:
-
Single-level Match: Used for a configurable entity that does not have a child entity associated with it. The key must match on the record for a match to occur. When a match occurs, the entire record is reused.
-
Multilevel Match: Used for a configurable entity that has a child entity associated with it. The key must match on the master and detail record(s) for a match to occur. When a match occurs, the entire master and detail record is reused. This is the default type of matching, typically used to match product variants and bill of materials.
-
Structure Match: Used for data entities entity that has a more than two-level structure which is typically a route. All match fields need to be provided via a process map. Match keys must match on the entire structure for a match to occur. When a match occurs, the entire structure is reused. This type of matching requires the Structure matching toggle to be set to Yes on the Match setup form.
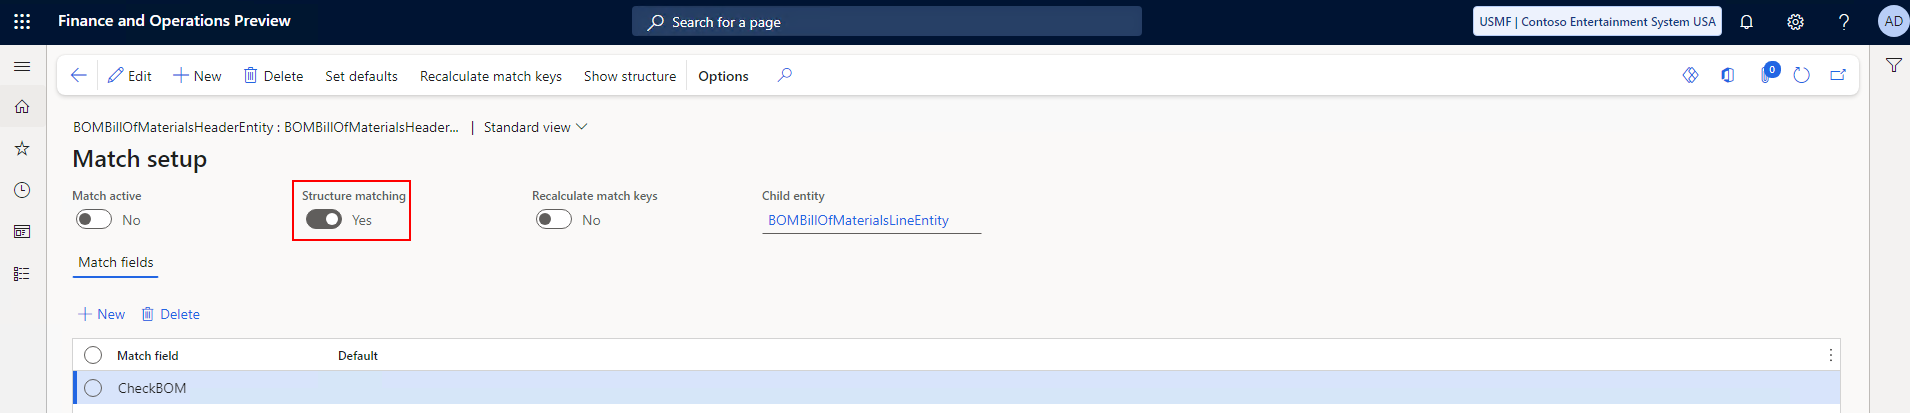
Examples BOM Structure

-
Root entity is
BOMBillOfMaterialsVersionEntity-
Child entity is
BOMBillOfMaterialsLineEntity.
-
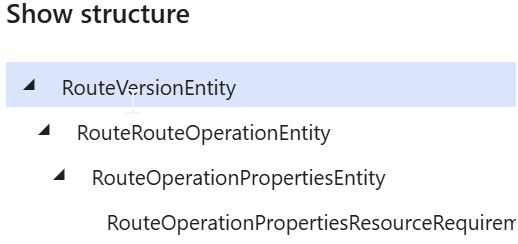
Example Route Structure
-
Root entity is
RouteVersionEntity-
Child entity is
RouteRouteOperationEntity-
Child entity of this processing entity is
RouteOperationPropertiesEntity-
Child entity of this processing entity is
RouteOpertationPropertiesResourceRequirementEntity
-
-
-
You can view the structure of a given entity by selecting the Show structure button from the Match setup page.
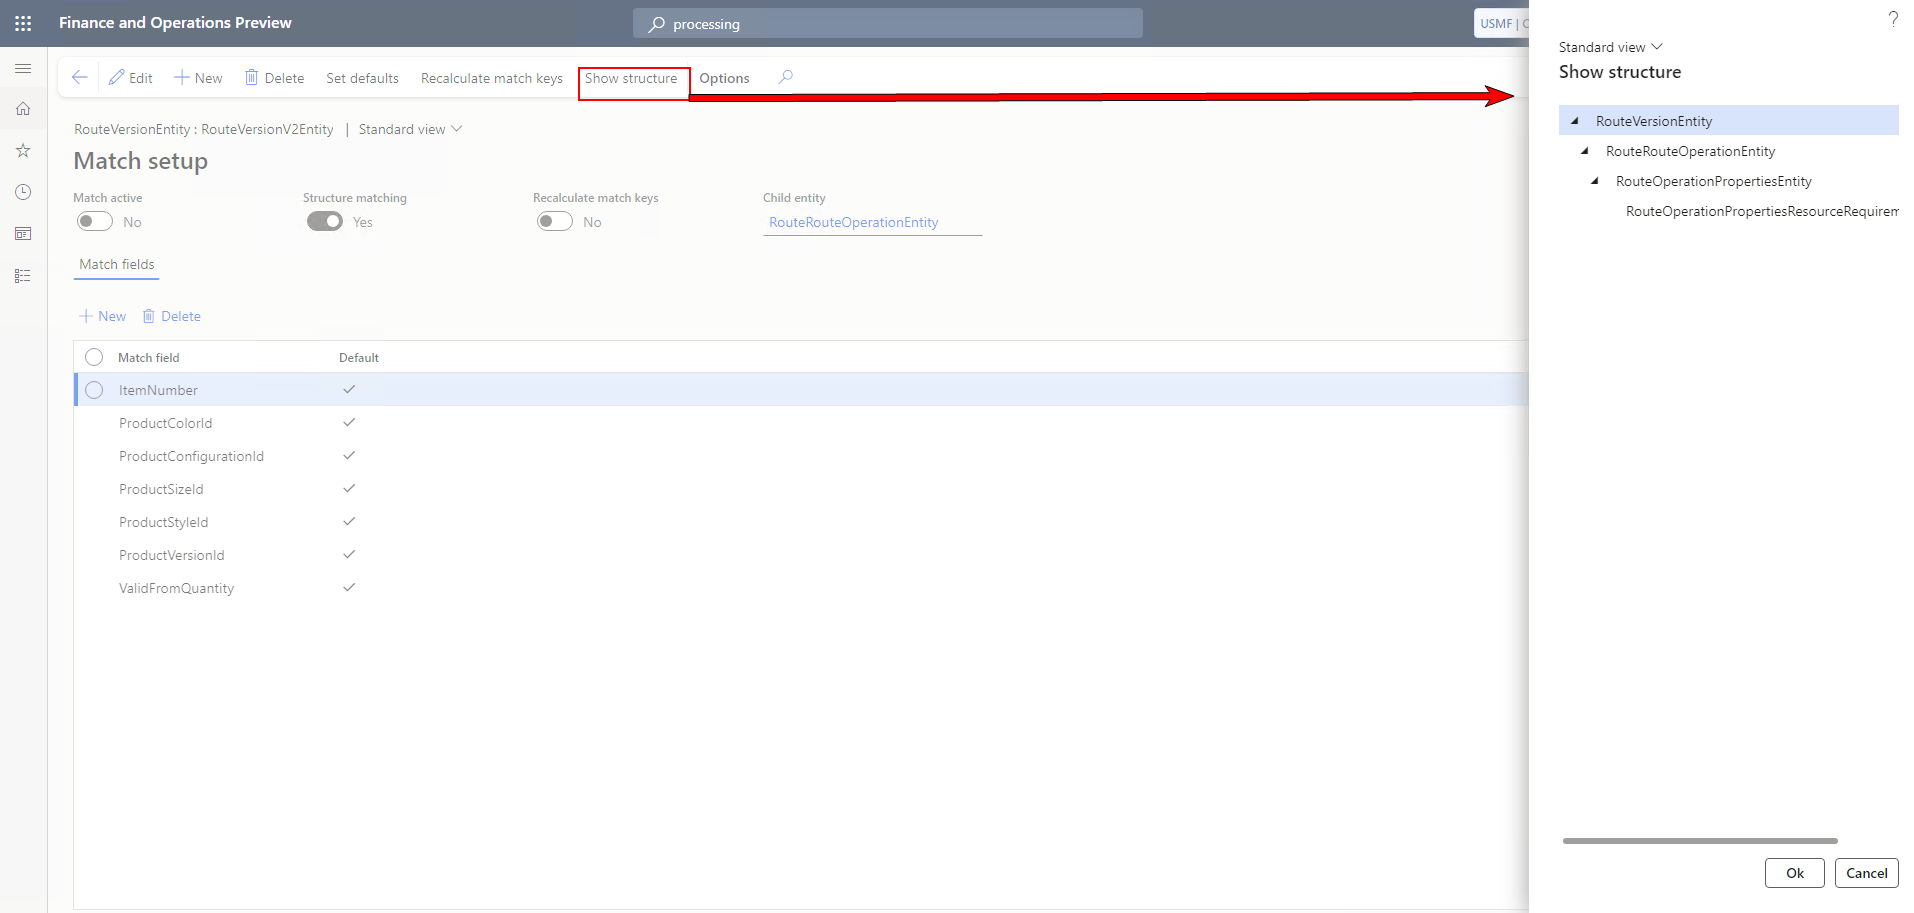
Limitations for Match Keys
-
You cannot use a template or base together with matching.
-
Any field you try to match must be part of the process map and be part of the process document.
Recalculate Match Keys
When you change a match field on an entity, you must use the process outlined in this topic to recalculate match keys so they are available the next time a Configurator user saves a configuration to Microsoft Dynamics 365 F&O. For more information, see the Recalculate Match Keys procedure.
Procedures
Initialize Default Matching Set
-
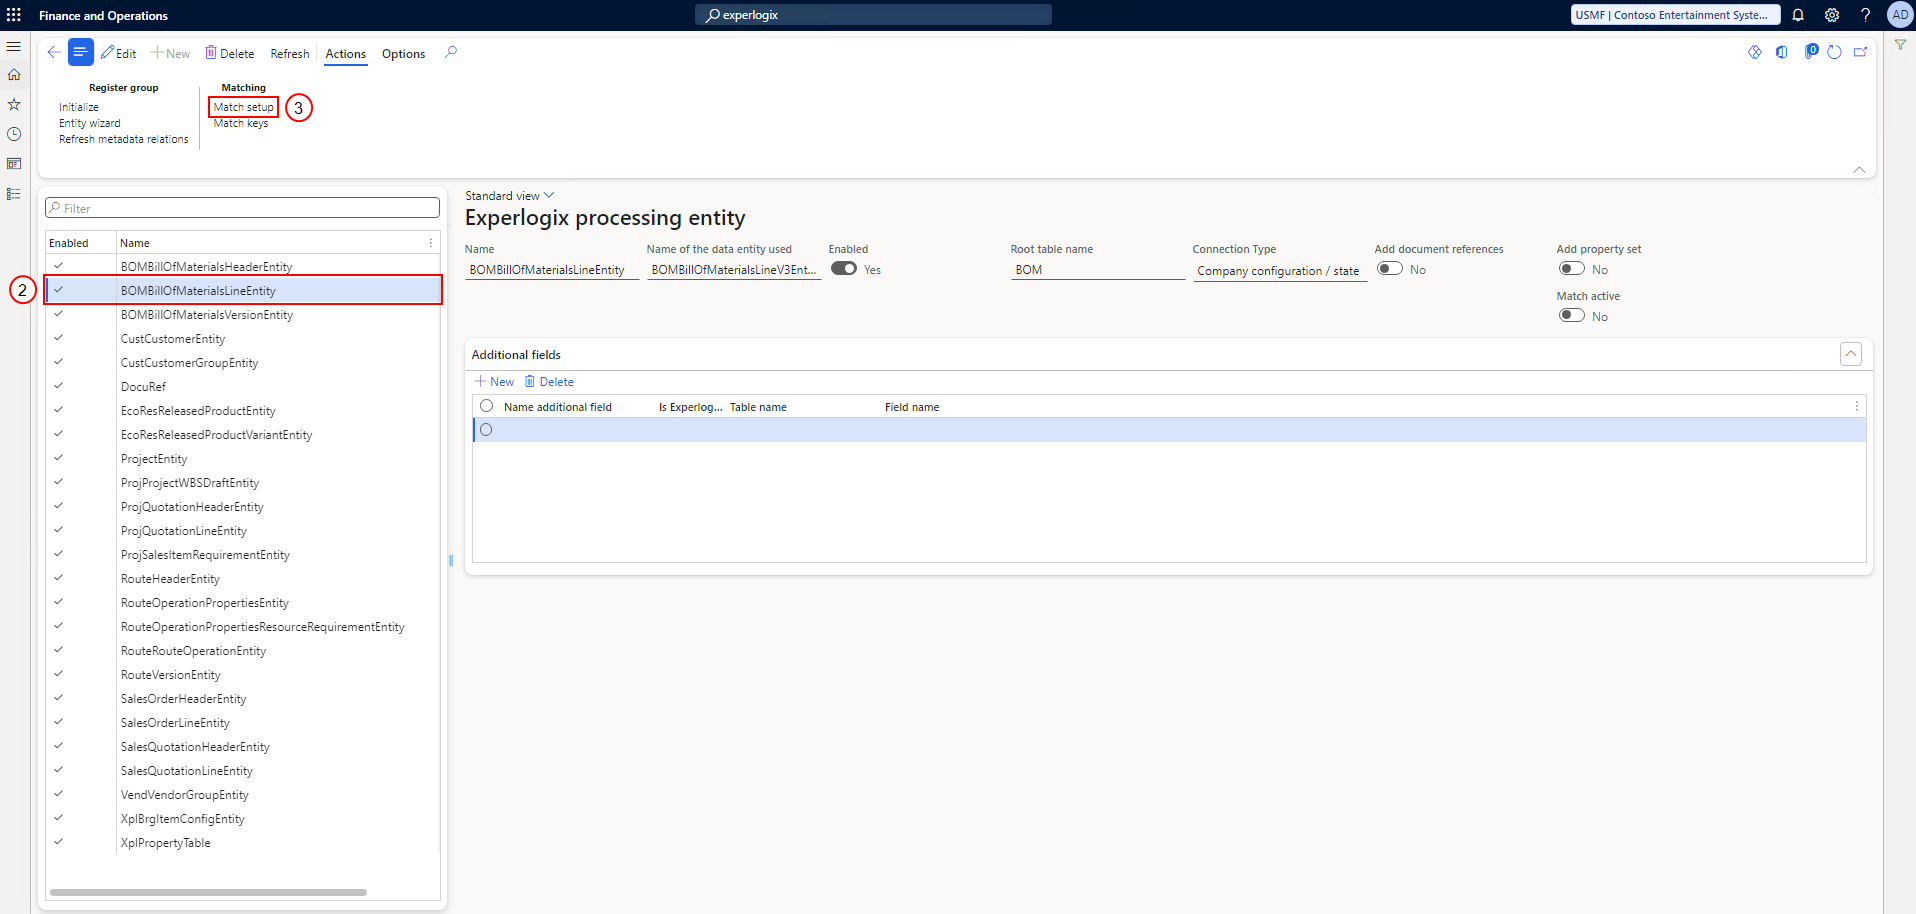
In Microsoft Dynamics 365 F&O, use search to navigate to the Experlogix Processing Entities page.
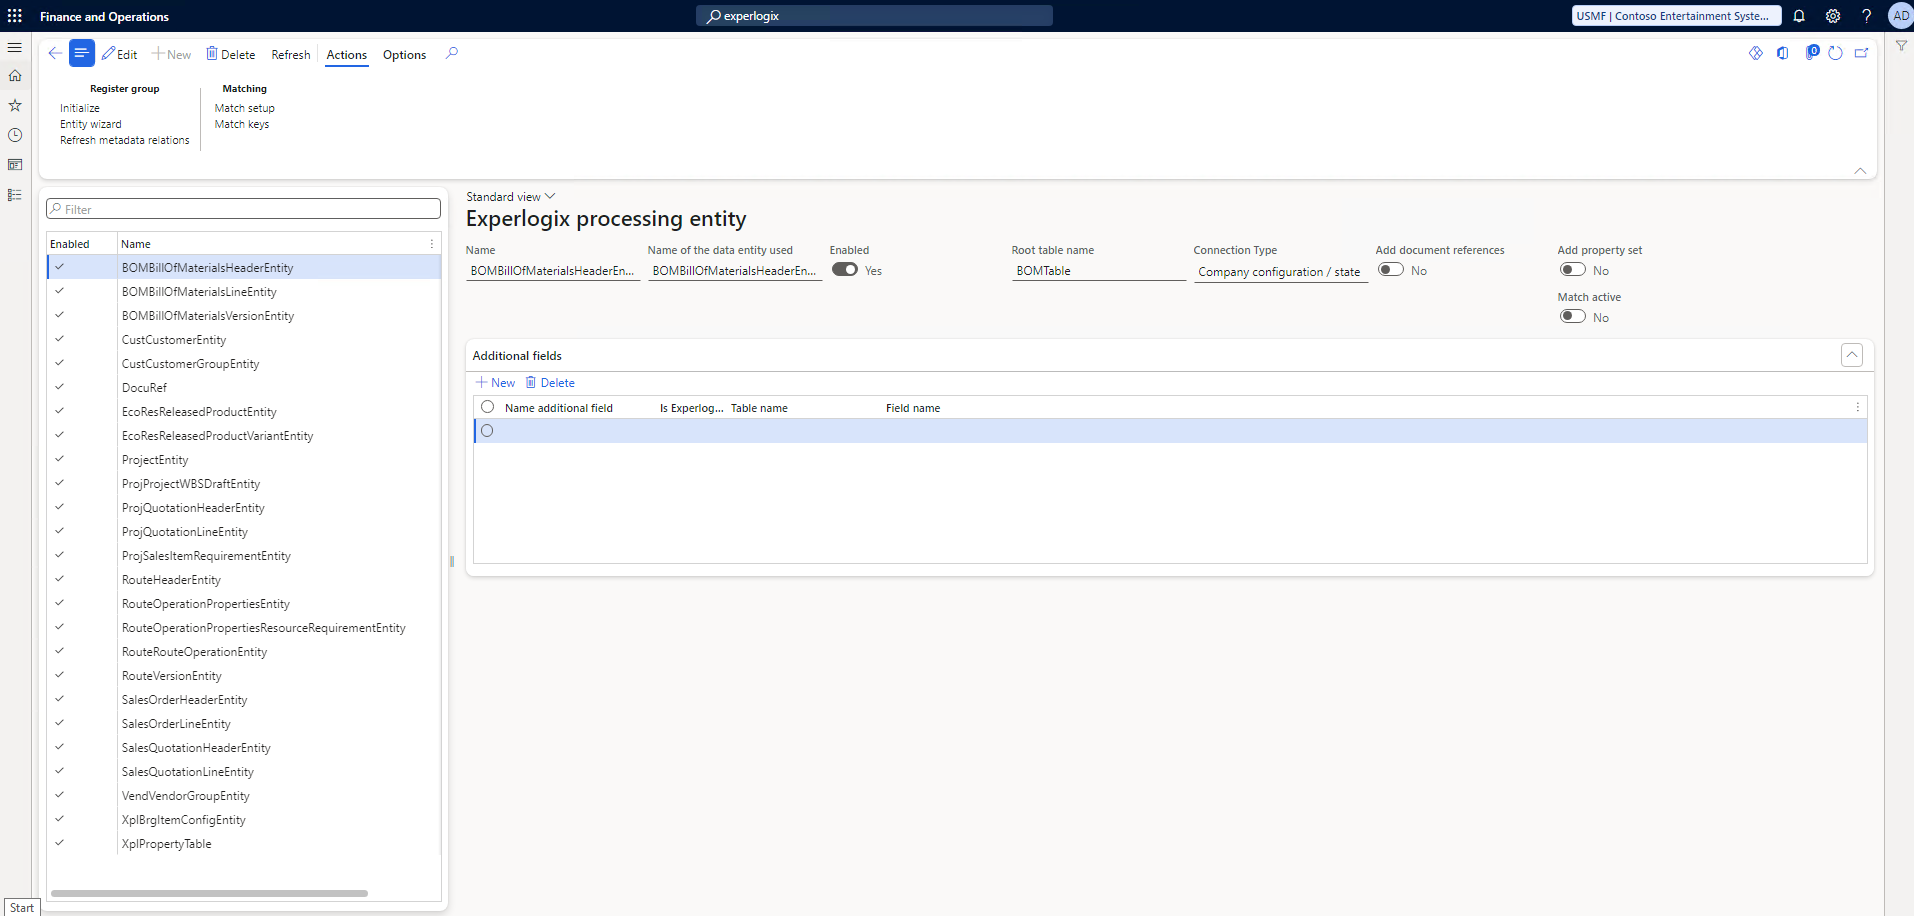
-
From the list of entities, select an applicable entity.
-
Select the Match Setup button.
-
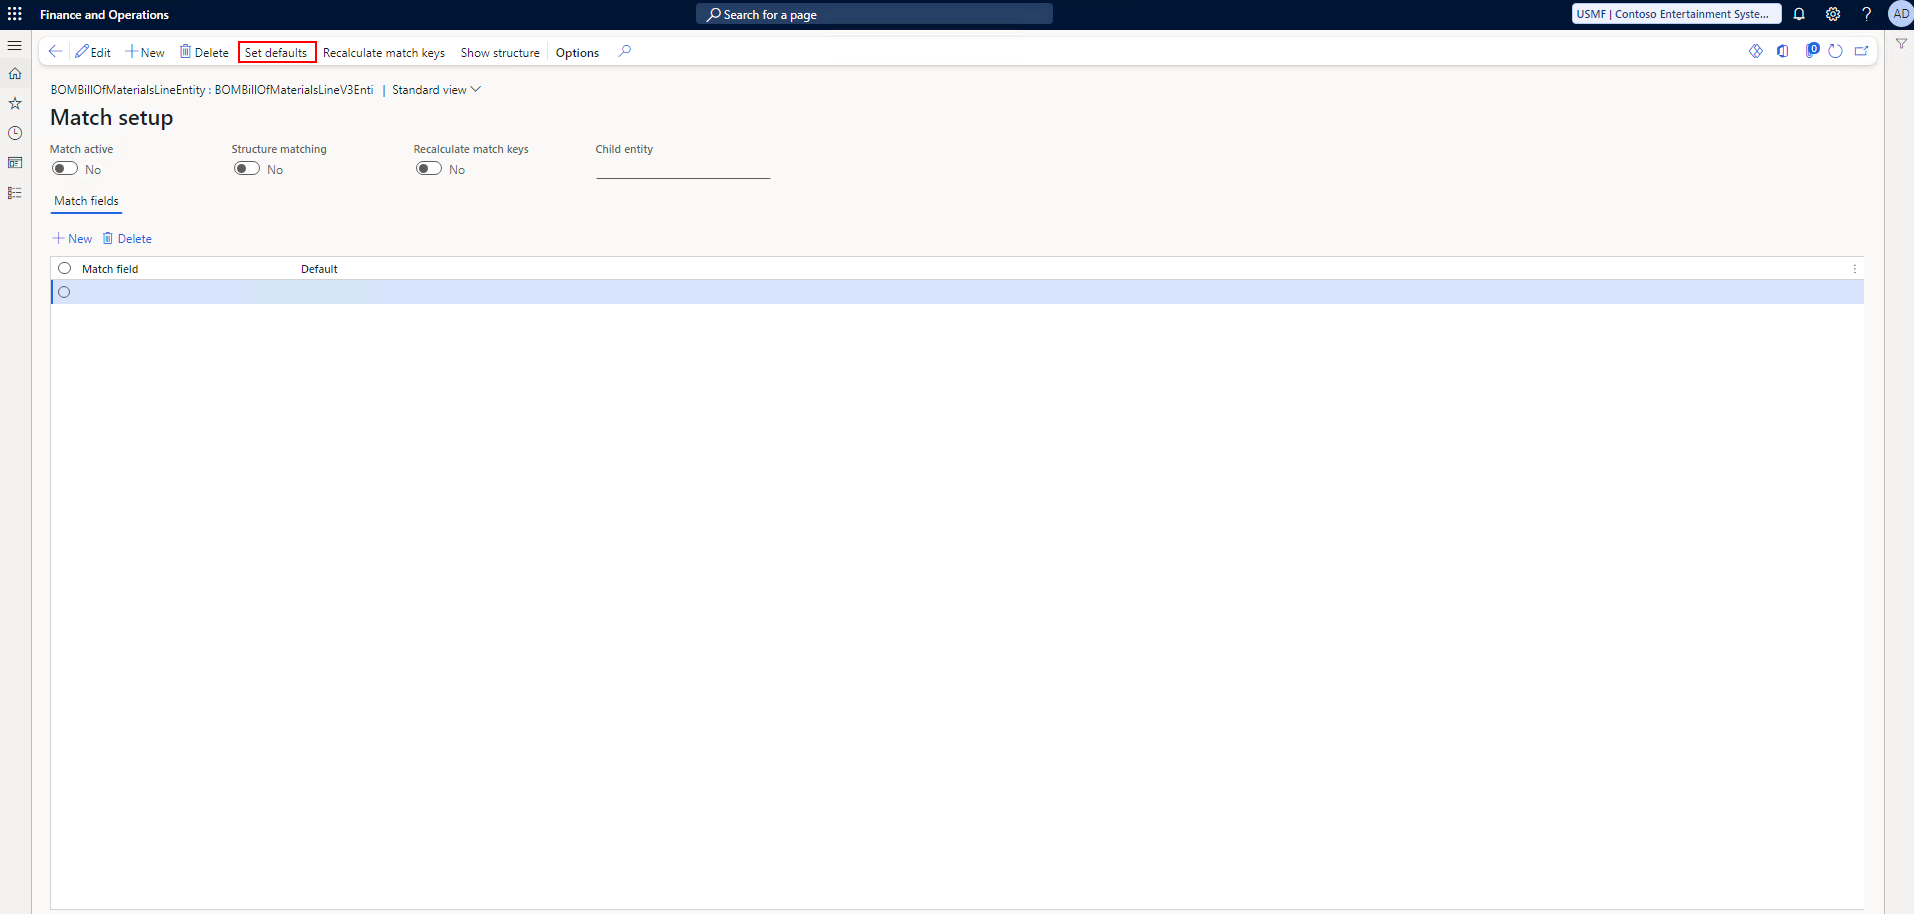
On the Match Setup page, select the Set Defaults button.
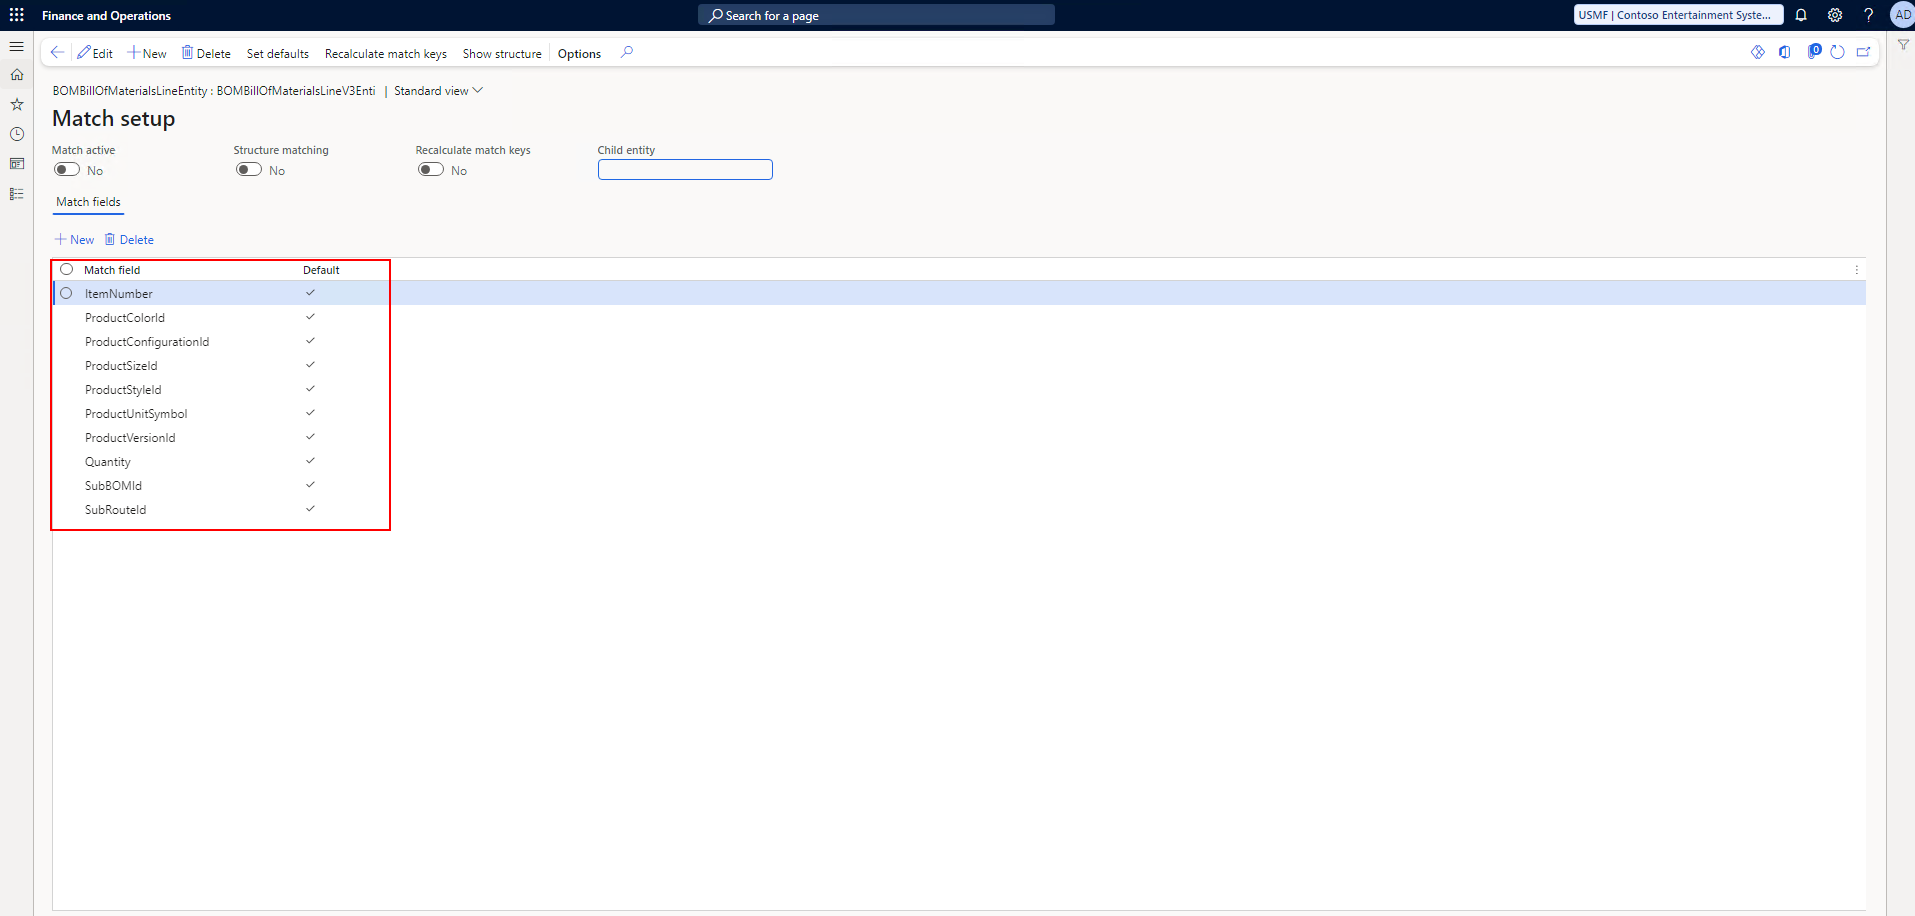
The list of default match fields populates.
Set Matching to Active
-
In Microsoft Dynamics 365 F&O, use the search to navigate to the Experlogix Processing Entities page.
-
From the list of entities, select an applicable entity.
-
Select the Match Setup button.
-
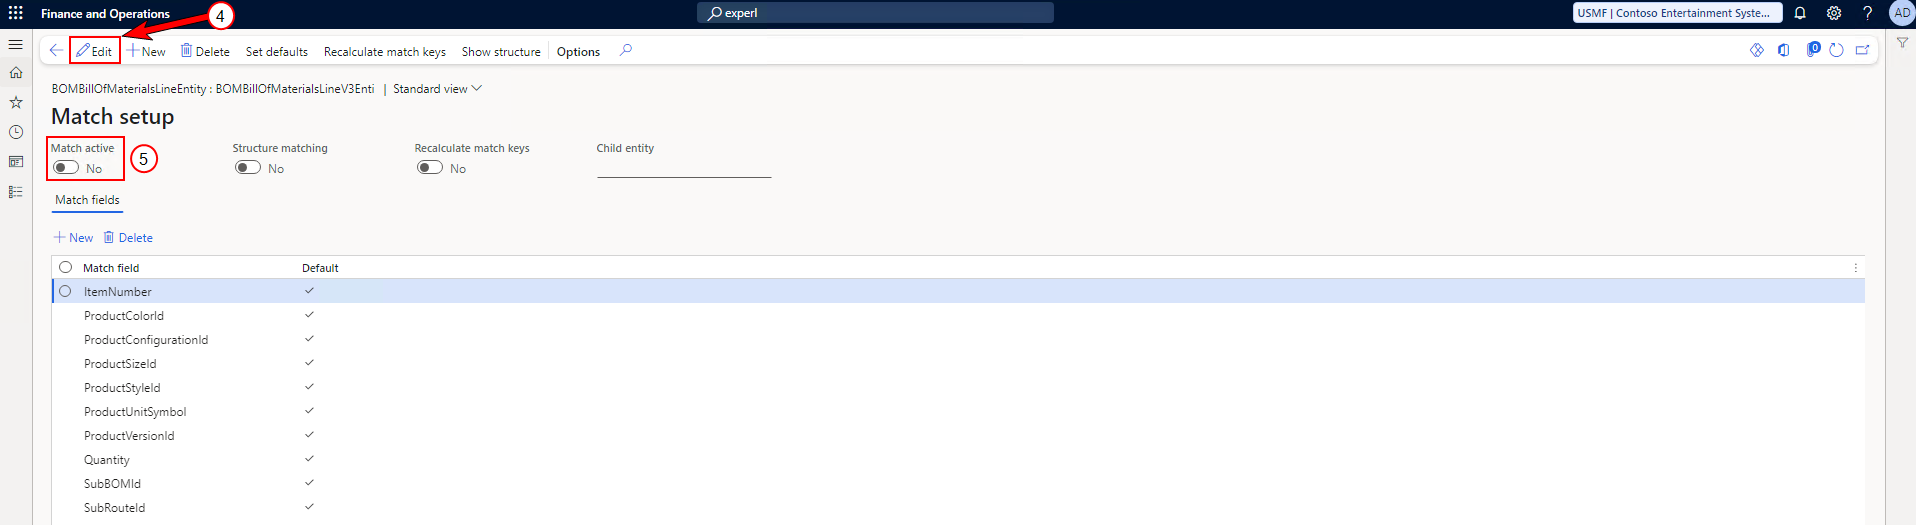
On the Match Setup page, select the Edit button.
-
Toggle Match Active to Yes.
Add a Match Field
The match key field must be added to the Match Setup page in Microsoft Dynamics 365 F&O to use it.
-
In Microsoft Dynamics 365 F&O, in the left pane, select Modules.
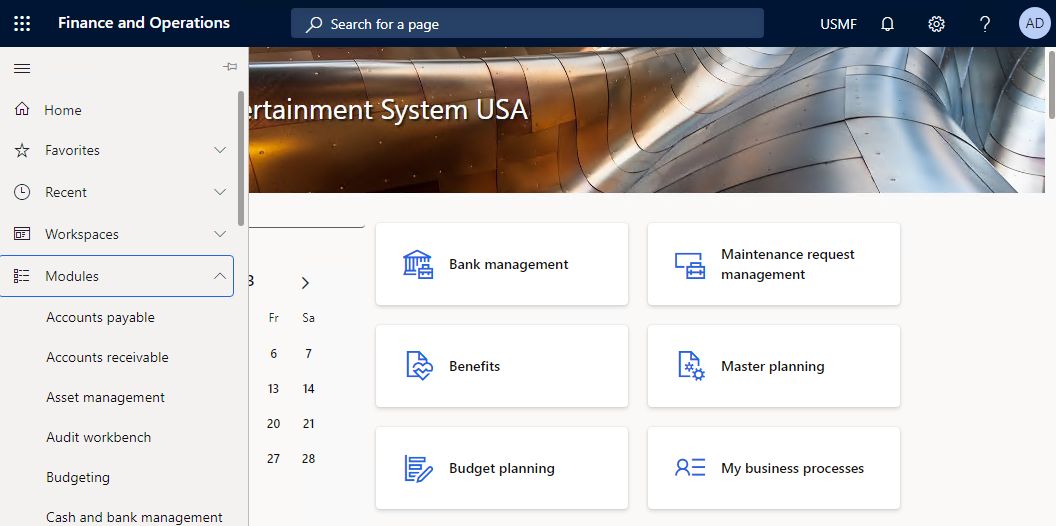
-
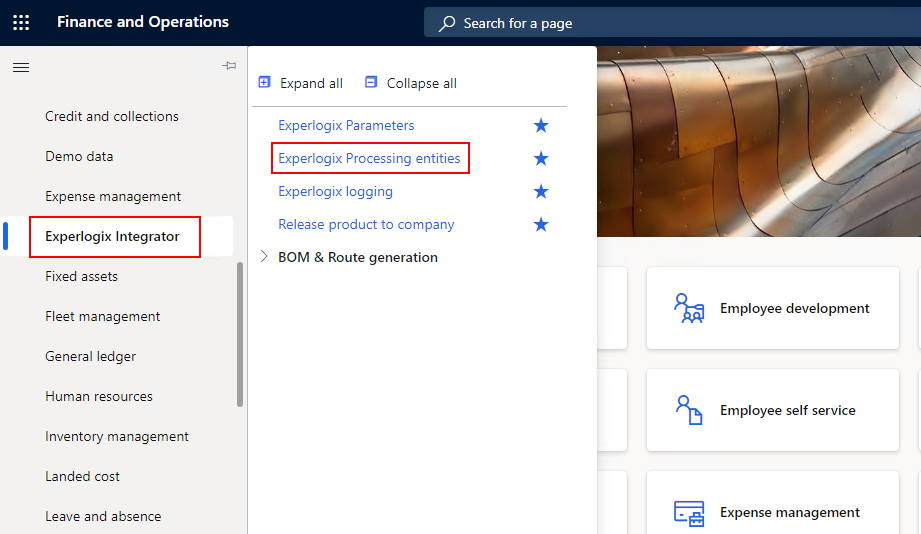
From the options displayed in the left pane, select Experlogix Integrator.
The Experlogix Integrator options display.
-
Select Experlogix Processing entities.
-
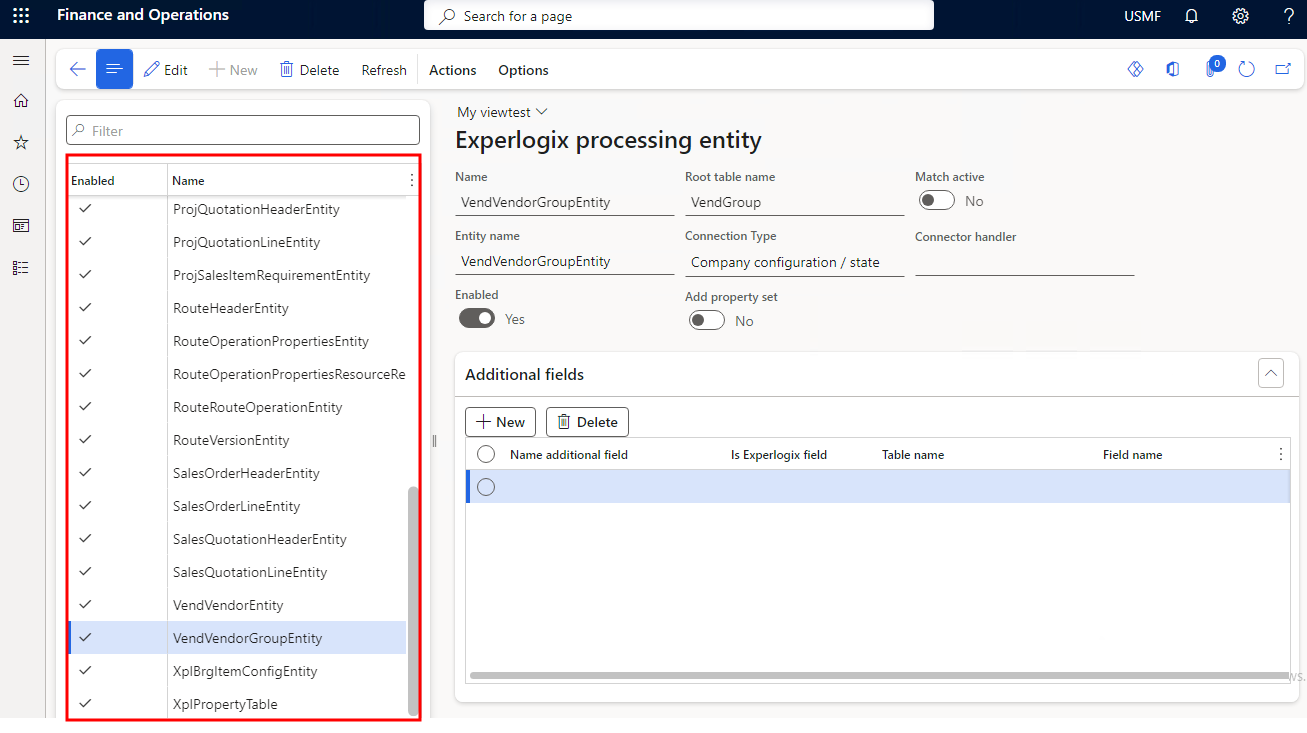
In the left pane, select the processing entity for which you want to enable matching.
-
At the top, select Actions.
-
Select Match setup.
The Match setup page displays.
-
Select New to add a new match key field.
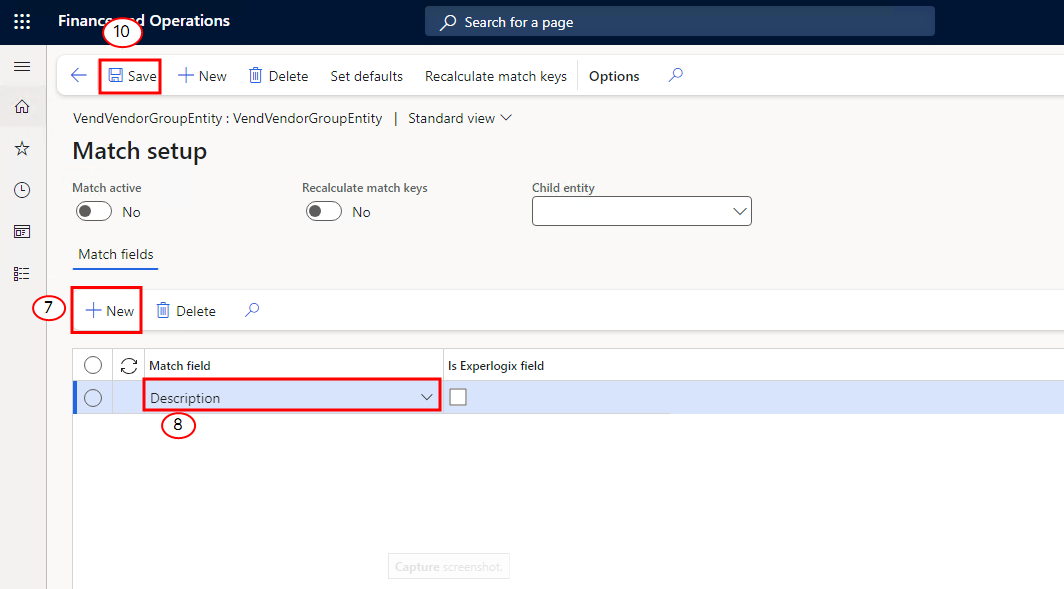
Alternatively, you can use the Set defaults button at the top to load the default set of match fields. This is only available for a limited set of entities.
-
In the Match field field, add the match field name.
-
Select the required name from the displayed options.
-
Select the Save button.
The Match field is added to the Match setup page.
Enable a Match Key
A match key needs to be enabled before it can be used in an Entity record. If you want to use the existing data in the system, recalculate the match keys as shown in Recalculate Match Keys.
-
Access the Experlogix Processing entity page.
-
Select the required entity.
-
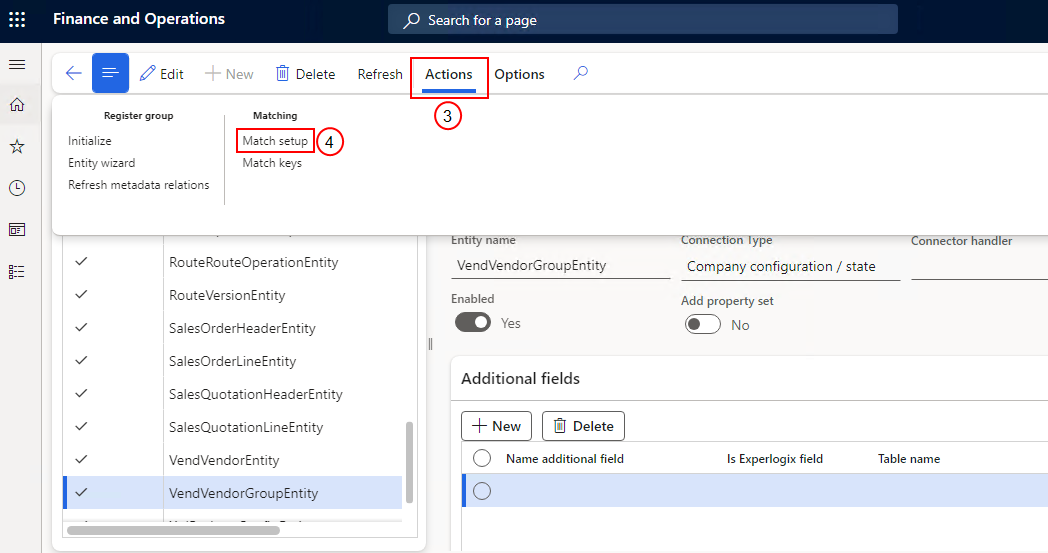
At the top, select Actions.
-
Select Match setup.
The Match setup page displays.
-
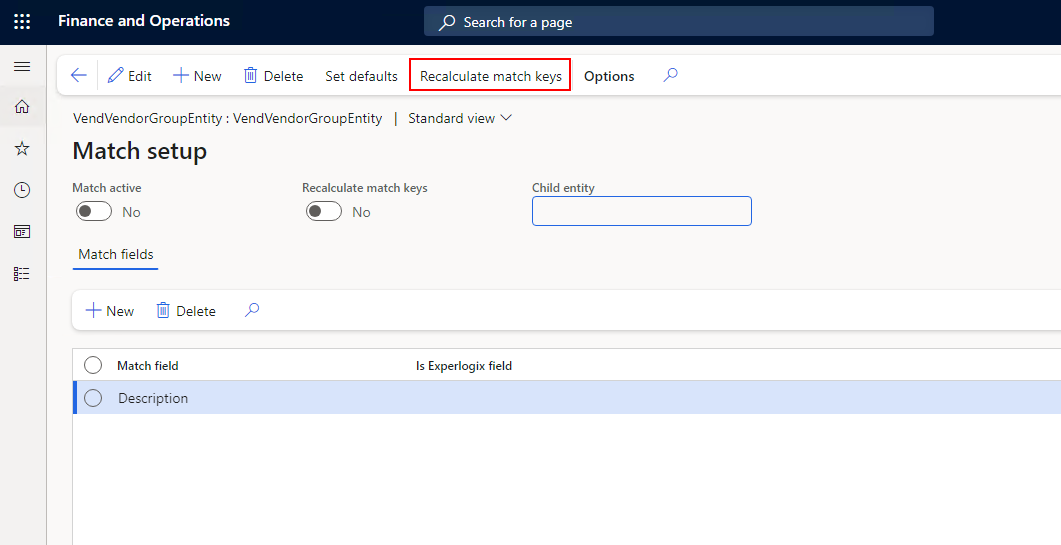
At the top, select the Recalculate match keys button.
-
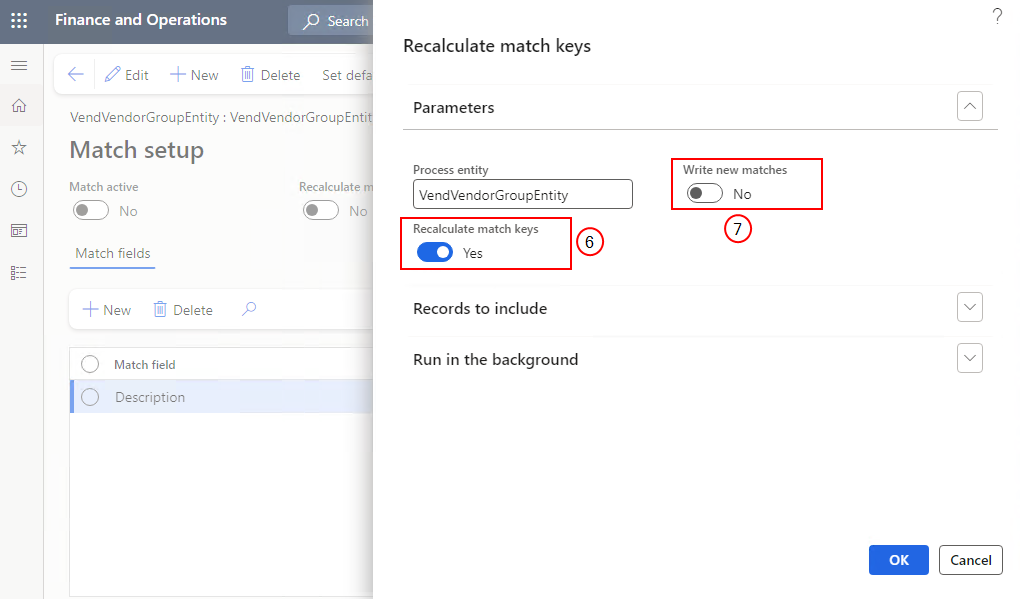
Toggle the Recalculate match keys button to enable the match key for the entity.
-
Toggle the Write new matches button to enable adding new matches.
-
Select the OK button.
The match key is enabled for the entity.
View Match Keys
-
Access the Experlogix processing entity page.
-
Select the required entity.
-
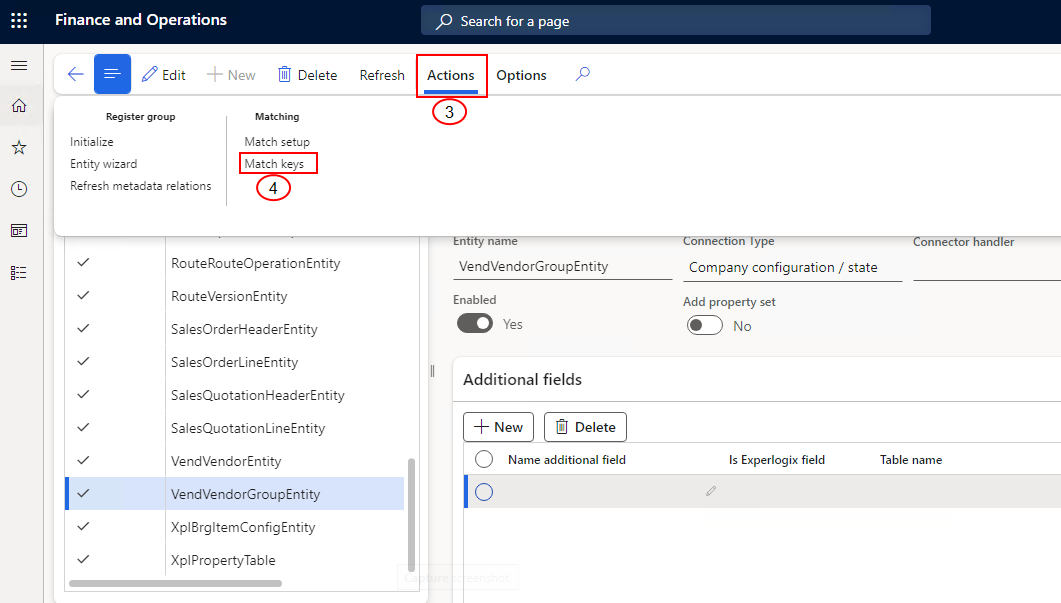
At the top, select Actions.
-
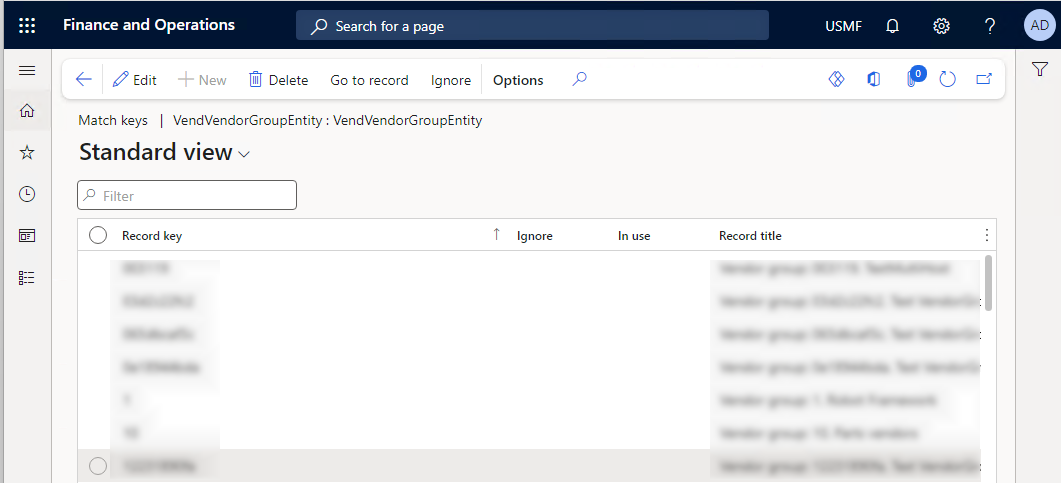
Select Match keys.
The Match keys page displays the available match keys for the entity.
Ignore a Match Key
-
Access the Match keys page.
-
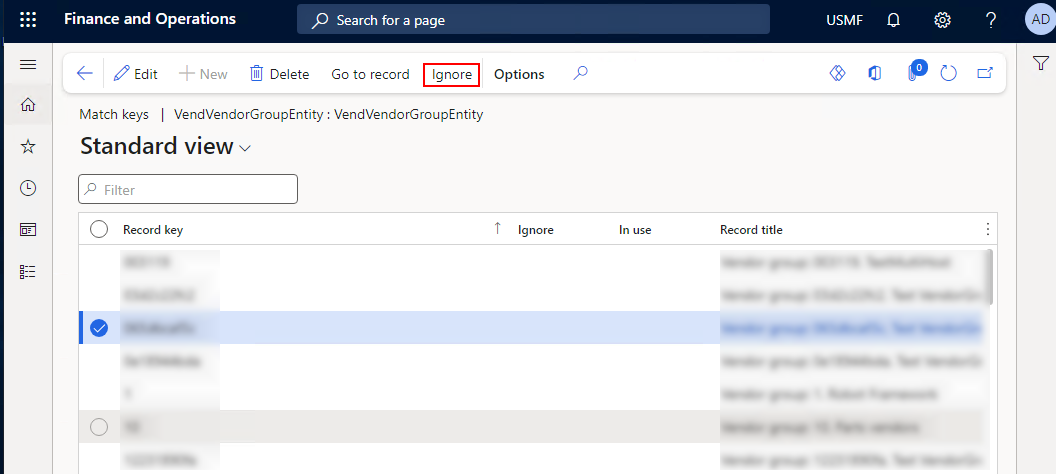
Select the match key record to ignore it for further matching.
-
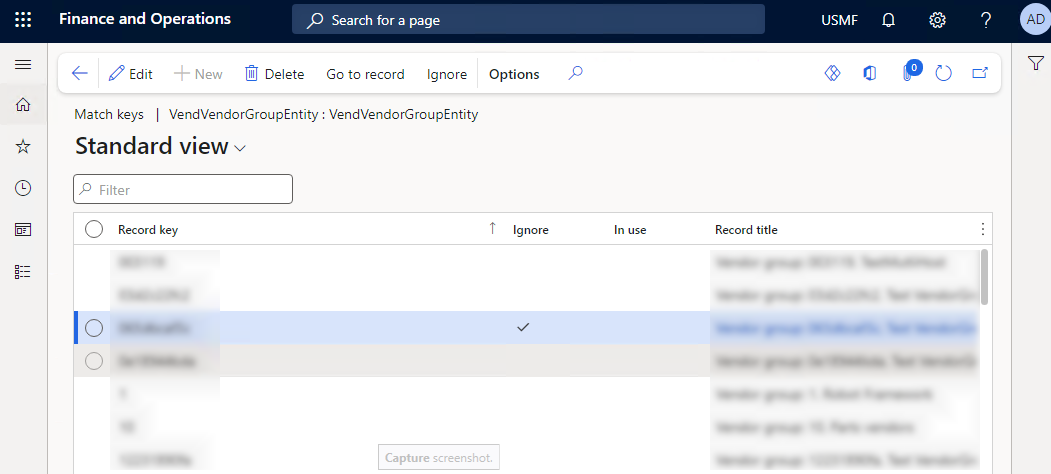
Select the Ignore button at the top.
The match key is set to ignore.
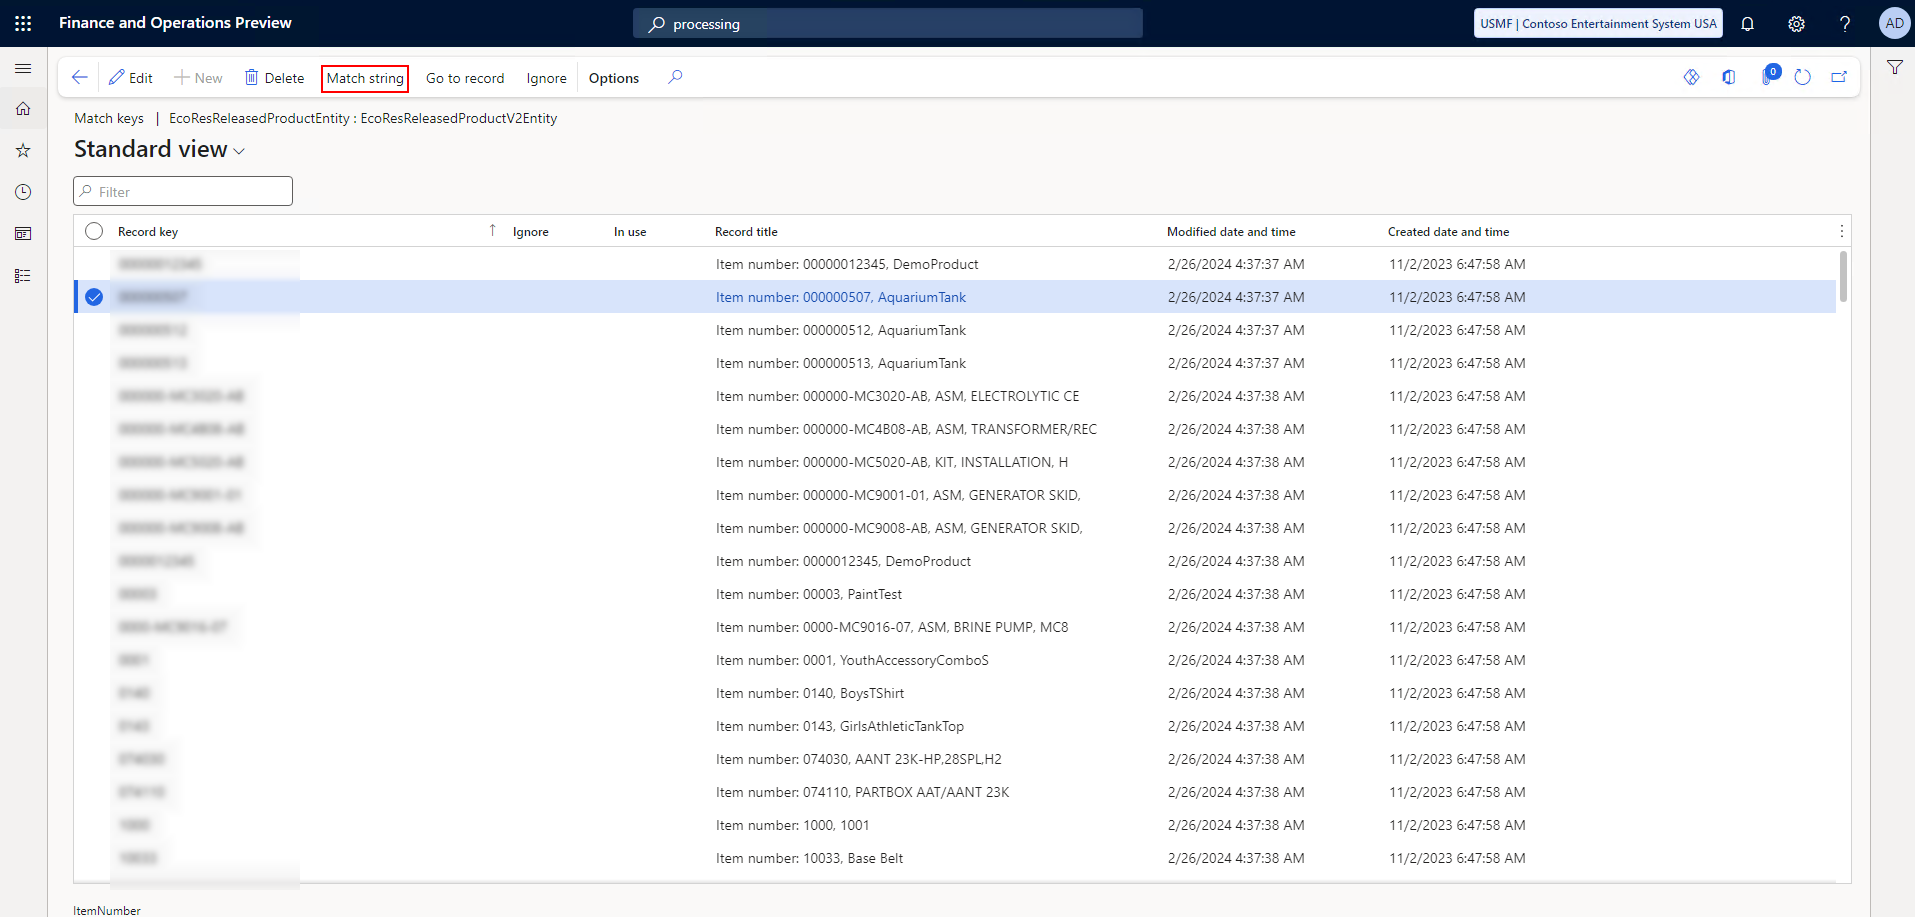
View a Match String
There are two ways a Microsoft Dynamics 365 F&O user can view a match string once a match occurs.
-
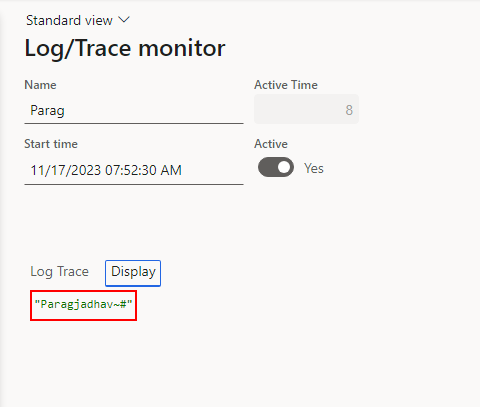
If a log trace is active when saving the configuration with a match, a Match string record appears in the log on the Experlogix logging page. The match string is visible under the Display header on the record.
-
On the Match Keys page, selecting the Match string button will display the match string for the selected record.
Export Matching Setup
If you looking to reuse your matching setup in another Microsoft Dynamics 365 F&O environment, you can export and import your matching data rather than recreate it manually.
-
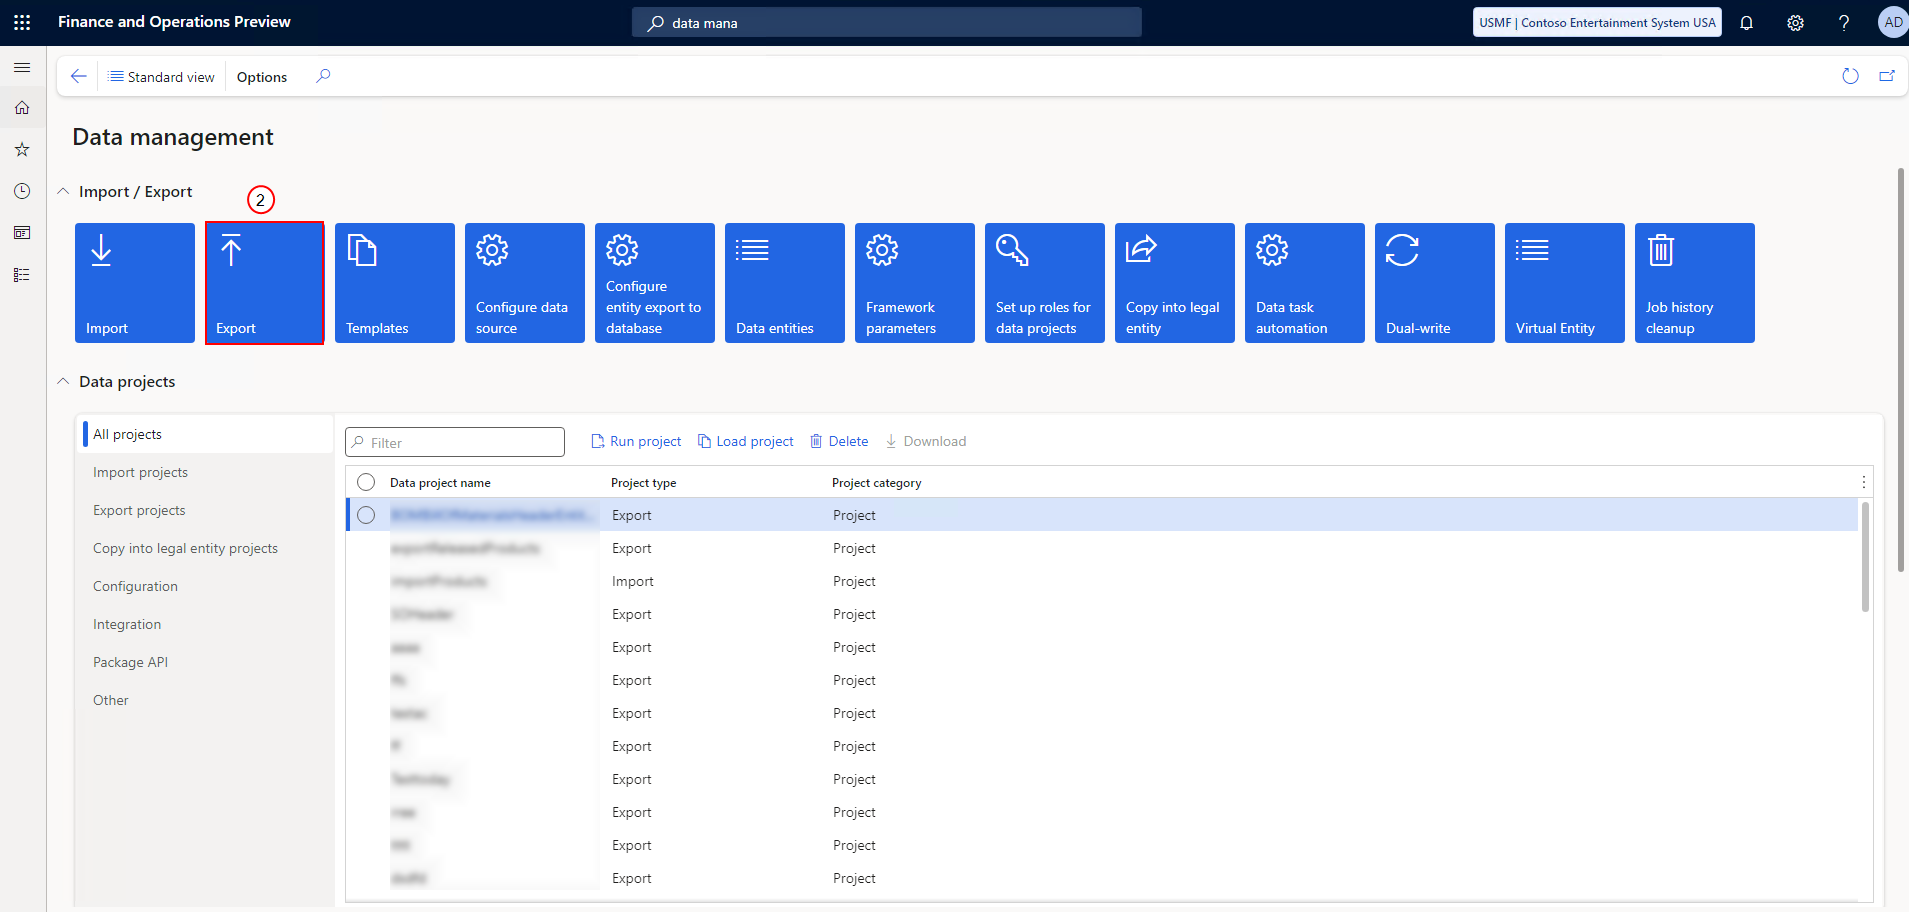
In Microsoft Dynamics 365 F&O, using the search tool, navigate to the Data management page.
-
Select the Export button.
-
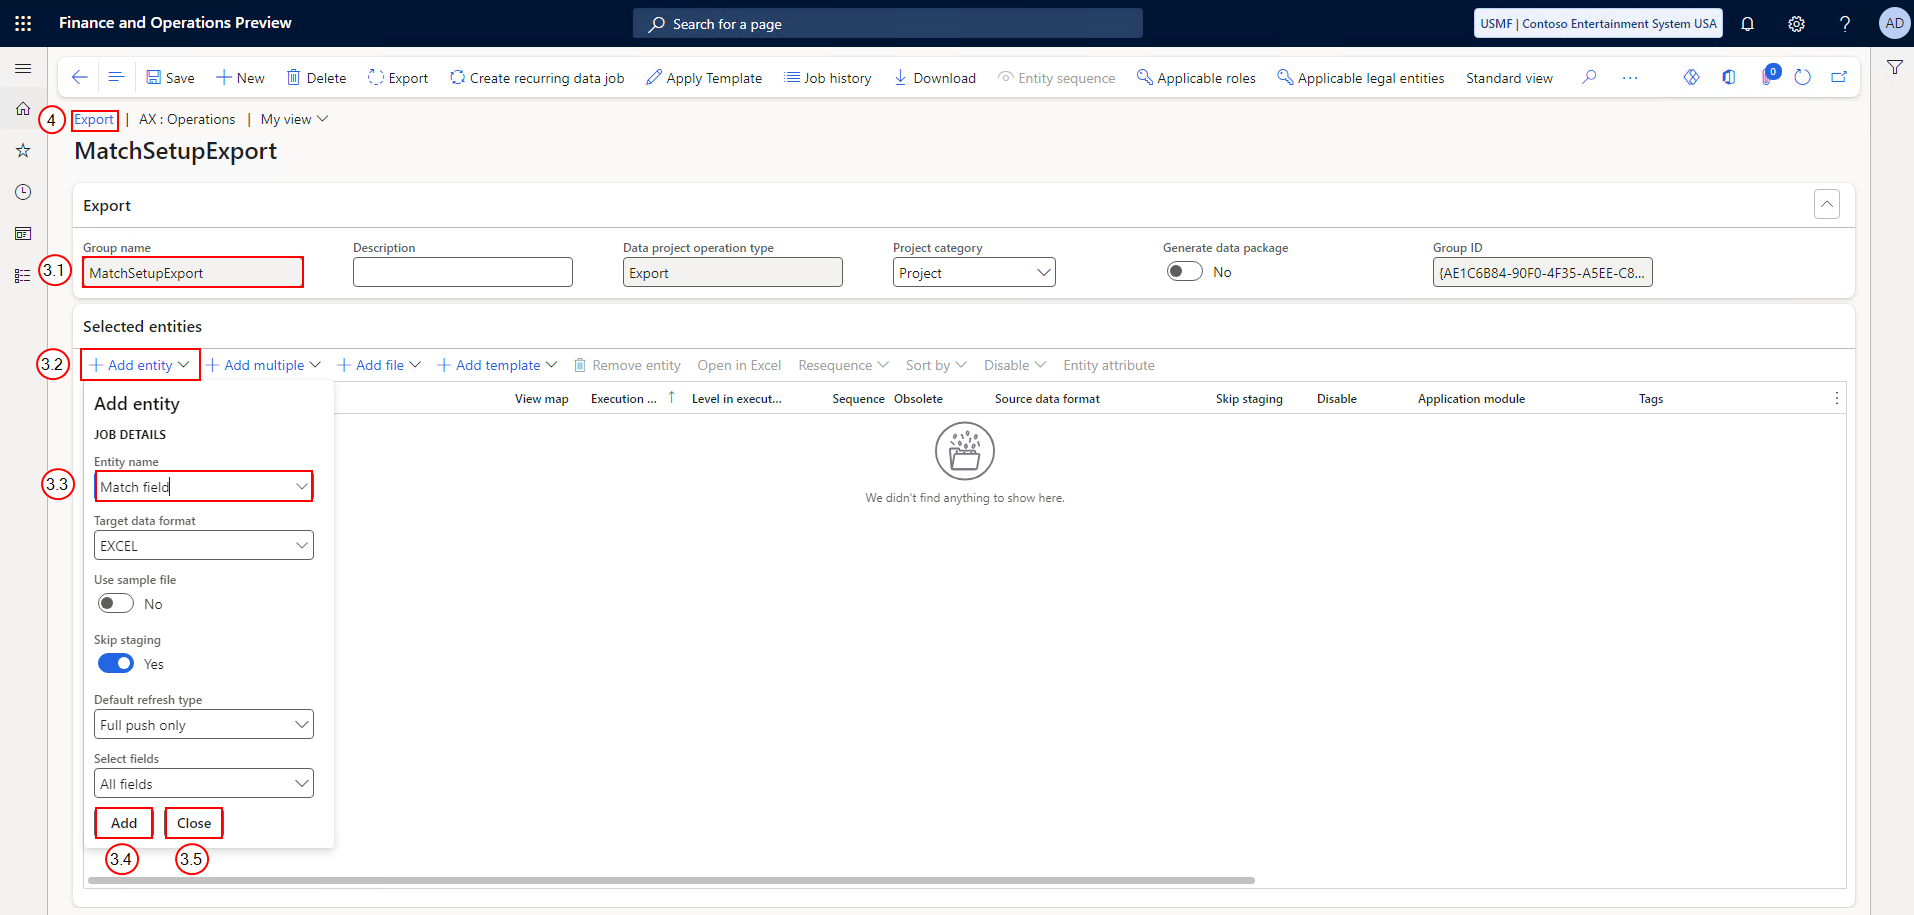
On the Export page, do the following:
-
In the Group name field, enter a group name.
-
Select the Add entity button.
-
In the Entity name field, select Match field.
-
Select the Add button.
-
Select the Close button.
-
-
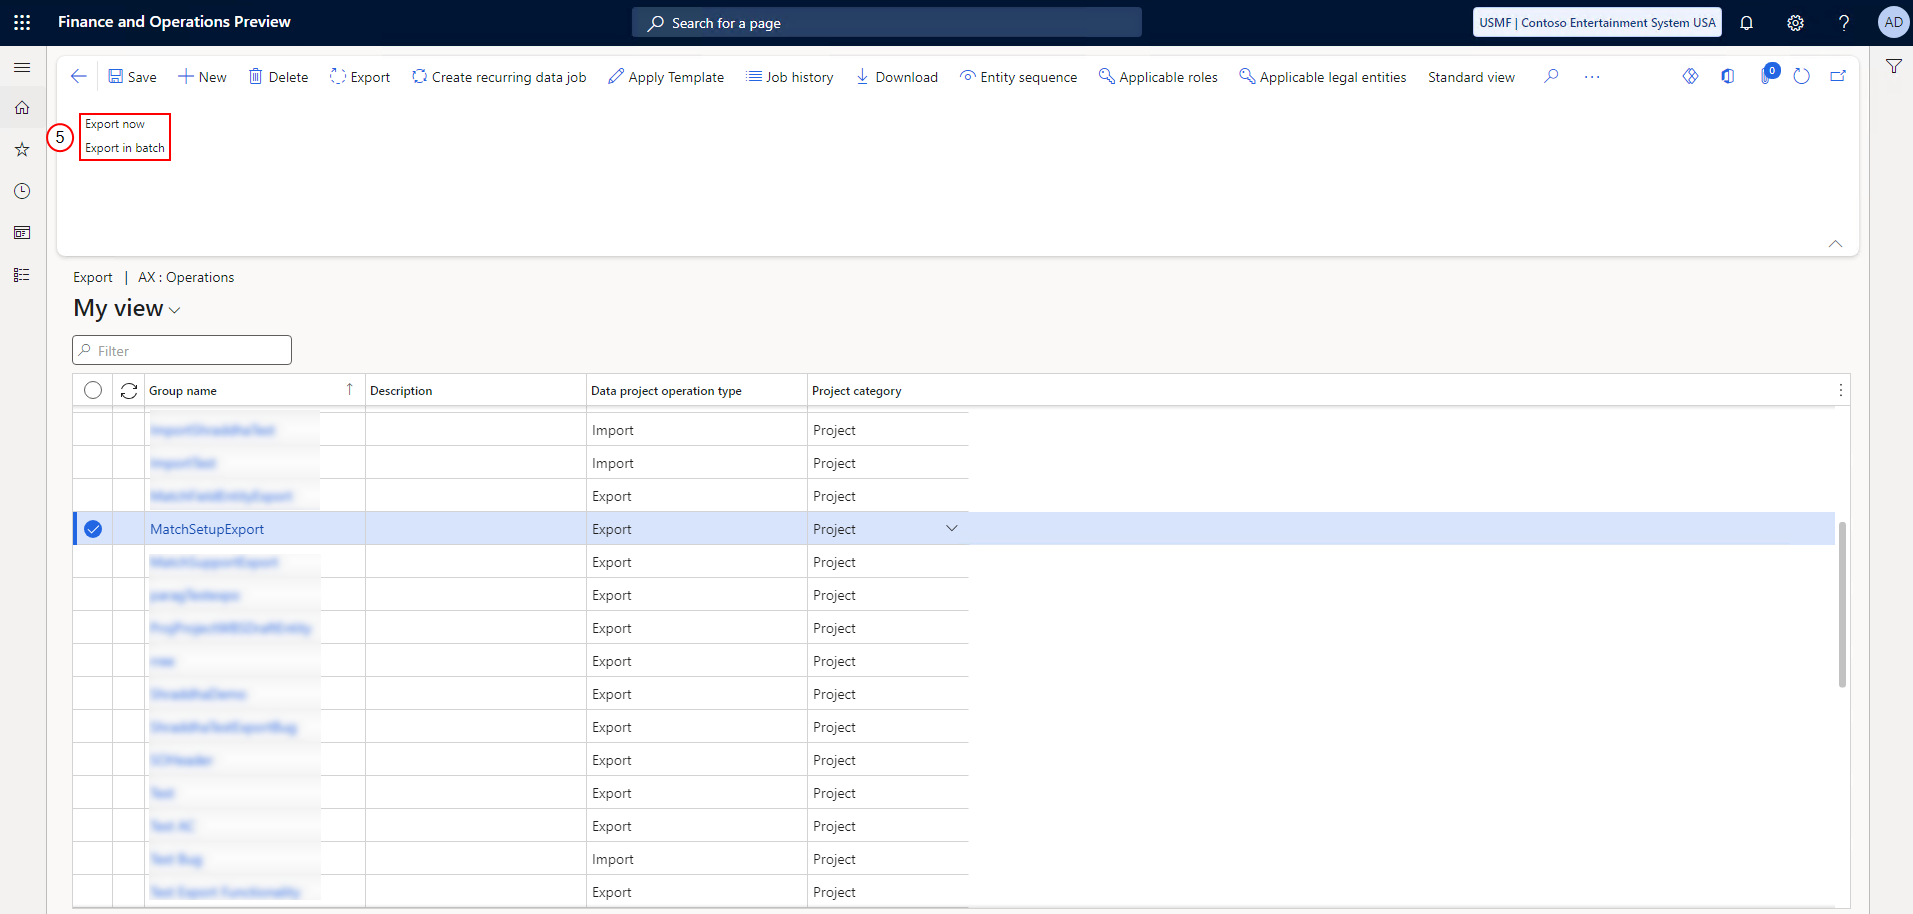
Select the Export button.
-
Select Export now or Export in batch as applicable and follow the on-screen prompts.
-
Once the request processes, select the Download file button.
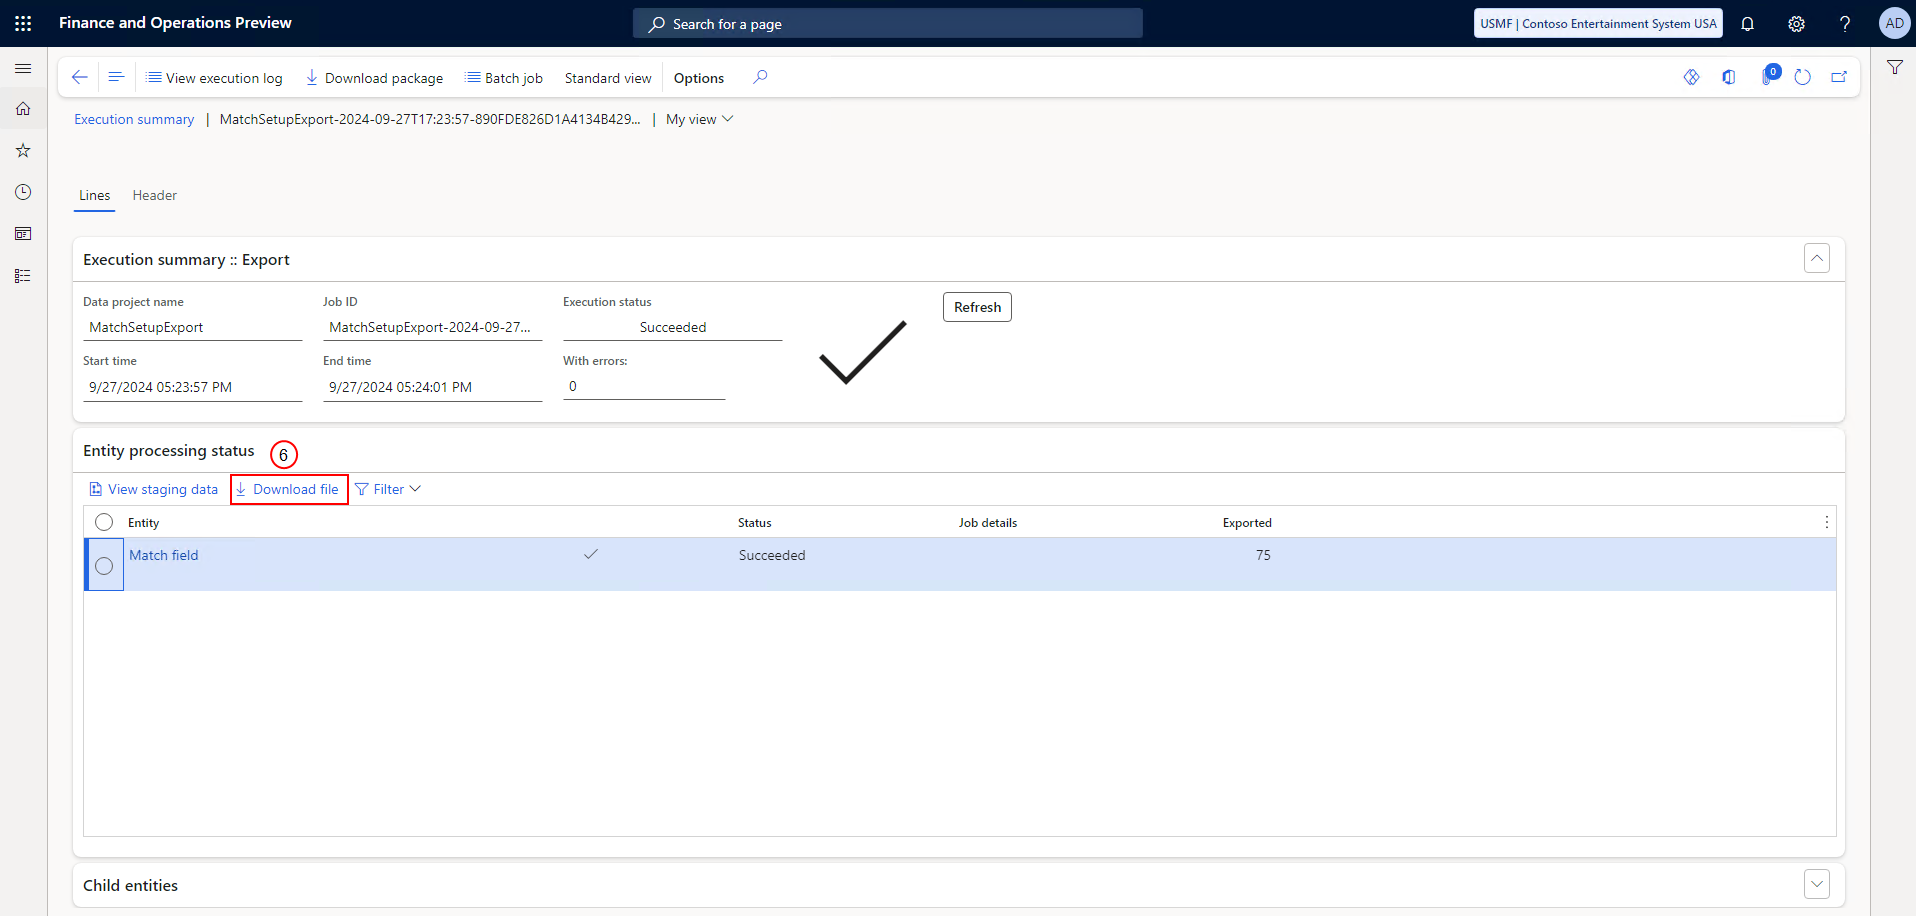
Your match key file downloads.
Import Matching Setup
If you looking to reuse your matching setup in another Microsoft Dynamics 365 F&O environment, you can export and import your matching data rather than recreate it manually. This process describe how to import match keys into an environment.
-
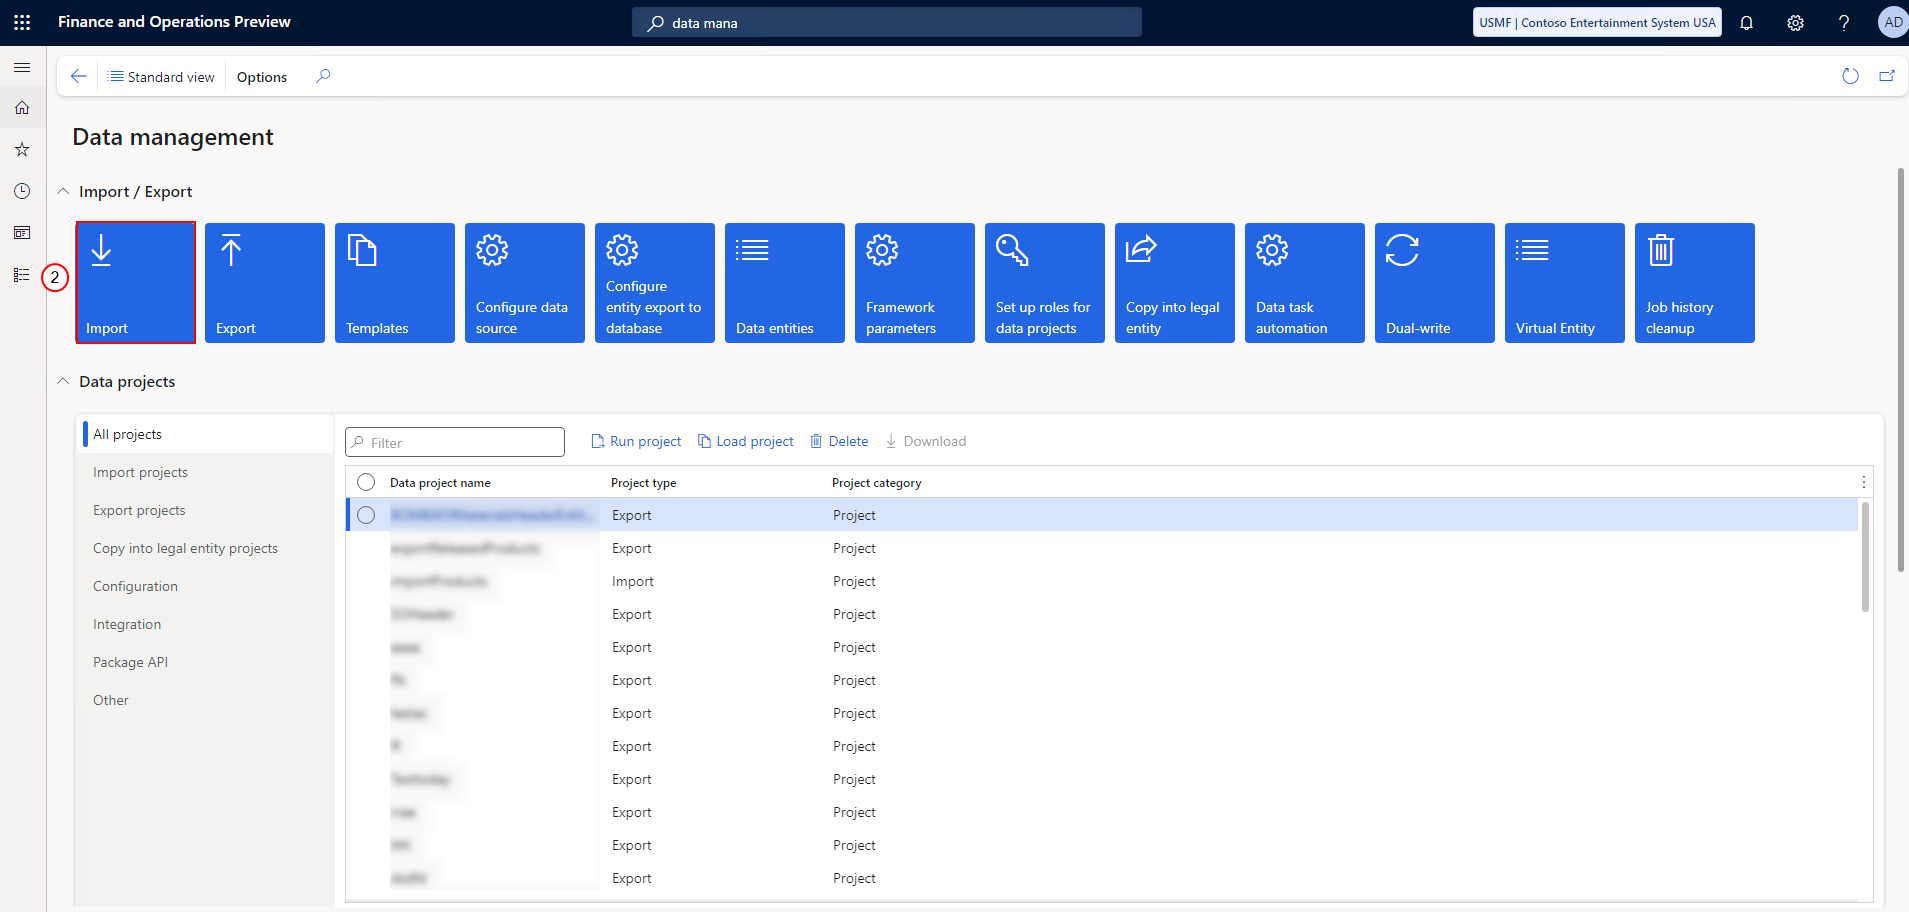
In Microsoft Dynamics 365 F&O, using the search tool, navigate to the Data management page.
-
Select the Import button.
-
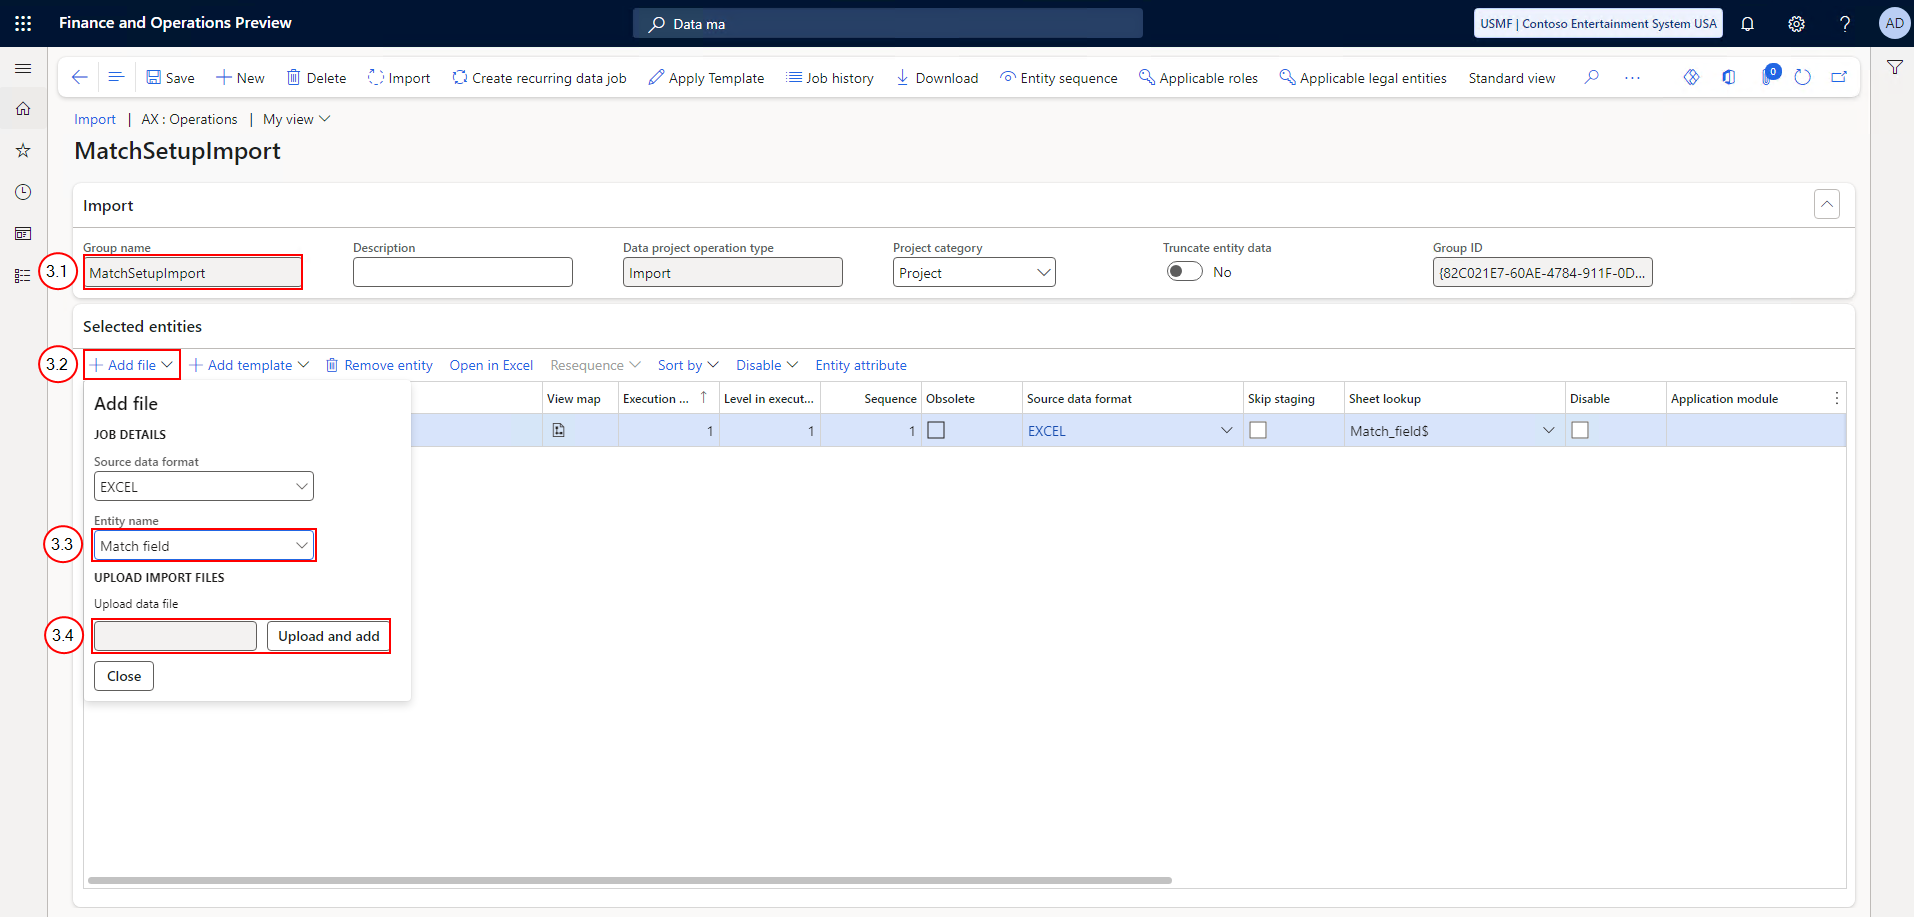
On the Import page, do the following:
-
In the Group name field, enter a group name.
-
Select the Add file button.
-
In the Entity name field, select Match field.
-
Select Upload and add.
-
Locate and select the XLSX file containing your match data.
The selected file is added to the Selected entities pane.
-
-
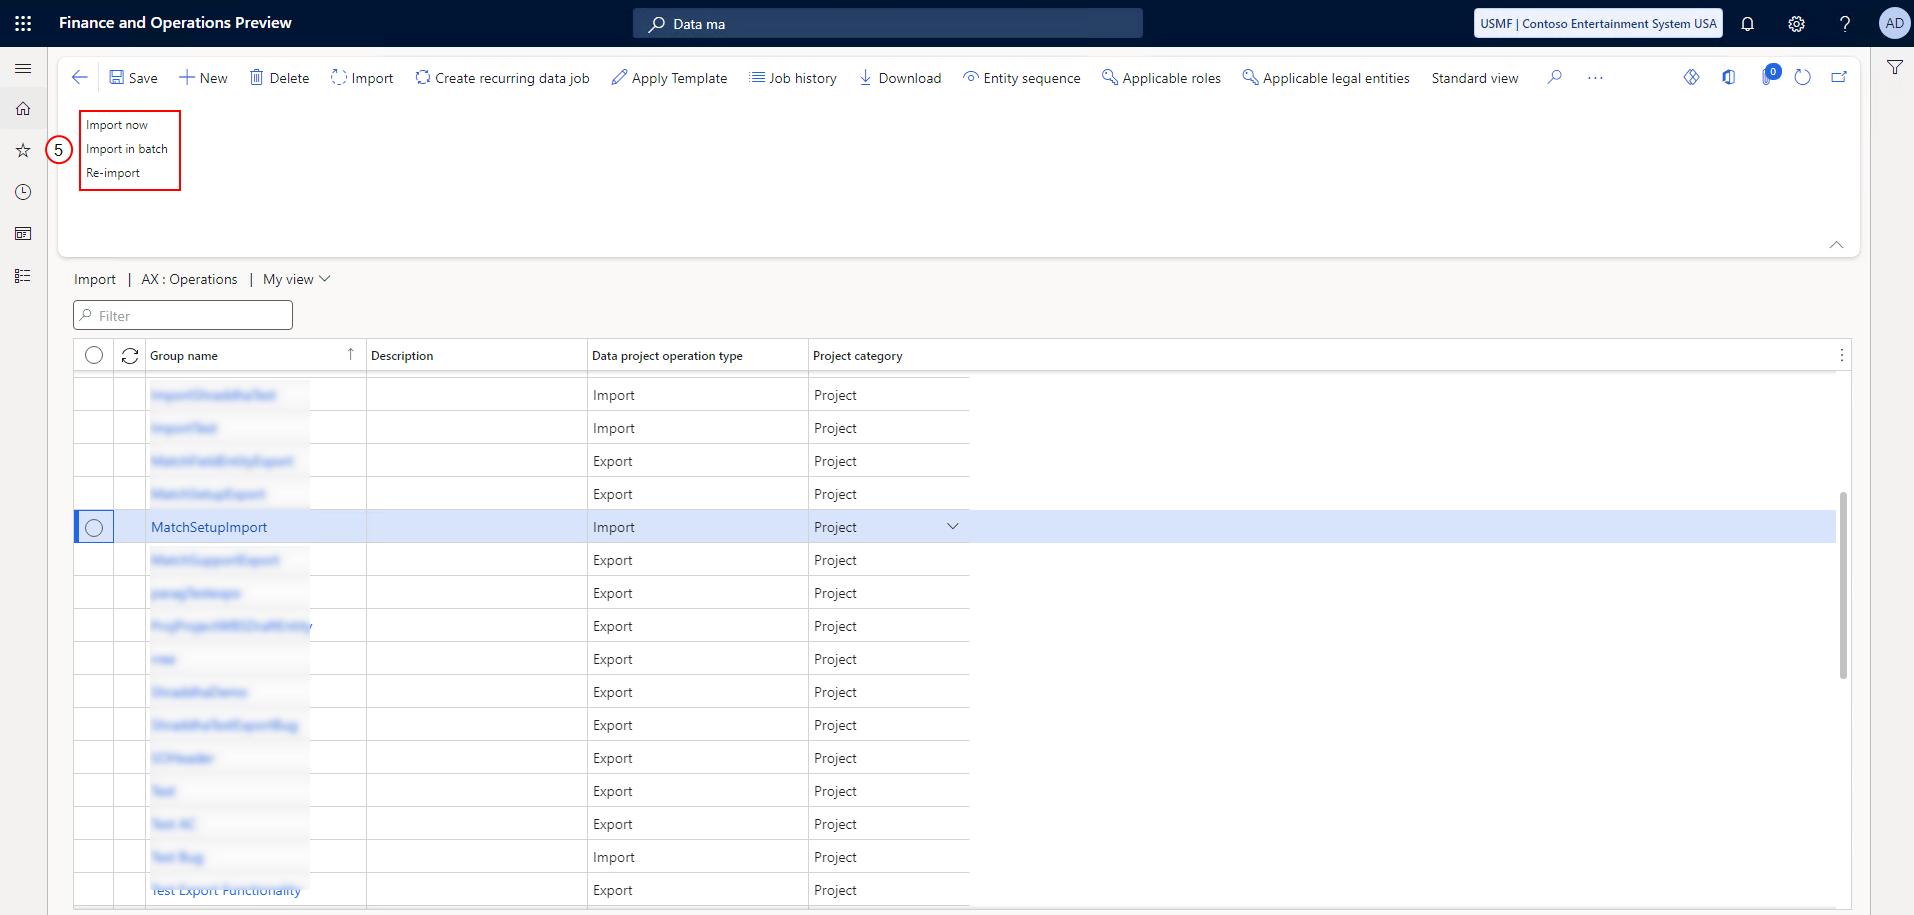
Select the Import button.
-
Select Import now, Import in batch, or Re-import as applicable and follow the on-screen prompts.
Recalculate Match Keys
Recalculate Match Keys for Child Entities in a Shared Structure
When an entity is a part of partially shared structure, you cannot recalculate match keys on it directly and must do it from the structure's root entity. When you make changes to one or more match fields on a child entity, a message displays in Microsoft Dynamics 365 F&O informing the user of on which specific root entities they must recalculate match keys.
-
Access the Experlogix processing entity page.
-
Select the required entity.
-
At the top, select Actions.
-
Select Match keys.
The Match keys page displays the available match keys for the entity.
-
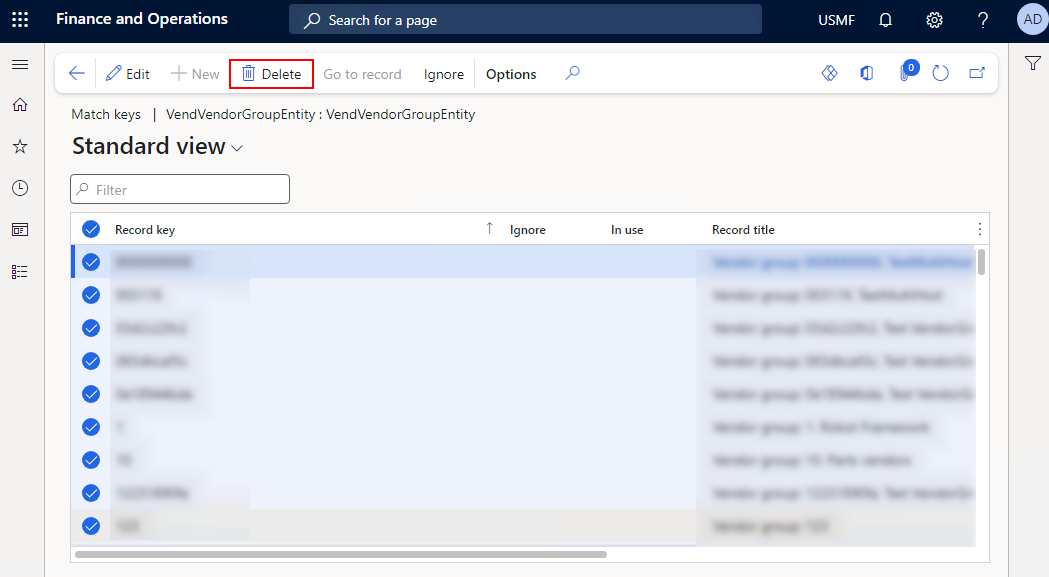
Select all the match keys.
-
At the top, select the Delete button.
-
Select the back arrow to access the Experlogix processing entity page.
-
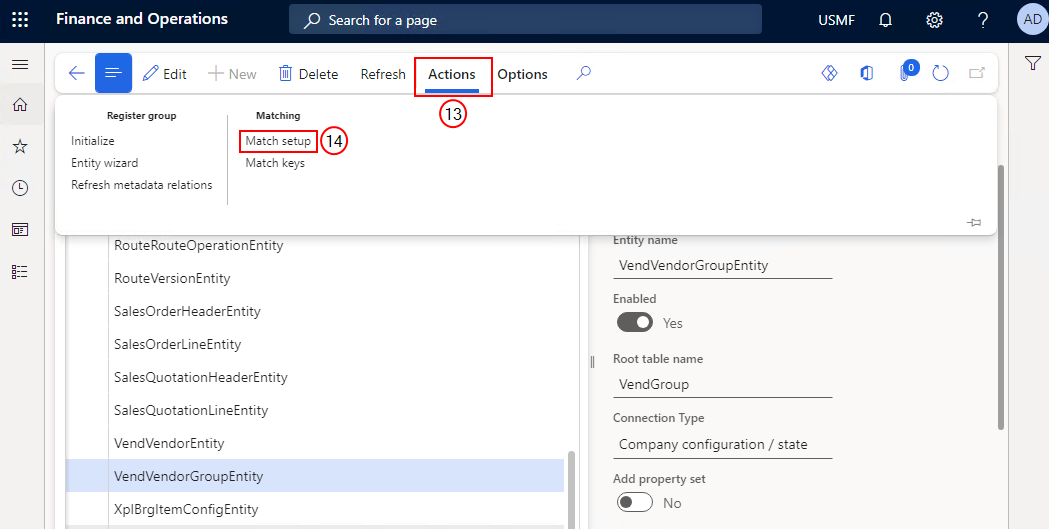
At the top, select Actions.
-
Select Match setup.
The Match setup page displays.
-
At the top, select the Recalculate match keys button.
-
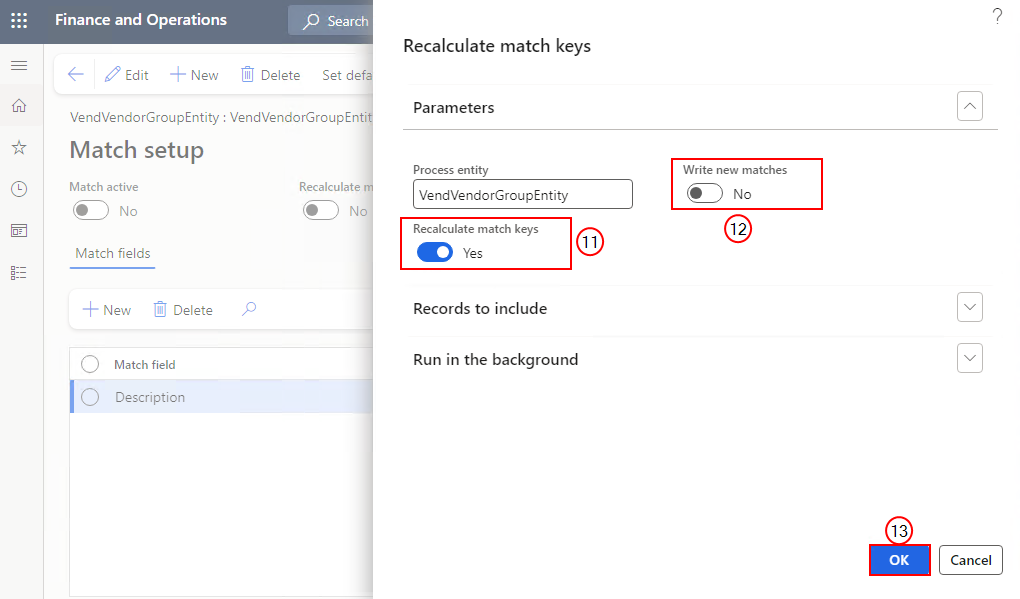
Toggle the Recalculate match keys button to enable the match key for the entity.
-
Toggle the Write new matches button to enable adding new matches.
-
Select the OK button.
-
Access the Match keys page to view the new match keys. The match keys are recalculated for the entity and newly added match keys display on the Match keys page.
Recalculate Match Keys in Batch Process
The match keys can be recalculated in a batch using the Batch Process in Microsoft Dynamics 365 F&O. The match keys typically need to be recalculated when either the data is changed or the match fields are changed.
The match key batch process allows processing multiple recalculate match key requests at once. For more information on match keys, see . For more information on batch processing in Microsoft Dynamics 365 F&O, please see Batch processing and batch servers.
-
In Microsoft Dynamics 365 F&O, in the left pane, select Modules> Experlogix Integrator>ExperlogixProcessing entities.
-
In the left pane, select the Processing Entity you want to enable matching.
-
At the top, select Actions.
-
Select Match setup.
The Match setup page displays.
-
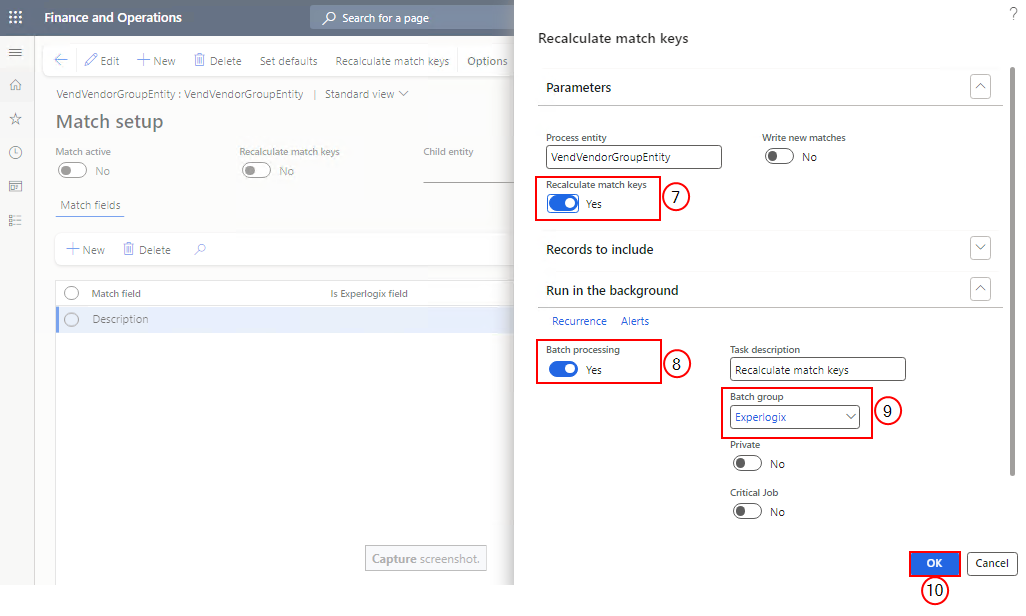
Toggle the Recalculate match keys button to Yes, to enable the match key for the entity.
-
Toggle the Batch process button to Yes to enable the batch process.
-
From the Batch group dropdown menu, select Experlogix.
-
Select OK. The batch job is added to the batch queue, and a 'The Recalculate match keys job is added to the batch queue.' message displays.
-
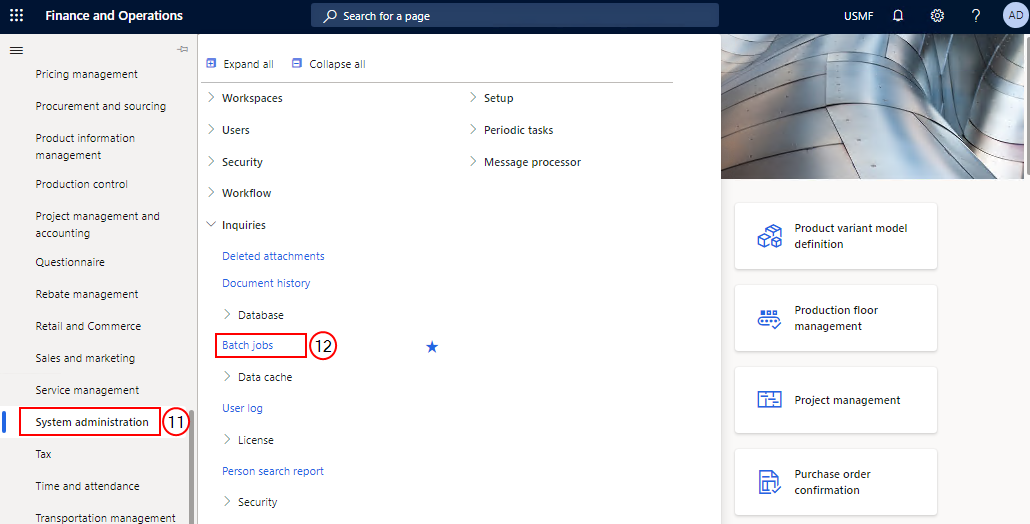
From the left pane, select System administration.
-
From the Inquiries section, select Batch jobs.
The Batch job page displays.
-
Filter the job description by Recalculate match keys to view the added batch job.
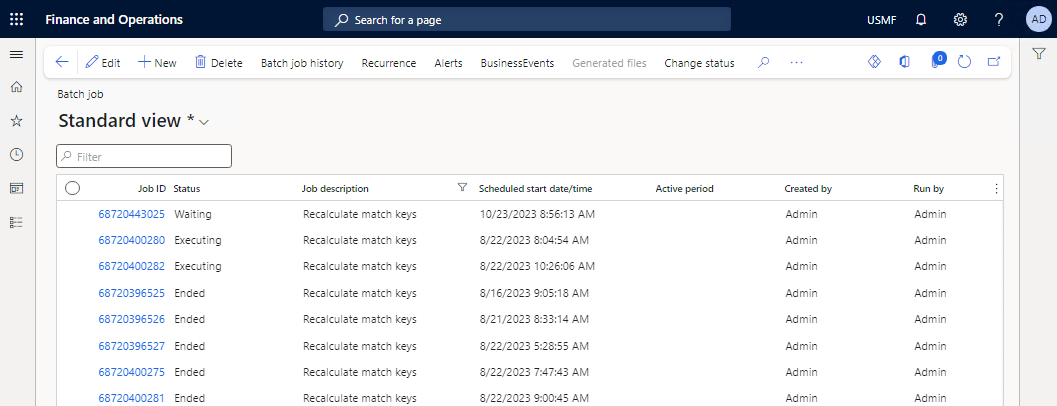
The match keys are recalculated when the batch job is executed as per the schedule.