
This topic explains how to manage the visibility and behavior of the Configure, Copy, and View buttons in Microsoft Dynamics 365 CE when using Cloud Connect CE. It covers how role assignments and security permissions determine which buttons appear to users, and how status fields affect whether a configuration opens in editable or read-only mode.
You’ll also learn how to extend button behavior using conditional visibility logic and how to align button access with your organization's workflow stages. For information on various user roles, see User Roles, and for information on custom buttons, see Making Custom Buttons.
Prerequisites
-
Users must already have roles assigned via Experlogix security role mapping. See User Roles
-
Cloud Connect CE is already installed and functional.
-
Buttons are present on the form via standard setup steps; see Setup Cloud Connect for Microsoft Dynamics 365 CE
Viewing Role-Based Button Permissions
Before customizing the Configure, Copy, and View buttons, it's important to understand how security roles in the standard Cloud Connect CE control their visibility. These permissions determine whether the buttons appear on the Standard Supported Entities for your Cloud Connect integration.
The create permission determines whether the button is visible. If you do not want a user to see a button, confirm that the role assigned does not have the create permission.
Copy and Configure Buttons
To view the security role permissions for the Copy and Configure buttons, complete the following steps:
-
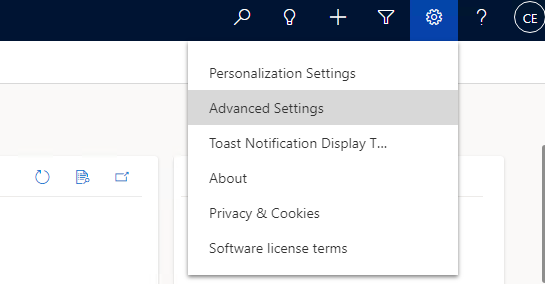
On the Microsoft Dynamics 365 CE home screen, at the upper-right corner of the screen, select the Settings icon.
-
Select Advanced Settings.
-
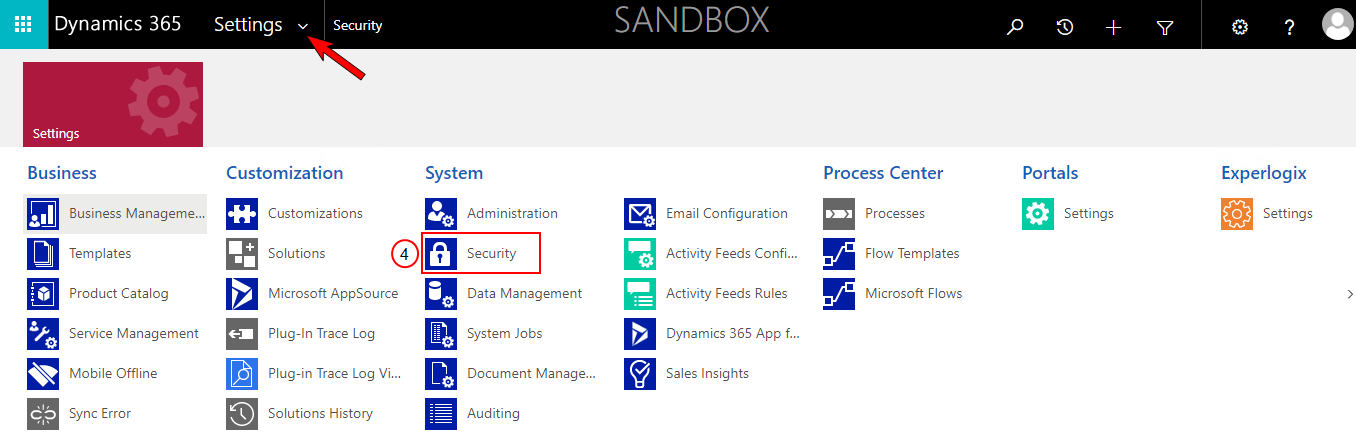
At the upper-left corner, select the Settings dropdown arrow to view the Settings options.
-
Under the System column, select Security.
-
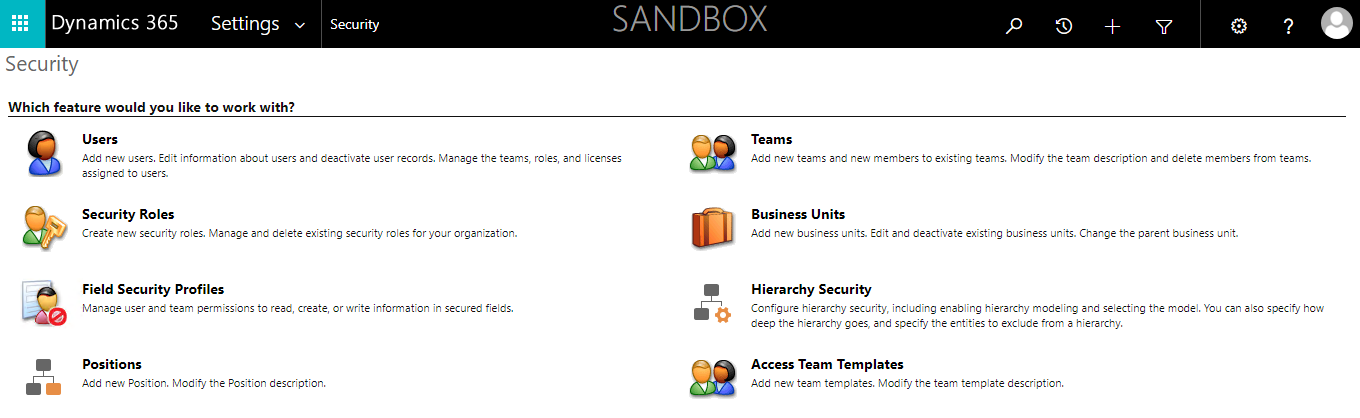
Select Security Roles.
-
Select either:
-
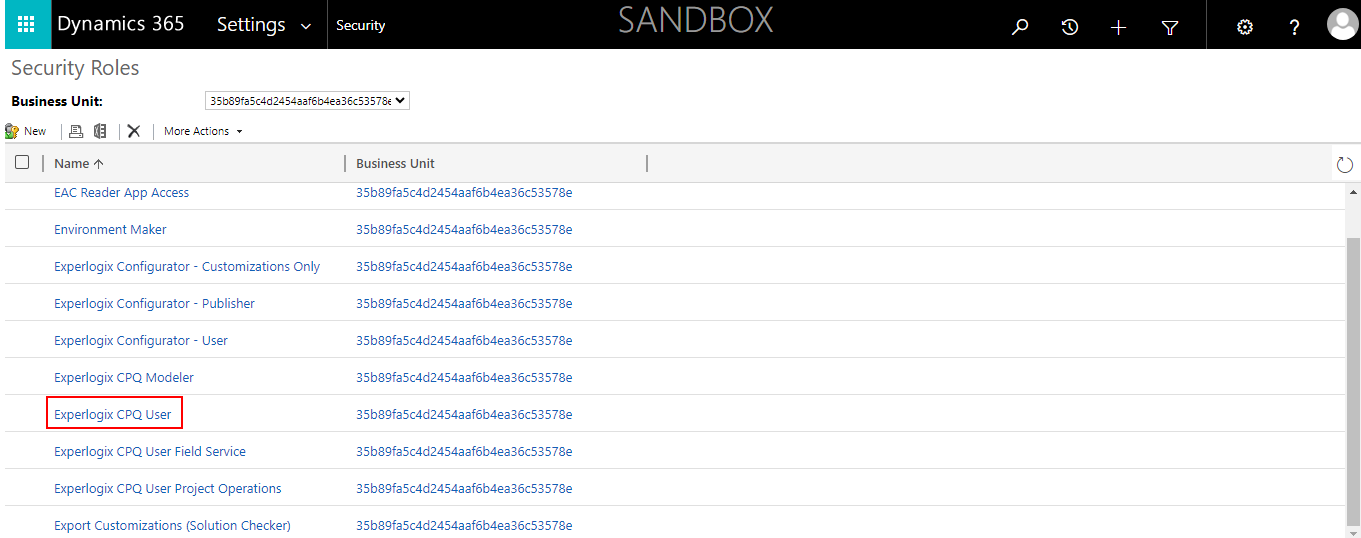
Experlogix CPQ User
-
Experlogix CPQ Modeler
-
-
Navigate to the appropriate tab for the supported entity
-
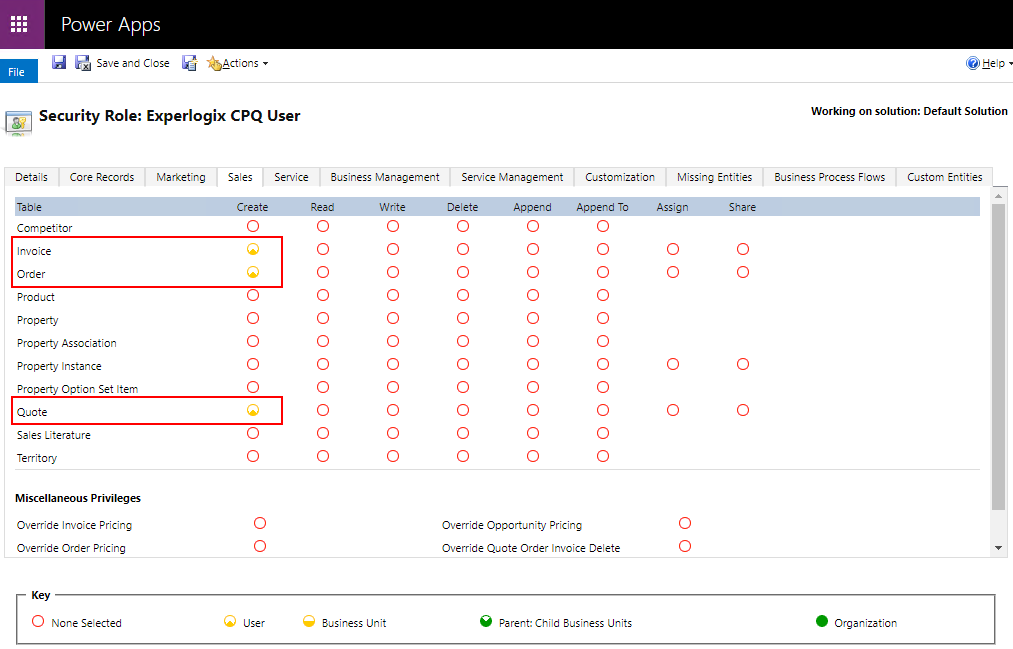
Use the Sales tab to view permissions for Quote, Invoice, and Order.
-
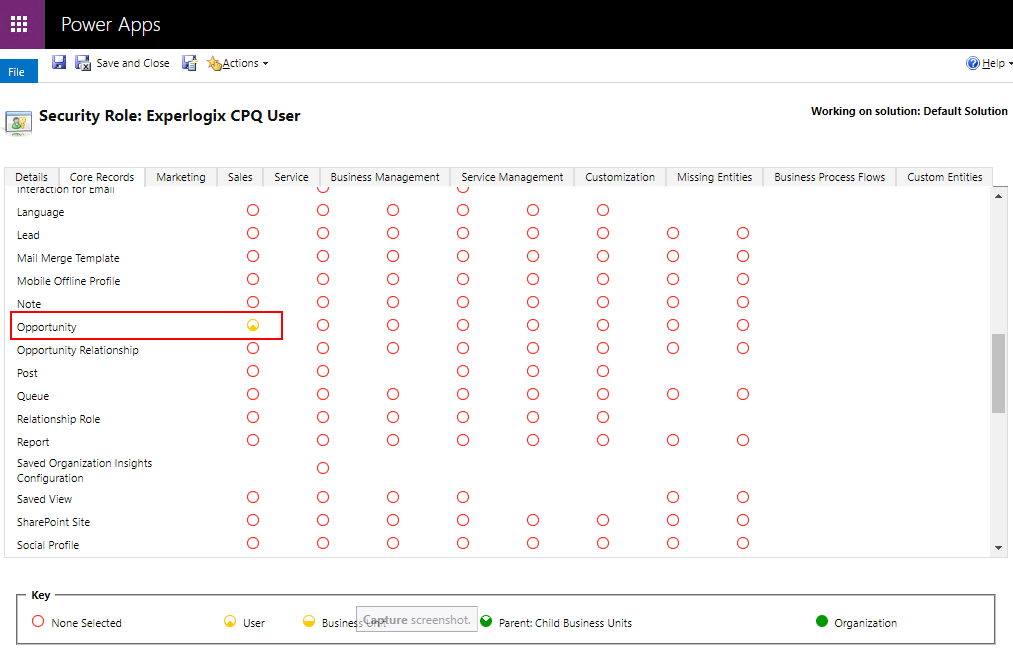
Use the Core Records tab to view Opportunity permissions.
-
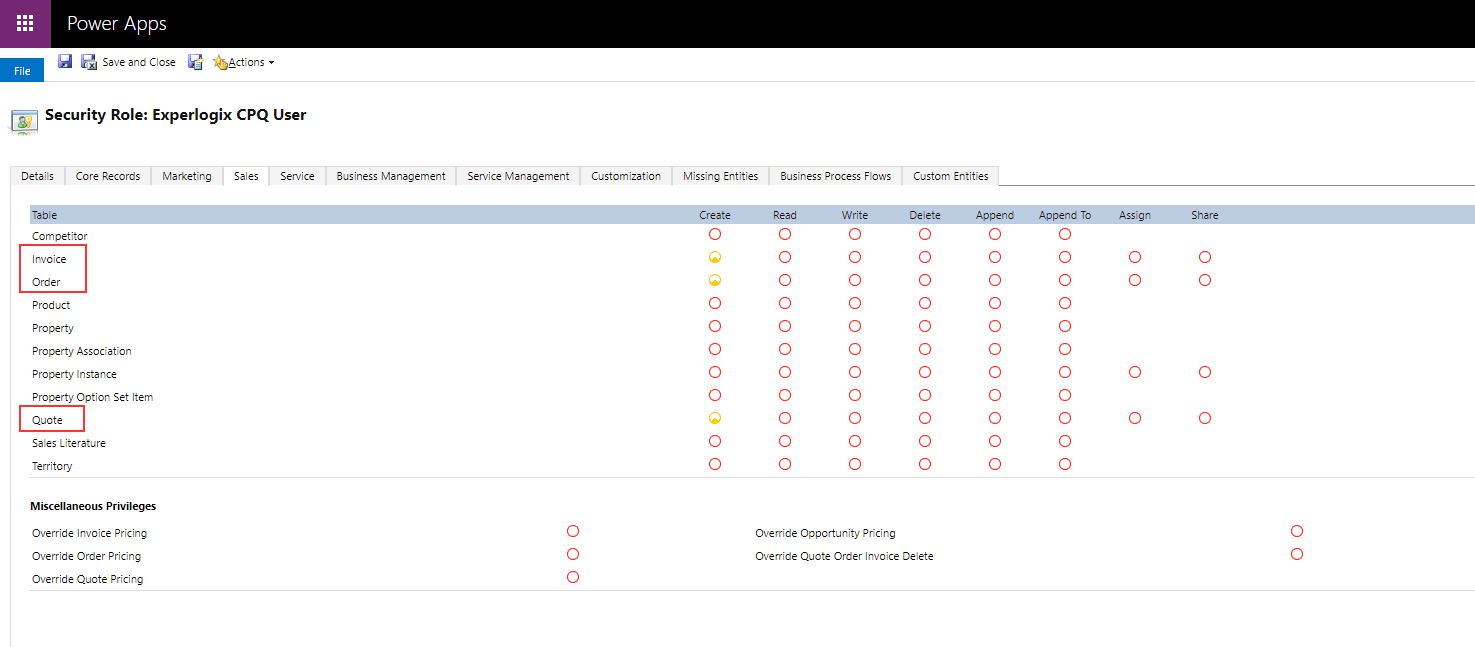
The permissions for the selected role and entity display for review.
View Button
To view permissions for the View button, complete the following steps:
-
On the Microsoft Dynamics 365 CE home screen, at the upper-right corner of the screen, select the Settings icon.
-
Select Advanced Settings.
-
At the upper-left corner, select the Settings dropdown arrow to view the Settings options.
-
Under the System column, select Security.
-
Select Security Roles.
-
Select the role: Experlogix CPQ View User.
-
Navigate to the appropriate tab for the supported entity.
-
Use the Sales tab to view permissions for Quote, Invoice, and Order.
-
Use the Core Records tab to view Opportunity permissions.
-
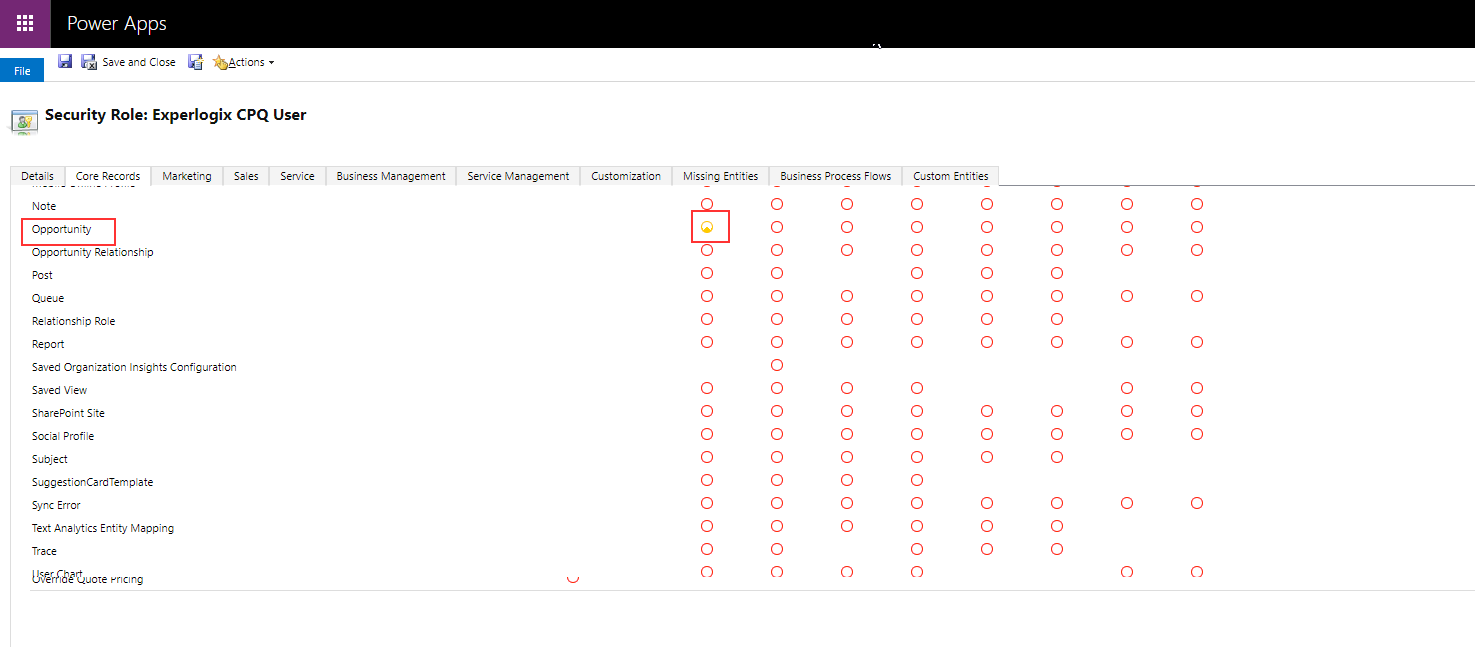
The permissions for the selected role and entity display for review.
Add Copy and Configure Buttons for the Experlogix CPQ Modeler Role
To add the Configure and Copy buttons to the Opportunity, Quote, Sales Order, and Invoice forms for the Experlogix CPQ Modeler role assign the user the Experlogix CPQ Modeler Role and grant the necessary permissions for accessing these forms. If you want the Copy and Configure button to appear exclusively on the Quote and not on the Opportunity, add it only to the Quote. By default, the Experlogix CPQ Modeler Role displays these buttons correctly.
Copy Button Example
The Copy button lets you quickly duplicate a previous configuration for similar projects. For example, if a client who previously ordered a large aquarium for their first floor wants a similar setup on the second floor, you can use the Copy button to replicate the original configuration. The ability to start from a previous configuration saves time by importing the entire setup into a new quote or similar entity, where you can easily make adjustments like adding more fish. The result is a faster, consistent process that efficiently adapts to the client's needs without starting from scratch.
When thinking about how the layout of custom buttons functions for these roles, the Configure and Copy buttons are applied together at the same time based on the Experlogix CPQ Modeler Role and the Experlogix CPQ User Role.
Assign Experlogix CPQ Modeler Role to User
-
On the Microsoft Dynamics 365 CE home screen, at the upper-right corner of the screen, select the Settings icon.
-
Select Advanced Settings.
-
At the upper-left corner, select the Settings dropdown arrow to view the Settings options.
-
Under the System column, select Security.
-
Select Users.
-
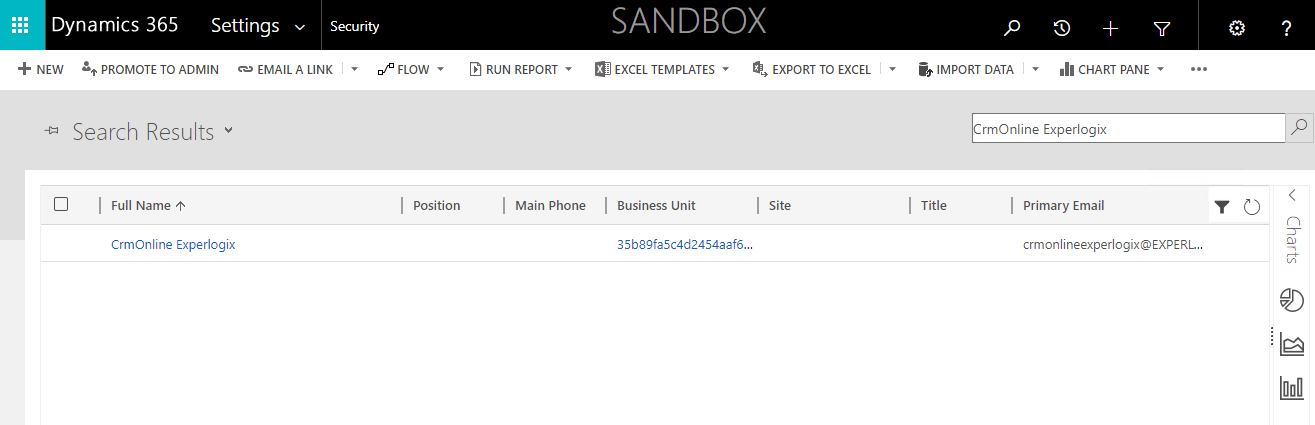
At the upper-right corner of the screen, in the search box, enter the desired user name.
-
Select the Full Name link.
-
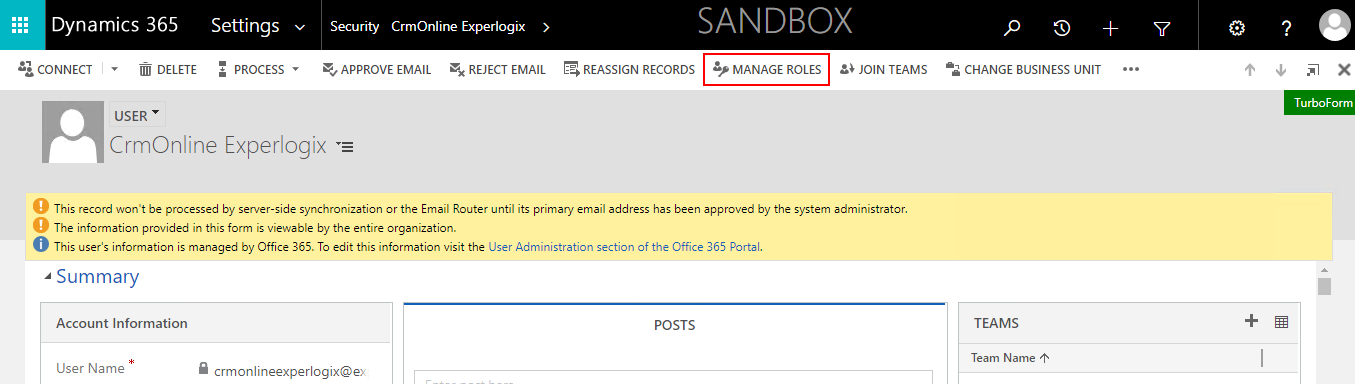
On the user form, in the menu at the top, select Manage Roles.
-
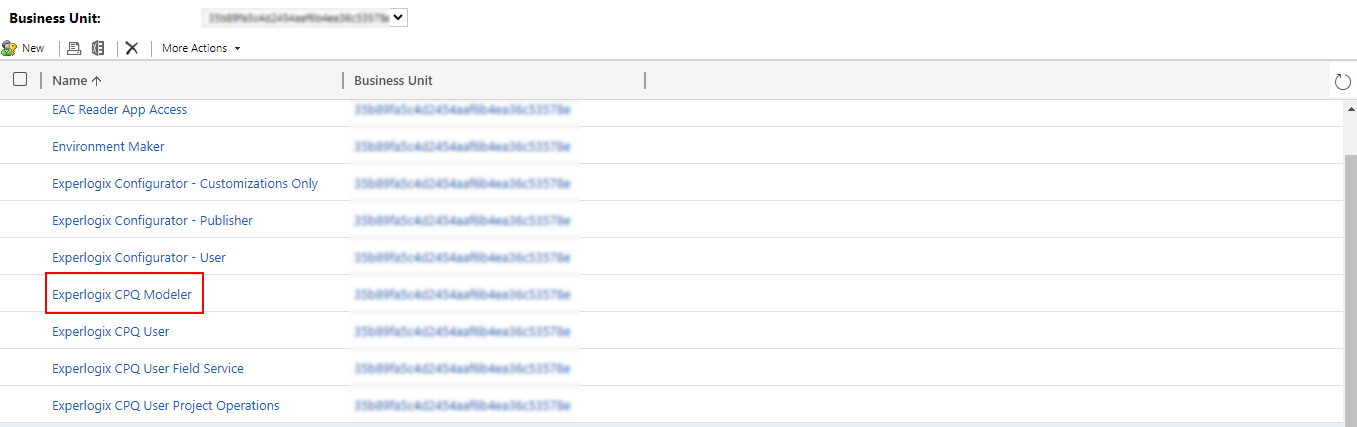
In the Manage User Roles dialog box, select the Experlogix CPQ Modeler checkbox.
Ensure that the Experlogix CPQ User checkbox is not selected.
-
Select the Ok button.
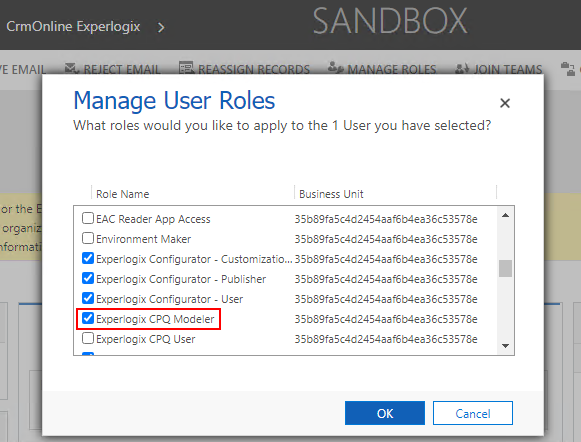
The Experlogix CPQ Modeler role is assigned to the user.
The system prioritizes the logged-in user's settings whenever they are available. If the user's settings are inactive or unavailable, the system defaults to the general Experlogix settings.
Provide Required Permissions to Experlogix CPQ Modeler Role
-
Navigate to the Microsoft Dynamics 365 CE Security screen.
-
Select Security Roles.
-
Select the Experlogix CPQ Modeler link.
-
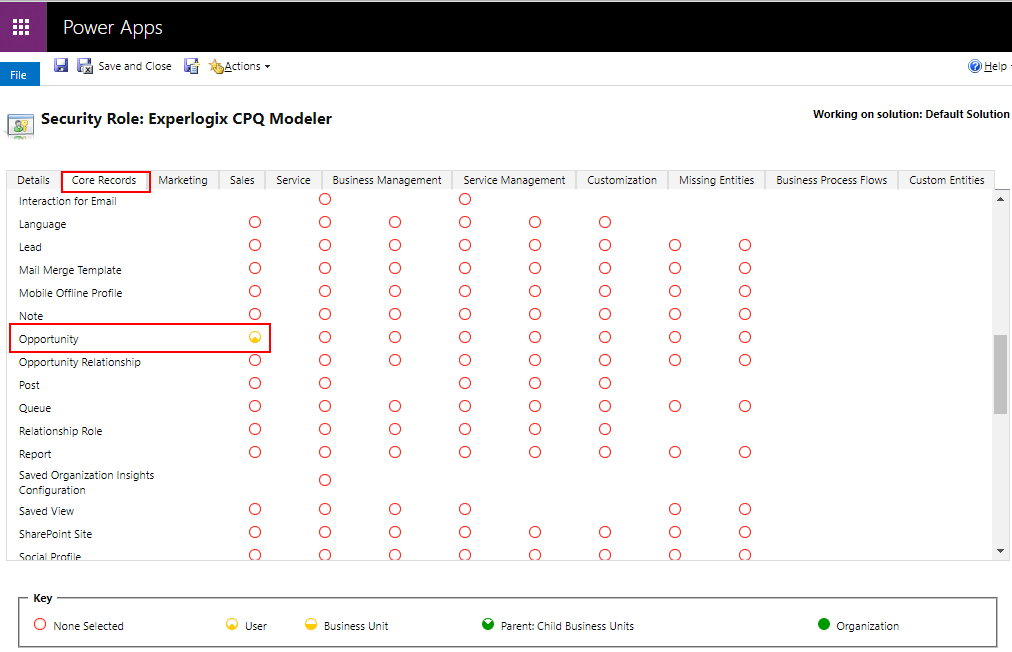
Select the Core Records tab.
-
Select the Yes option in the Create column for Opportunity.
-
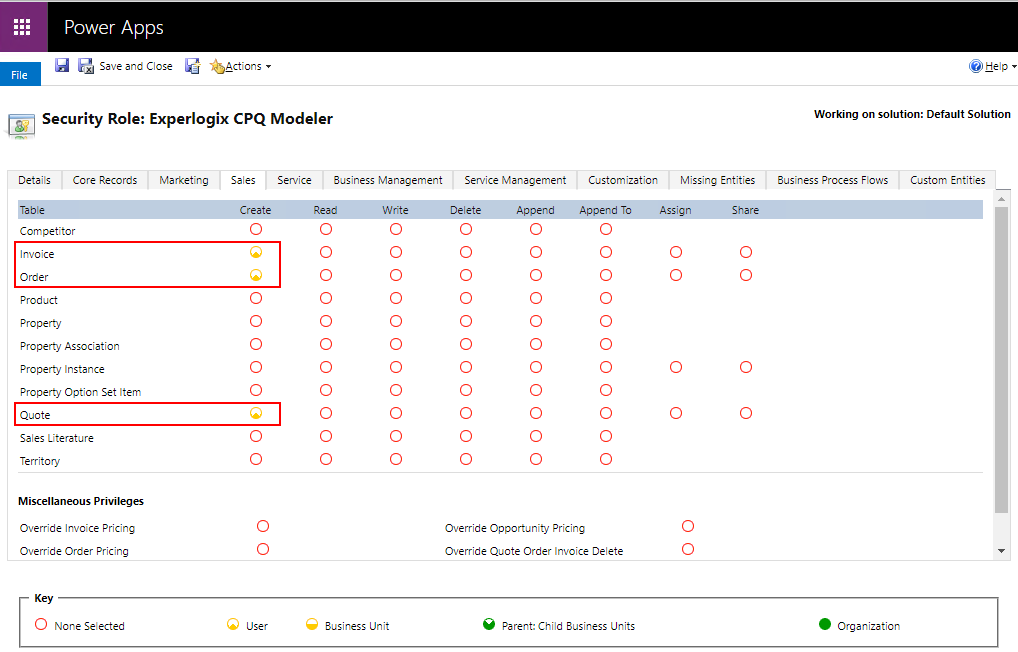
Select the Sales tab.
-
Select the Yes option in the Create column for Invoice, Order, and Quote.
-
Select Save and Close.
On accessing the Opportunity, Quote, Sales Order, and Invoice forms in Microsoft Dynamics 365 CE, the Configure and Copy buttons are available for the Experlogix CPQ Modeler role.
Add Copy and Configure Buttons for the Experlogix CPQ User Role
Adding the Configure and Copy buttons on the Opportunity, Quote, Sales Order, and Invoice forms for the Experlogix CPQ User role requires assigning the user the Experlogix CPQ User Role and providing permissions to the role for accessing Opportunity, Quote, Sales Order, and Invoice forms.
Assign Experlogix CPQ User Role to User
-
On the Microsoft Dynamics 365 CE home screen, at the upper-right corner of the screen, select the Settings icon.
-
Select Advanced Settings.
-
At the upper-left corner, select the Settings dropdown arrow to view the Settings options.
-
Under the System column, select Security.
-
Select Users.
-
At the upper-right corner of the screen, in the search box, enter the desired user name.
-
Select the Full Name link.
-
On the user form, in the menu at the top, select Manage Roles.
-
In the Manage User Roles dialog, select the Experlogix CPQ User checkbox.
-
Select Ok.
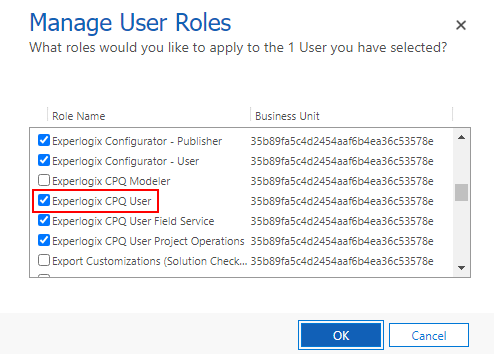
The Experlogix CPQ User role is assigned to the user.
Provide Required Permissions to Experlogix CPQ User Role
-
Access the Microsoft Dynamics 365 CE Security screen.
-
Select Security Roles.
-
Select the Experlogix CPQ User link.
-
Select the Core Records tab.
-
Select the Yes option in the Create column for Opportunity.
-
Select the Sales tab.
-
Select the Yes option in the Create column for Invoice, Order, and Quote.
-
Select Save and Close.
On accessing the Opportunity, Quote, Sales Order, and Invoice forms in Microsoft Dynamics 365 CE, the Configure and Copy buttons are available for the Experlogix CPQ User role.
Understanding Read-Only Mode and Status Behavior
The Configure button that opens configurations functions in different modes
-
Edit Mode: Users can modify the configuration (read-only =
false) -
View Mode: Users can only review the configuration (read-only =
true)
The Configure button exhibits one of two behaviors. The behavior is determined by evaluating two fields on the entity (e.g., Quote, Opportunity).
-
Status (
statecode) -
Status Reason (
statuscode)
Only the specific status value combinations below enable edit mode. All other values result in a read-only experience, even if the user has the appropriate role.
Default Edit Mode Conditions
|
Entity |
Status ( |
Status Reason ( |
Read-Only = false |
|---|---|---|---|
|
Opportunity |
0 |
Open |
✅ Yes |
|
Quote |
0 |
Draft |
✅ Yes |
|
Order |
0 |
Active |
✅ Yes |
|
Invoice |
0 |
Active |
✅ Yes |
Extending Status Reason for Additional Customization
Organizations can extend the Status Reason field (statuscode) under a valid editable status (e.g., Draft or Active) to support more detailed internal workflows while preserving default logic. This enables businesses to reflect custom internal stages such as Under Review or Awaiting Approval without triggering read-only behavior.
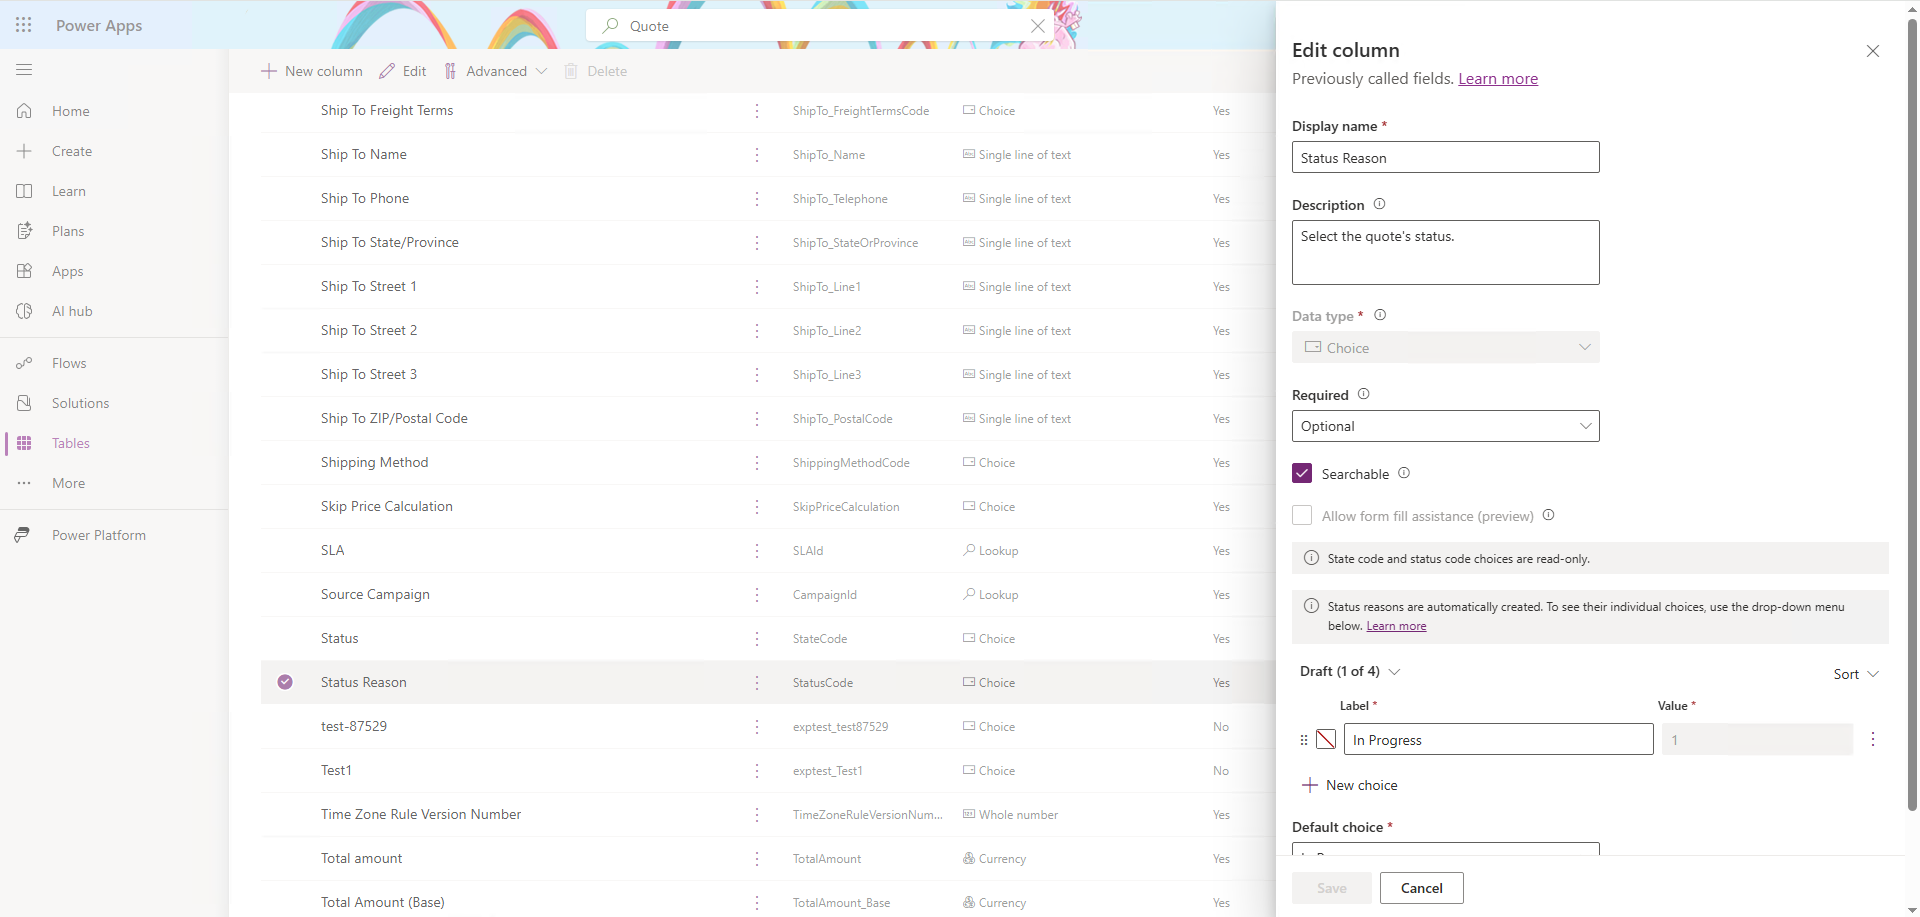
Microsoft Dynamics 365 CE Standard Quote Status and Reasons
In the standard setup below, users can only edit configurations with a statecode= Draft. However, administrators and organizations can extend this logic for Drafts by matching it with additional status reasons and statuscodes.
|
Status (statecode) |
Status Reason (statuscode) |
Read-Only? |
|---|---|---|
|
0 Draft |
1 In Progress |
❌ No |
|
1 Active |
2 In Progress |
✅ Yes |
|
|
3 Open |
✅ Yes |
|
2 Won |
4 Won |
✅ Yes |
|
3 Closed |
5 Lost |
✅ Yes |
|
|
6 Canceled |
✅ Yes |
|
|
7 Revised |
✅ Yes |
The quote below remains in Draft (allowing complete configuration) in this setup, but internal teams can reflect more granular process stages without losing edit capability.
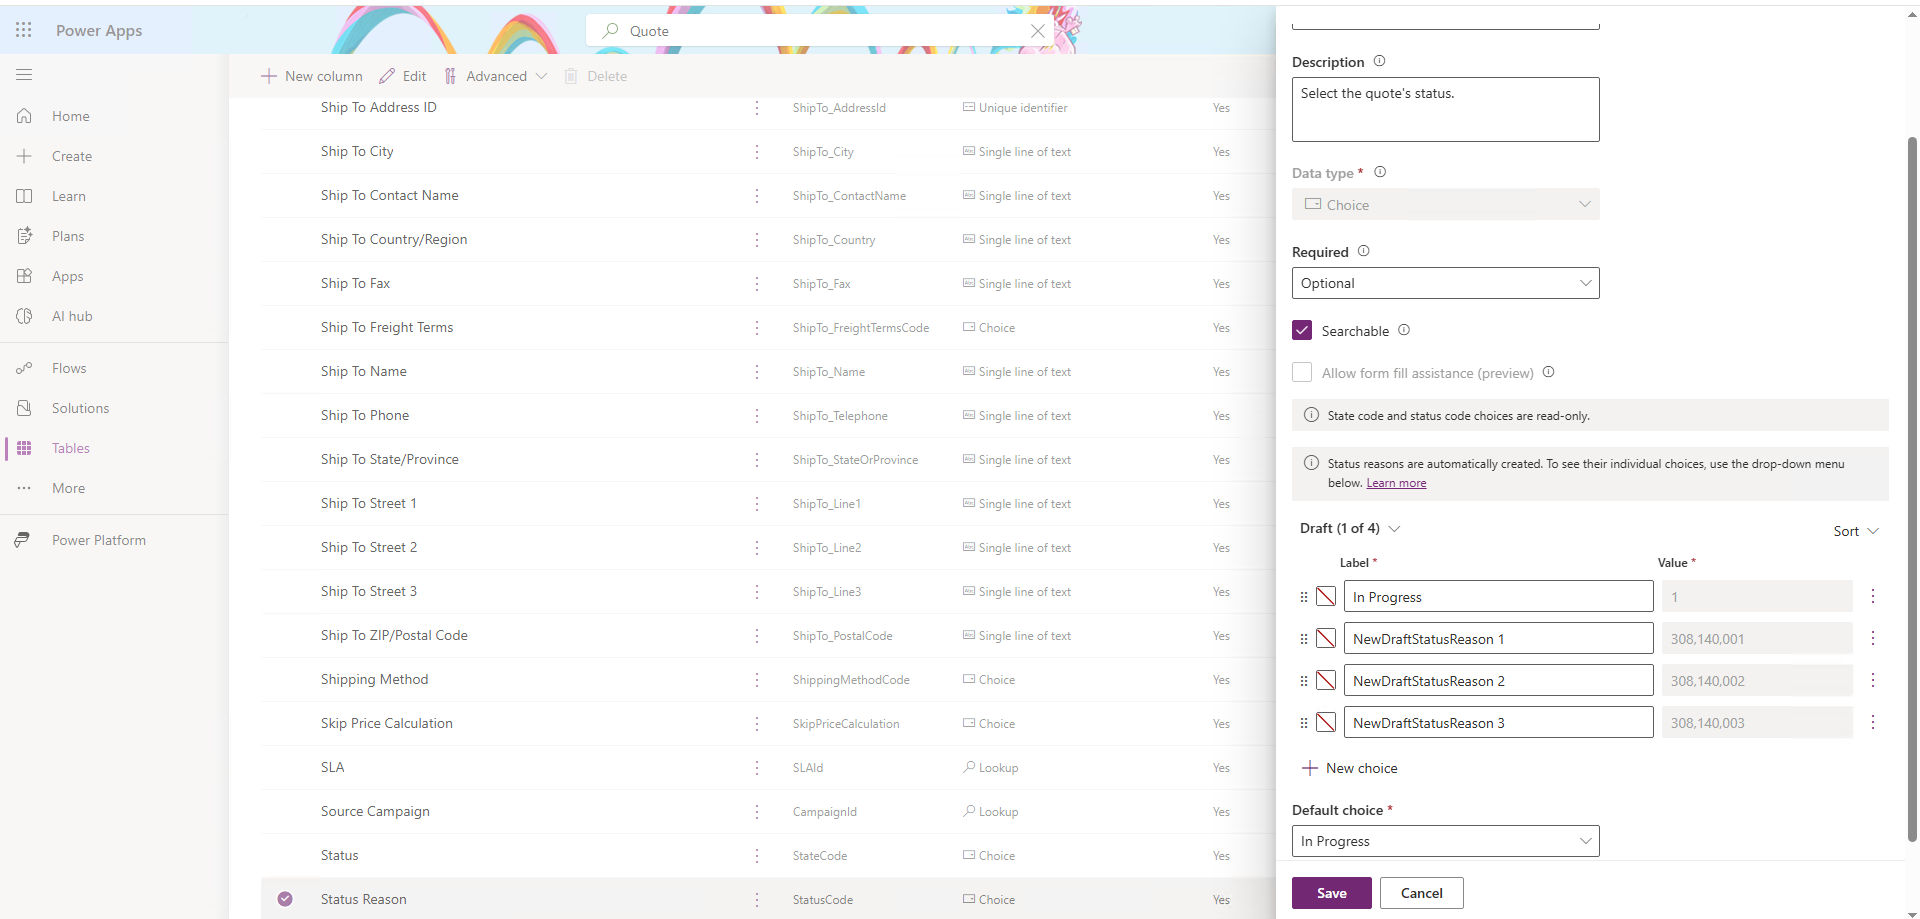
Example: Quote Status Reason Extension
|
Status (statecode) |
Status Reason (statuscode) |
Read-Only? |
|---|---|---|
|
0 Draft |
1 In Progress |
❌ No |
|
0 Draft |
Auto-Generated In Progress - Legal |
❌ No |
|
0 Draft |
Auto-Generated In Progress - Reviewed |
❌ No |
|
0 Draft |
Auto-Generated In Progress - Approved |
❌ No |
|
1 Active |
2 In Progress |
✅ Yes |
|
|
Under Review |
✅ Yes |
|
|
Approved |
✅ Yes |
|
|
3 Open |
✅ Yes |
|
2 Won |
4 Won |
✅ Yes |
|
3 Closed |
5 Lost |
✅ Yes |
|
|
6 Canceled |
✅ Yes |
|
|
7 Revised |
✅ Yes |
Any custom status reasons added under 0 Draft for a Quote entity retain full edit access for the Configure button. Read-only behavior only applies once the Quote transitions to a status of Closed or other finalized state.
Adding Business Rule Logic to Button Visibility
While security roles are the foundation for button visibility in Microsoft Dynamics 365 CE, organizations often require context-sensitive control that reflects real-time business logic. For instance, a user may have the right role but you only want them to see the Configure button when a record meets a specific workflow or data criteria exclusive to your organization.
Real-World Use Cases
-
Stage-Based Visibility: Show the button only when an opportunity is in Qualified or a quote is in Draft.
-
Department or Business Unit Restrictions: Limit button display based on department-level metadata such as region or product division.
-
Flag-Based Toggles: Use Boolean fields like Allow Configuration to grant or revoke visibility at the record level.
Supported Implementation Methods
-
Ribbon Workbench + JavaScript EnableRule: Offers lightweight, client-side evaluation for most UI-based conditions.
Example Scenario – Conditional Visibility
This example demonstrates how to conditionally display the Configure button based on a combination of user role, record state, and data-driven flags. In this scenario, the button appears only when all the following conditions are true:
-
The record’s Status is set to Draft (
statecode === 0). -
The record’s Status Reason is set to a specific extended value such as Auto Generated In Progress – Approval.
-
A custom Boolean field such as Allow Configuration is enabled (
true). -
The user is assigned the Experlogix CPQ Modeler role.
This type of rule ensures that even users with the correct security role will only see the Configure button when specific business logic and record state requirements are met. It’s a practical approach for gating configuration access during early workflow stages or while awaiting approvals.
Implementation via Ribbon Workbench
To implement this client-side visibility rule, complete the following steps
-
Create a new Display Rule in the Ribbon Workbench.
The display rule is linked to the custom button via the Command properties panel.
-
Add a Custom JavaScript Action to evaluate the record's state, status reason, and custom field flag..
function allowConfigureVisibility(context) { const formContext = context.getFormContext(); const state = formContext.getAttribute("statecode")?.getValue(); const status = formContext.getAttribute("statuscode")?.getText(); const allowFlag = formContext.getAttribute("new_allowconfiguration")?.getValue(); const editableStatuses = [ "In Progress", "Auto Generated In Progress - Legal", "Auto Generated In Progress - Reviewed", "Auto Generated In Progress - Approval" ]; return state === 0 && editableStatuses.includes(status) && allowFlag === true; } -
Reference a function stored in a web resource, for example:
XplRibbon.allowConfigureVisibility.
This script must be published as part of a web resource and referenced in the command.
-
Add a CrmParameter with
PrimaryControl. -
Test the button visibility with both matching and non-matching values.
-
Status / Status Reason
-
Allow Configuration values
-
Assigned Roles
-