
Custom buttons in Microsoft Dynamics 365 CE allow you to streamline user interactions by triggering specific commands, scripts, or navigation actions tailored to your business processes. This guide walks you through creating a custom button using Ribbon Workbench, applying command logic, and defining visibility rules based on context and security roles. Custom buttons such as Configure, Recalculate, Copy, and View enable users to interact with configurations in different ways, including editing, recalculating, copying, and viewing configurations in read-only mode.
By the end of this walkthrough, you'll be able to deploy functional and permission-aware buttons, enhancing the end-user experience across your environment.
The 'Copy / Configure / Recalculate' button is available on Quote, Opportunity, Sales Order, and Invoice forms. This functionality is enabled only if the user has permission to create entities in Microsoft Dynamics 365 CE and one of the following roles:
-
Experlogix CPQ User
-
Experlogix CPQ Copy User / Experlogix CPQ Configure User / Experlogix CPQ Recalculate User (According to the button visibility)
-
Experlogix CPQ Modeler
Teh user permissions for Experlogix CPQ Copy / Configure/ Recalculate User role, is same to that of Experlogix CPQ User role, with the exception of 'Copy' button visibility.
Prerequisites
-
Experience with low code programming in Dynamics CRM/Microsoft Dynamics 365 CE/Power Platform.
-
Familiarity with Ribbon Workbench for Dynamics CRM/Microsoft Dynamics 365 CE & Power Platform.
Button Types Overview
|
Button |
Purpose |
|---|---|
|
Configure |
Opens the CPQ Configurator in edit mode |
|
Recalculate |
Recalculates an existing configuration using CPQ logic and saves the result |
|
Copy |
Creates a new configuration by copying an existing one |
|
View |
Opens the CPQ Configurator in read-only mode |
All buttons follow the same base creation process, with specific differences in command configuration and enable rules.
Add the Button Using Ribbon Workbench
This section guides you through setting up your solution and opening it in Ribbon Workbench so you can begin customizing the command bar.
Create the New Solution
Start by creating a new unmanaged solution and adding the target entity. Then, open the solution in Ribbon Workbench to begin modifying the UI.
-
Create a new solution.
-
Use Add Existing to include the relevant entity (exclude metadata and relationships).
-
Save the newly-created solution.
-
Open Ribbon Workbench and connect to the appropriate Microsoft Dynamics 365 CE environment.
-
Open the newly created solution in Ribbon Workbench.
-
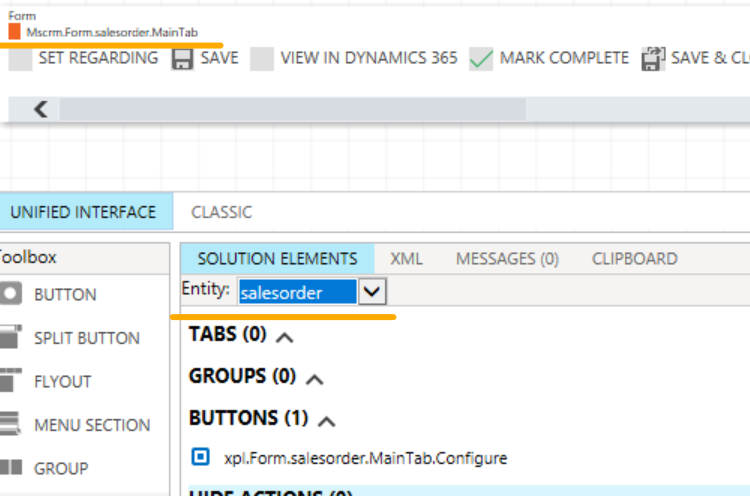
Navigate to the Main tab and drag and drop a new button for the selected entity.
-
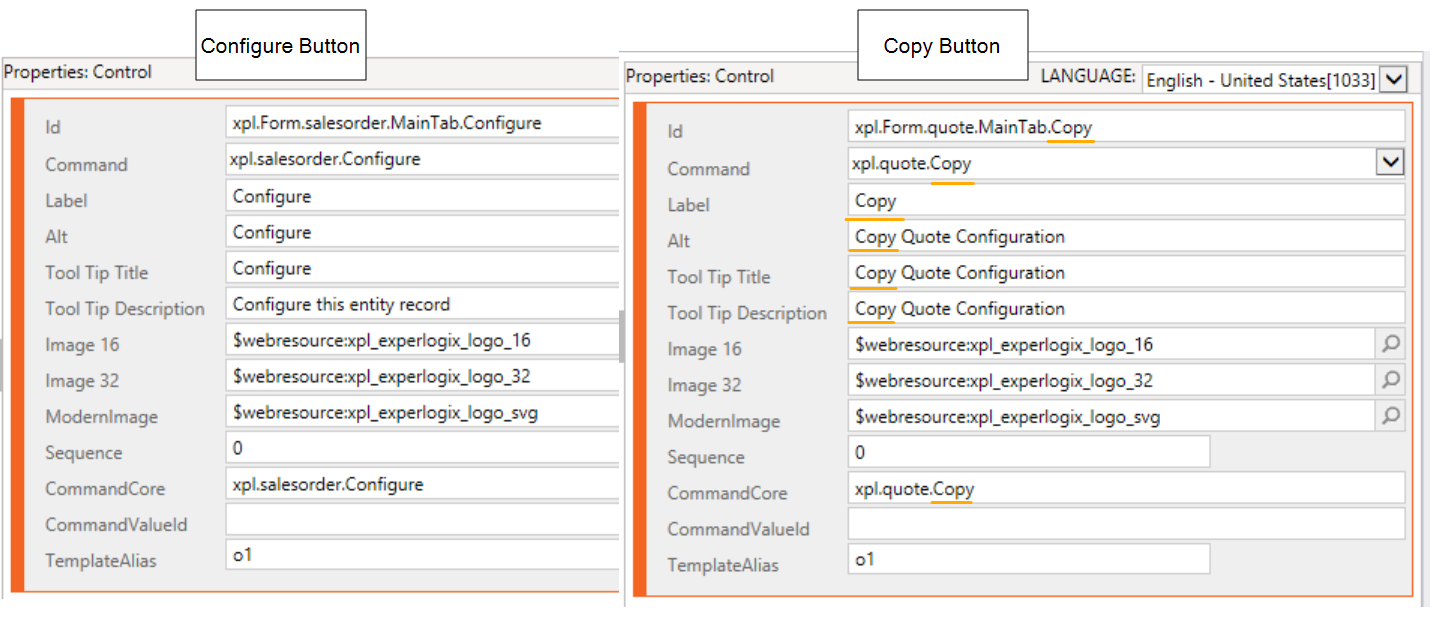
Set the button's properties using the following table.
Button Properties (Common for All Buttons)
For each custom button, configure the following properties. The examples show typical values for Configure, Copy, Recalculate, and View buttons.
|
Property |
Description |
Example (Configure / Copy / Recalculate / View) |
|---|---|---|
|
Id |
Unique logical name for the button. Use a clear and descriptive naming pattern. |
xpl.Form.salesorder.MainTab.Configure
|
|
Label |
Text displayed on the command bar button. |
Configure / Copy / Recalculate / View |
|
Alt |
Alternative text used by accessibility tools. Typically matches the label. |
Configure / Copy Quote Configuration / Recalculate / View |
|
Tool Tip Title |
Short title shown when the user hovers over the button. |
Configure
|
|
Tool Tip Description |
Brief description explaining the button action. |
Configure this entity record
|
|
Image 16 |
16×16 icon displayed on the command bar. |
$webresource:xpl_experlogix_logo_16 |
|
Image 32 |
32×32 icon used in expanded views. |
$webresource:xpl_experlogix_logo_32 |
|
Modern Image |
Icon used in the modern command bar experience. |
$webresource:xpl_experlogix_logo_svg |
|
Command |
Logical name of the command executed when the button is clicked. |
Leave empty while creating the button |
|
Command Core |
Core command reference. Typically matches the Command value. |
Leave empty while creating the button |
The Command and Command Core fields are populated after the command is created and assigned to the button.
Do not enter any value for the fields Command and CommandCore because these fields are intended to be populated later when you define the button’s specific actions and behaviors.
Create and Assign the Command
A command defines what happens when your button is clicked. In the steps below, you’ll create a command, assign a JavaScript action, and connect it to the button for execution.
The setup for the Copy and Configure buttons is described in the sections below. This configuration applies to all button types. Any deviations or additional settings required for a specific button (such as Recalculate or View) are called out separately in the Button Differences table.
-
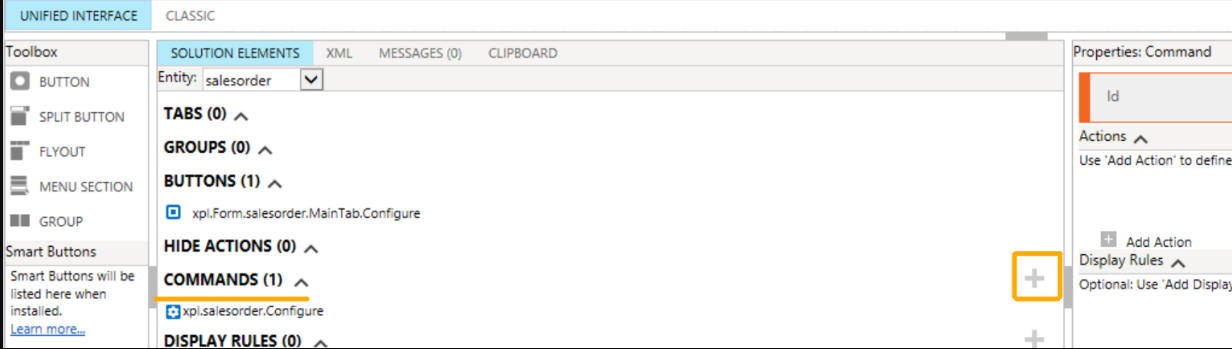
Go to the Commands section for the entity for which you wish to define the button command.
-
Select + to add a new command.
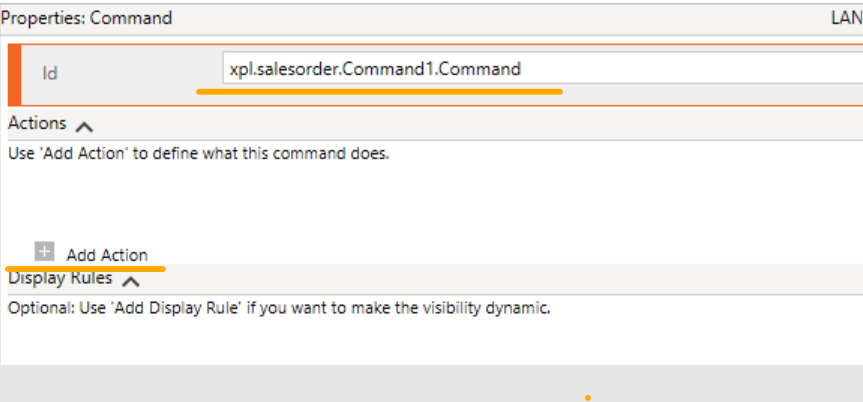
In the Properties panel, you'll see that it has been given an ID that uses the solution prefix in the format: {prefix}.{entity_name}.Command1.Command. You can use any suitable sequence of logical names.
-
In the Properties: Command Actions, select + Add Action.
-
In the Actions tab:
-
Select JavaScript Action.
-
Assign your library and function name.
-
Add a
CrmParameterwith value thePrimaryControl.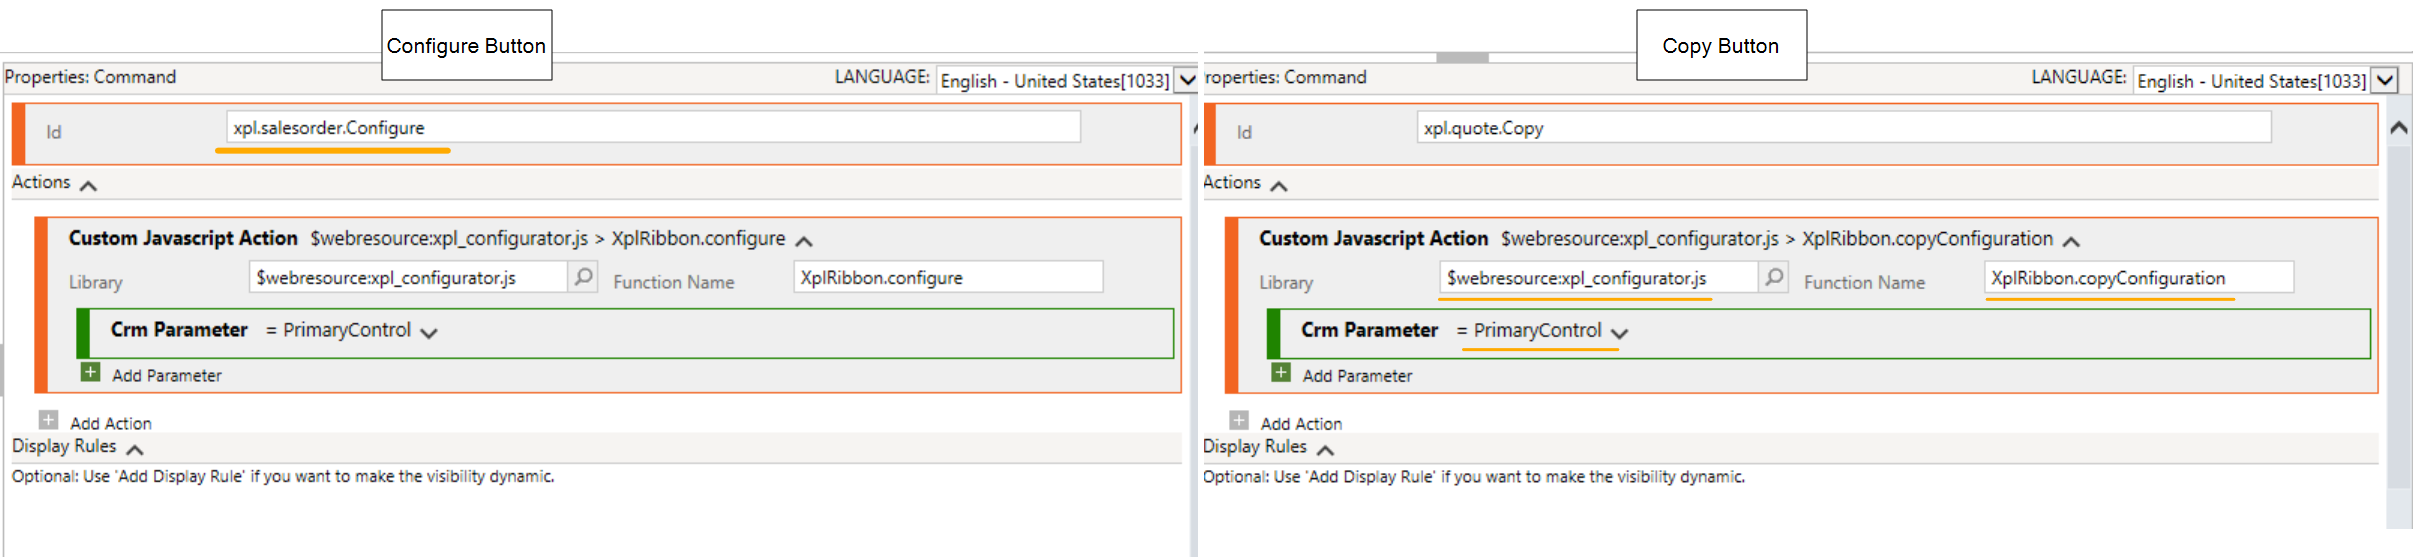
-
Add a Boolean parameter set to
False. For Copy button, only CRM Parameter should be added.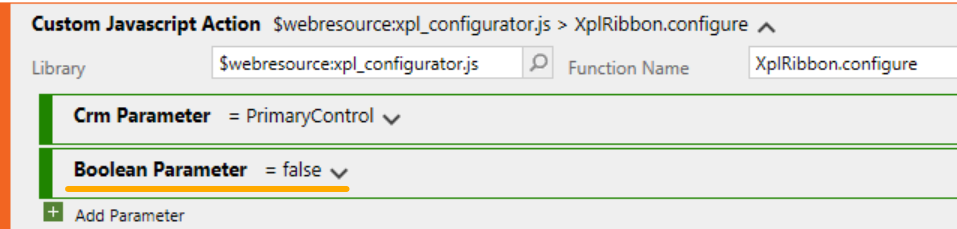
-
-
Return to the Buttons tab:
-
Assign the new command to the Command property
-
Use the same value for Command Core
-
Define the Enable Rule
The setup for the Configure buttons is described in the sections below.
Use an Enable Rule to control when the button displays based on context or user permissions. This ensures the button only shows when relevant.
-
In Ribbon Workbench, in the Solution Elements panel, expand the ENABLE RULES section.
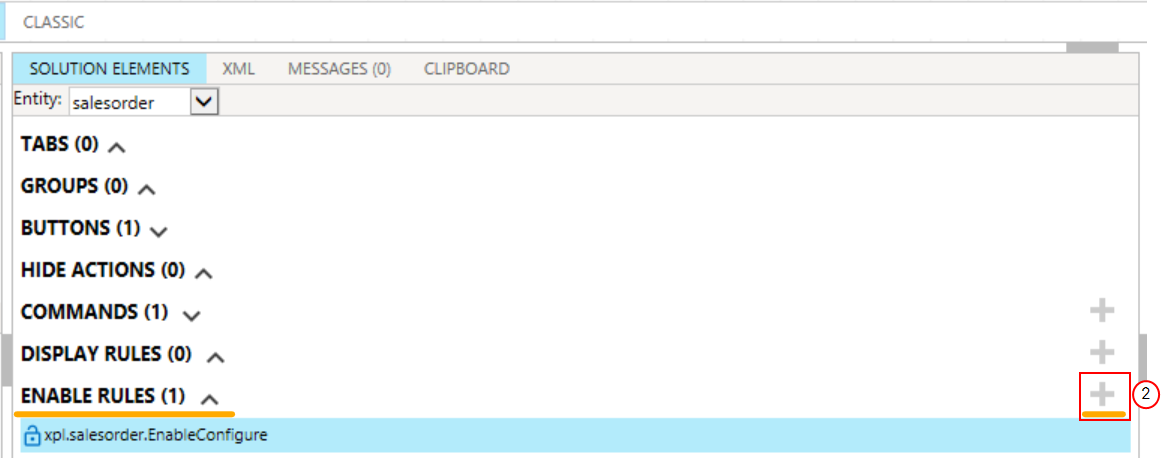
-
Select the + icon to create a new rule.
In the Properties panel, you'll see that the rule has been automatically assigned an ID in the format:
{prefix}.{entity_name}.EnableRule1.EnableRule -
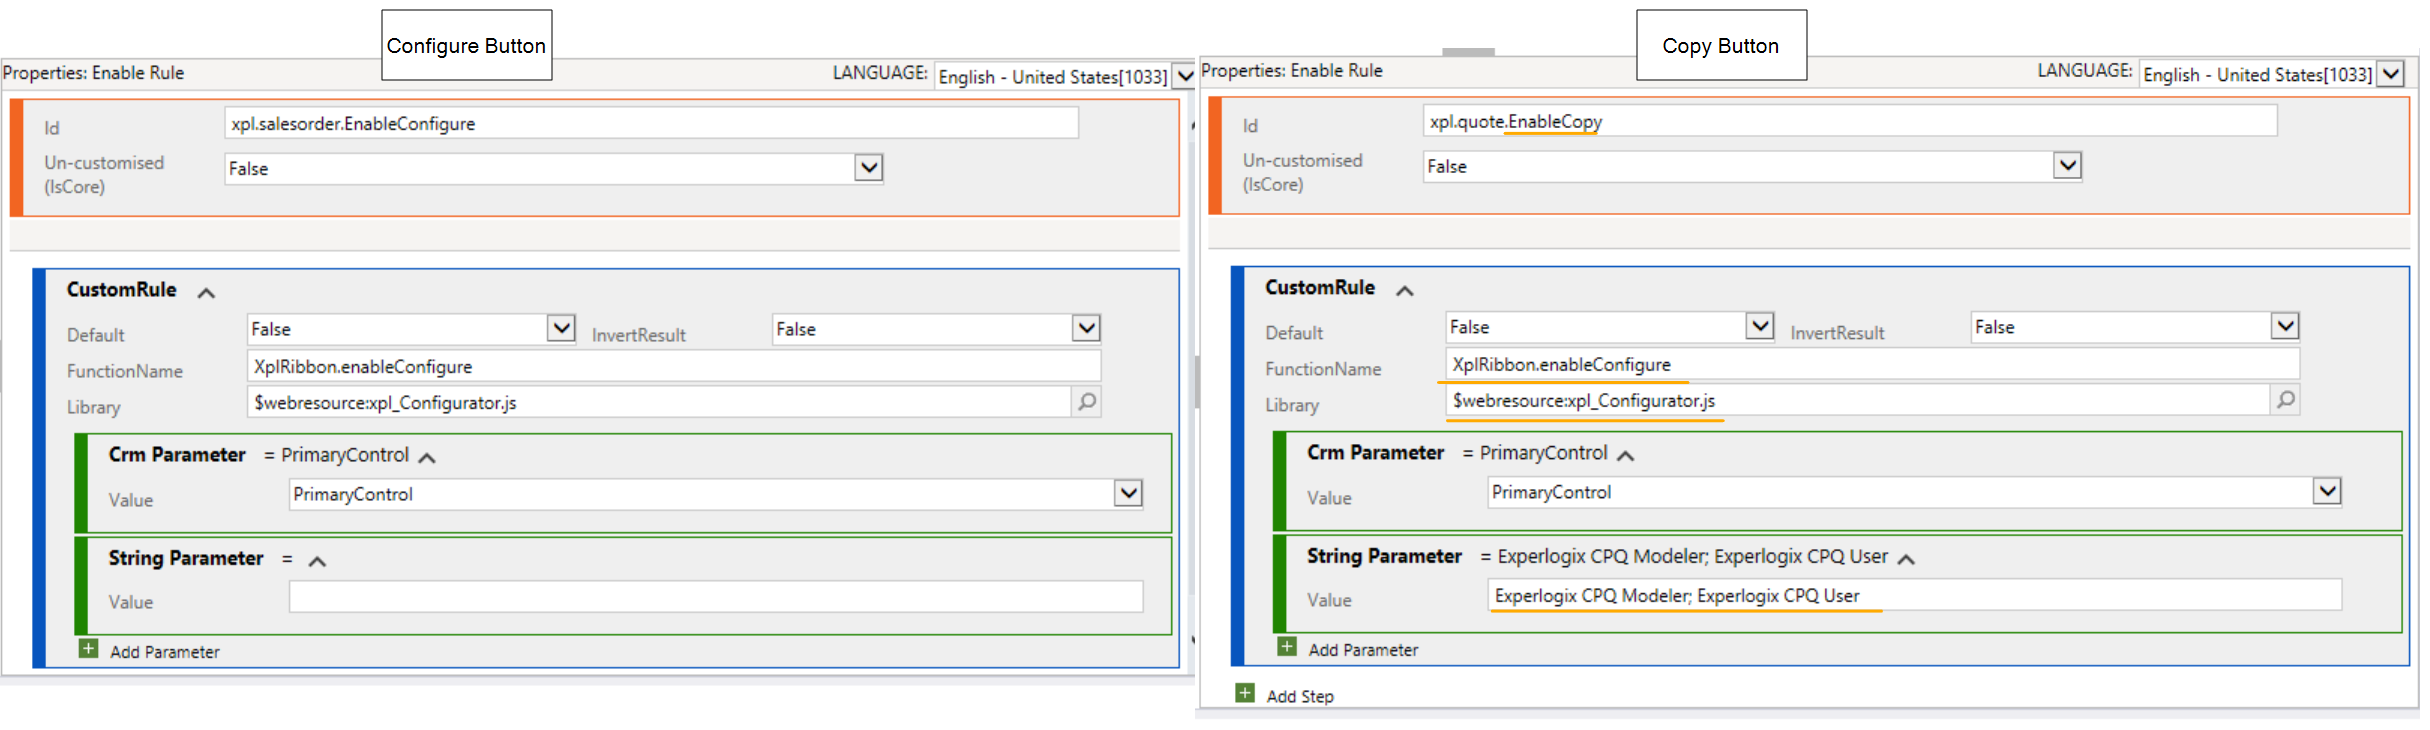
Select Add Step and choose Custom Rule.
-
In the CustomRule panel, complete the following:
-
Default:
False -
InvertResult:
False -
FunctionName:
XplRibbon.enableConfigure -
Library:
$webresource:xpl_Configurator.js
-
-
Add the following parameters:
-
Crm Parameter
-
Type: CrmParameter
-
Value: PrimaryControl
-
-
String Parameter
-
Type: StringParameter
-
Value: (Leave this blank for now)
-
-
-
Save the Enable Rule.
Attach the Enable Rule to the Command
After defining your Enable Rule, you’ll apply it to your command so the button respects your defined logic for visibility and access.
-
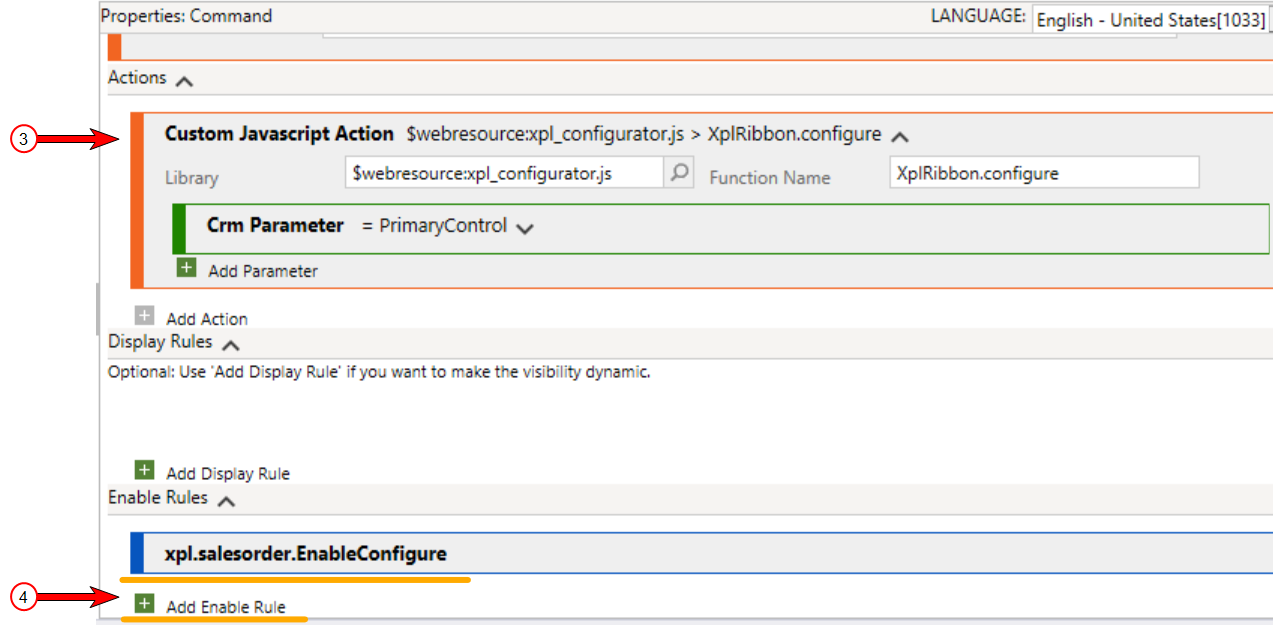
Navigate to the COMMANDS section and select the command linked to your custom button.
-
In the Actions section, confirm that your JavaScript function is listed.
-
Scroll down to the Enable Rules section.
-
Select + Add Enable Rule and select your created rule (e.g.
xpl.salesorder.EnableConfigure). -
At the top of the Ribbon Workbench dialog, select the Publish button to apply all changes.
-
Once publishing is complete, navigate to your Microsoft Dynamics 365 CE environment and verify that the custom button displays on the entity’s command bar.
Apply Security Roles (Optional)
You can restrict visibility using security roles in the Enable Rule's StringParameter to control which users can see the Configure button.
Enter the applicable security roles in the String Parameter field in the Enable Rule, separated by semicolons.
Example Rule String Parameter
Company User Role 1; Company User Role 2
Each role entered must match an existing security role name in your Microsoft Dynamics 365 CE environment.
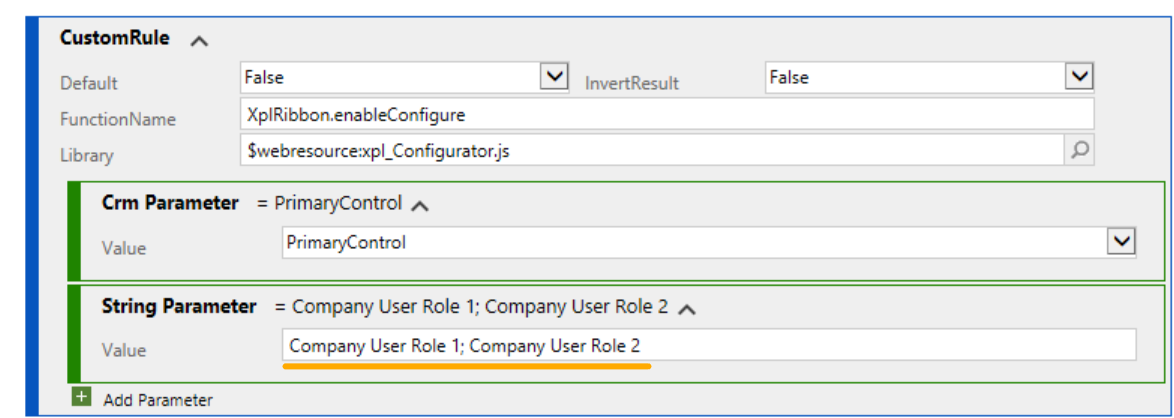
The String Parameter in the Enable Rule controls the button's role-based visibility. If this field is left empty, the Configure button will be visible to all users with access to the entity. Populate this field only if you intend to restrict the button by a security role.
Button Differences
|
Button |
Function Name |
Parameters |
Enable Rule Difference |
|---|---|---|---|
|
Configure |
XplRibbon.configure |
PrimaryControl |
Standard CPQ roles |
|
Recalculate |
XplRibbon.recalculateConfiguration |
PrimaryControl only |
Same as Configure |
|
Copy |
XplRibbon.copyConfiguration |
PrimaryControl only |
Same as Configure |
|
View |
XplRibbon.configure |
PrimaryControl + Boolean = True |
CPQ View User |
Creating a View Button for the Configurator in Read-Only Mode
This section explains creating a View button for the Configurator in read-only mode. This button allows users to view configurations without making changes. By performing these steps, you ensure that users can review configurations while maintaining data integrity and preventing unauthorized modifications.
Create a New Custom Button
-
Follow the steps outlined in the Making Custom Buttons to create a new custom button.
-
Verify that each new button property has a unique and descriptive name to avoid conflicts and ensure clarity in the configuration.
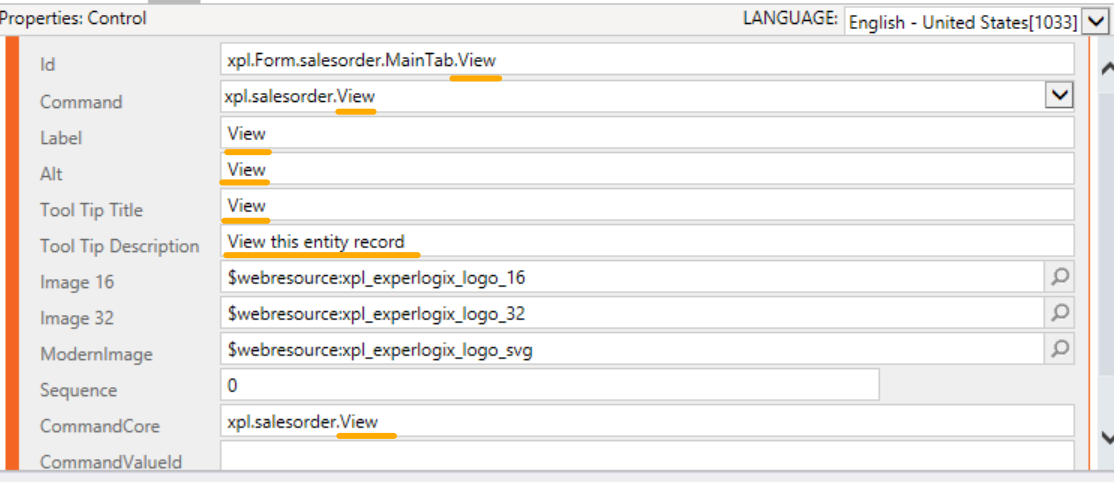
This helps maintain a well-organized and easily understandable setup, especially when multiple buttons are involved.
|
Property |
Description |
|---|---|
|
Id |
Default template |
|
Label |
A label that will be displayed on the command button. |
|
Alt |
Alternative text for the button used for accessibility tools such as screen readers. |
|
Tool Tip Title |
The title displays to the user when they hover their mouse over the command. |
|
Tool Tip Description |
The description displays for the user below the tooltip title when they hover their mouse over the command. |
|
Image 16 |
Add icon image with size 16 pixels x 16 pixels. |
|
Image 32 |
Add icon image with size 32 pixels x 32 pixels. |
|
Modern Image |
Select an icon for the command button. You may choose from any system icons or web resource SVG files. You can also upload your web resource. |
|
Sequence |
Auto Populated, depends on the button's location compared to other buttons within the same command bar. |
|
Template Alias |
Auto Populated, depends on the location of the button. |
|
Command / CommandCore |
Leave empty if creating a new button. You'll assign these values once you move to the Command interface of Ribbon Workbench. |
Set Command Value
Set the Boolean Parameter to True.
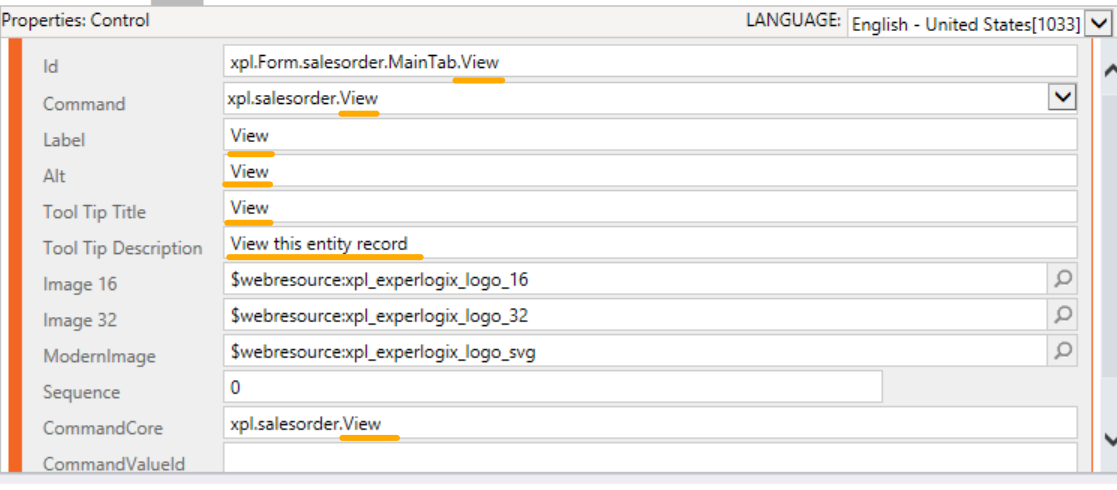
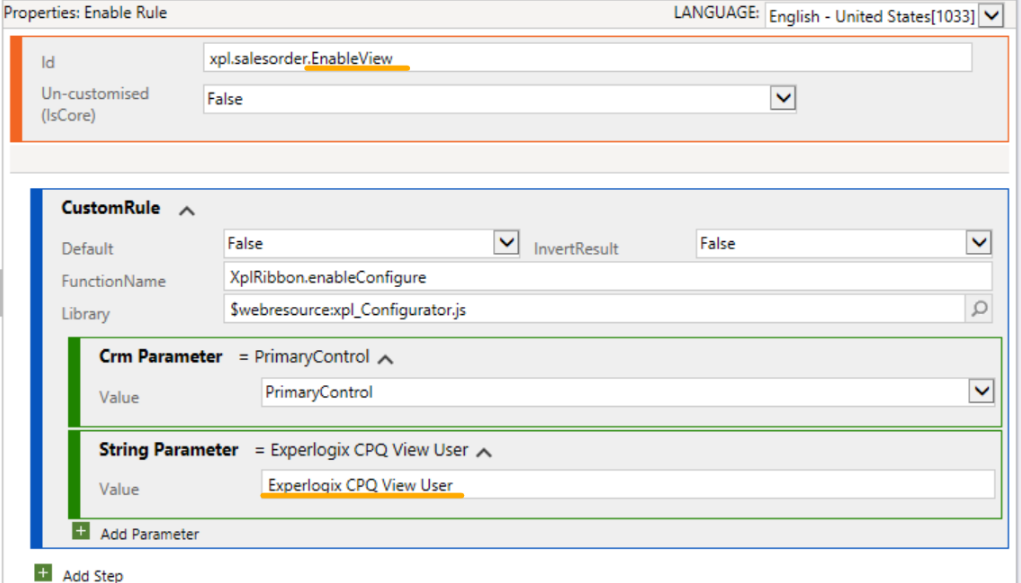
Enable Rule
Add Experlogix CPQ View User to the String Parameter.
Additional Information
-
This button is intended for use within the Experlogix CPQ Product Line environment.
-
Ensure compatibility with the latest Microsoft Dynamics 365 CE release. See Cloud Connect Compatibility Matrix and CPQ Integration Compatibility Matrix.