
Overview
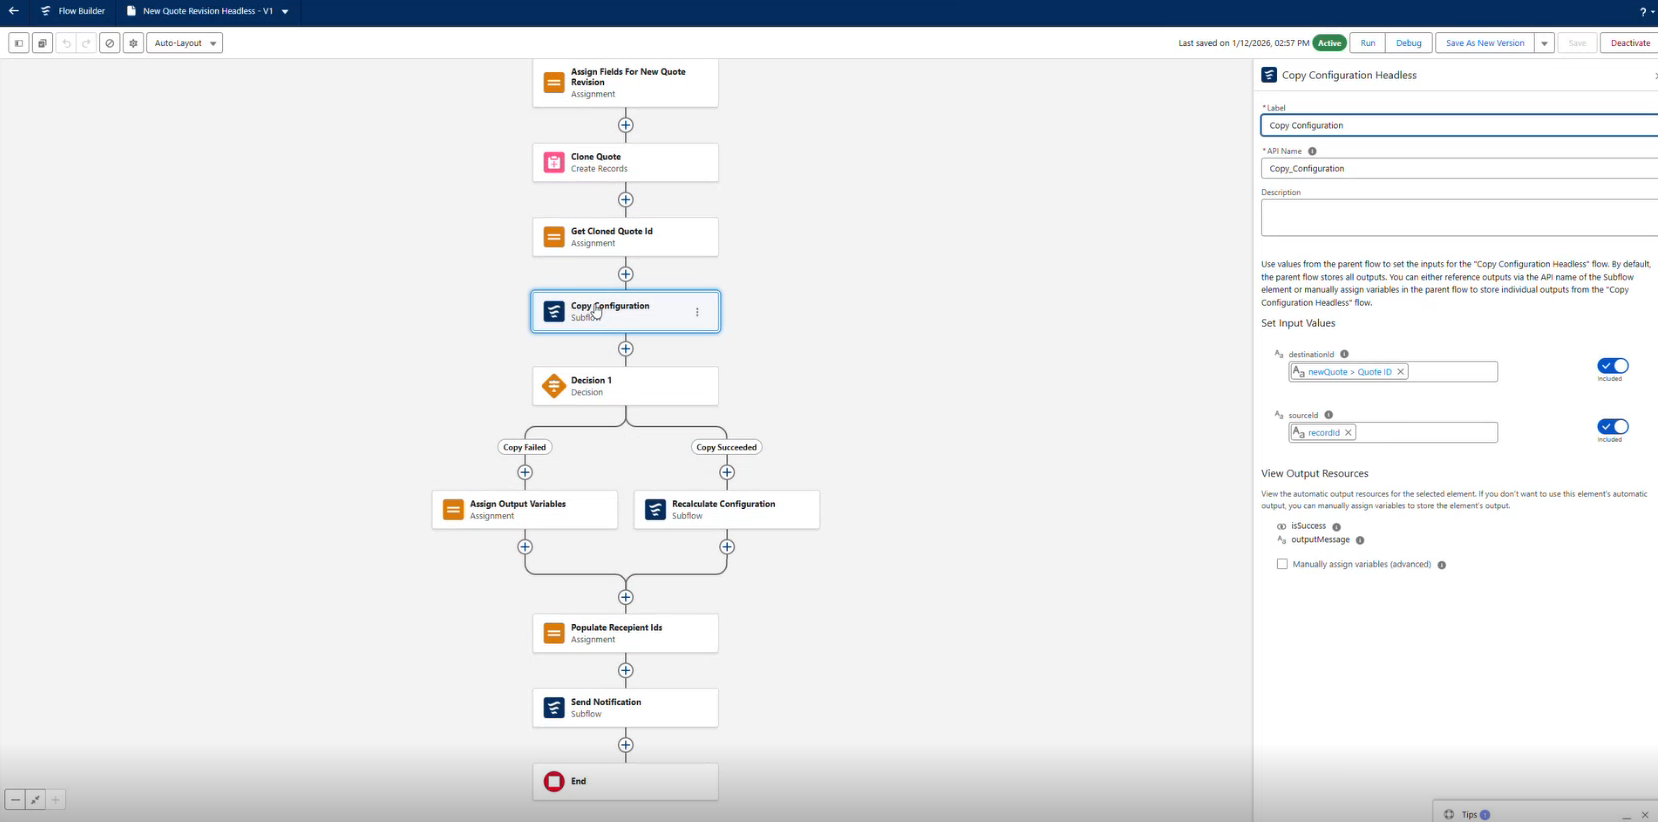
This guide explains how to configure and enable a Copy + Recalculate Configuration headless flow in Cloud Connect CPQ for Salesforce. You’ll learn how to build a custom Screen Flow that copies an existing configuration from a source record to a destination record and then automatically recalculates it—without opening the Configurator. Copy transfers an existing configuration to a new record, while Recalculate completes the process by executing configuration logic and saving the data.
Together, these flows provide a seamless, headless automation pattern that delivers the same outcome as manual configuration—faster and at scale.
Prerequisites
Before configuring this feature, ensure the following items are correctly set up:
-
Cloud Connect Salesforce 25.12 or later
-
Integration API Settings in Salesforce configured and tested successfully
-
Cloud Connect Configurator URL in Admin Center configured and tested
-
Web Configuration Migration Service enabled
-
Stateless Configurator Webservice enabled
Creating a Custom Copy and Recalculate Flows Work
The Copy + Recalculate functionality is implemented by combining two managed subflows:
You will create a Screen Flow that:
-
Allows a user to select a source record
-
Copies the configuration to the current record
-
Recalculates the copied configuration automatically
Step 1: Create Flow and Variables
See Create a Custom Copy Configuration Flow to create a basic custom flow.
Step 2: Copy Configuration Managed Subflow Utilization
-
A configuration linked to a source record (Record ID A) is copied.
-
The copied configuration is linked to a destination record (Record ID B).
-
This step focuses on reusing the existing configuration as-is.
See Copy Configuration Setup to understand the steps in detail.
Step 3: Recalculate Configuration Managed Subflow Utilization
-
Recalculate is triggered for Record ID B.
-
The Configurator runs in the background.
-
Configuration logic is executed and the data is saved to the host.
See Recalculate Configuration Setup to understand the steps in detail.
After these steps, the destination record contains a configuration that is both reused and fully evaluated and persisted.
Step 4: Save and Activate the Flow
-
Select Save.
-
In the Flow Label field, enter a value such as: Copy and Recalculate Configuration
-
In the Flow API Name field, enter a value such as: Copy and Recalculate Configuration
-
Select Activate to make the flow available for use.
Step 5: Create a Quick Action
To allow users to launch the flow directly from a record page, create a Quick Action.
-
Navigate to Setup > Object Manager > Opportunity (or Quote).
-
Select Buttons, Links, and Actions.
-
Select New Action.
-
Set Action Type to Flow.
-
Select the Copy and Recalculate Configuration flow.
-
Enter a Label and API Name.
-
Select Save.
Add the Quick Action to the Page Layout
-
In Salesforce, navigate to Setup > Object Manager > Opportunity/Quote > Page Layouts.
-
Select the required layout.
-
Select Mobile & Lightning Actions in the toolbar.
-
Drag Copy and Recalculate Configuration to Current Opportunity to the Salesforce Mobile and Lightning Experience Actions section.
Why Use Them Together?
-
Reuse an existing configuration in a single automated flow
-
Execute CPQ logic automatically
-
Persist data without opening the Configurator UI
-
Achieve the same outcome as a manually saved configuration
-
Support scalable, integration-friendly automation with consistent results